
Oh, you know those treats from fairs or those childhood parties that just smell like pure joy? I’ve been chasing that nostalgic flavor forever, but those hard candy coatings always felt too intimidating to make at home. Well, guess what? I cracked the code this week, and I finally perfected the easiest, fluffiest Marshmallow Apples imaginable! Trust me, these aren’t the sticky, rock-hard apples of your memory. They are light, sweet, and so incredibly simple. I remember begging my mom for one at every summer carnival we went to—now I can whip up a batch faster than we can drive to the fairground!

Why You Will Make These Marshmallow Apples Repeatedly
Seriously, I was shocked at how quickly this recipe comes together. You can go from the pantry to a fancy-looking dessert in under thirty minutes if you move quick! It’s the perfect sweet fix when you need something impressive but have zero patience for complicated candy making. If you’re looking for more fast sweets, check out some of my other quick treats! You will adore these simple sweets.
- Lightning Fast Prep: The active time is minimal, mostly just stirring and heating for about ten minutes.
- Incredible Texture: That marshmallow creme keeps the coating soft, fluffy, and wonderfully chewy instead of brittle.
- No Stress Candy Making: You don’t need to master the complicated hard-crack stage; 250 degrees is much more forgiving!
- Kid Approved (and Easy for Them too!): They look spectacular, which makes the kids think you spent hours impressing them.
Essential Ingredients for Perfect Marshmallow Apples
Okay, look at the ingredient list. It looks so small, right? That’s why I love this recipe! It’s magic using just a few simple pantry staples. But even though the list is short, paying attention to the *type* of ingredient makes all the difference between a great coating and one that slides right off the apple. Don’t even think about substituting the marshmallow creme with standard marshmallows—the creme is what gives us that smooth, pliable texture we’re aiming for!
Here’s what you need bustling around your kitchen:
- Firm, medium apples (This is important—we don’t want mushy apples here!), about 4 of them.
- Granulated sugar (one full cup for sweetness).
- Light corn syrup (half a cup—this stops the sugar from crystallizing into sand, which is a nightmare).
- Water (just a quarter cup to help things get started).
- Vanilla extract (a teaspoon for that classic warm flavor).
- Marshmallow creme (half a cup; please use the jarred creme, not the fluffy stuff in the bag!).
- Wooden sticks—you need four sturdy ones!
My biggest piece of advice, and the one thing I quadruple-checked when testing this version, is the apple choice. You absolutely must use firm apples. I usually reach for Granny Smiths or Honeycrisps. If your apple is too soft, the weight of the hot coating will cause it to sink right down to the stick, or worse, crack the coating as it cools. Make sure those apples are scrubbed clean and bone dry before you even think about dipping them! If you ever need help planning meals around what you have on hand, check out this tip for quick meals.
Step-by-Step Instructions for Amazing Marshmallow Apples
Now for the fun part! Getting the candy mixture right is where most people get nervous, but honestly, if you have a candy thermometer, you’ve already won half the battle. This process is straightforward, but you have to respect the heat. Remember, if you try to eyeball the temperature, you’ll end up with a sticky mess that never sets, or worse, a coating so hard you chip a tooth! We are shooting for perfection here, which means exact temperature control. Don’t rush this part; it’s what separates a truly great batch from just okay candy apples.
Preparing the Apples and Sticks
First things first: wash those apples really well to get off any wax coating they might have. Then, and this is non-negotiable, you must dry them completely. I mean, dry them until they feel dusty dry! Any drop of water will cause the sugar mixture to seize up on you, and that’s a disaster when you’re dealing with boiling sugar. Once they are dry, just push those wooden sticks right into the stem end. Keep them standing up somewhere safe while you get your sugar pot ready.
Cooking the Marshmallow Apple Coating to Temperature
Grab your saucepan—medium heat is all you need here. Toss in your sugar, corn syrup, and water. Stir this gently until the sugar dissolves and it looks beautifully clear. As soon as it starts to simmer, put the lid on for about two minutes to let the trapped steam wash down any sugar crystals clinging to the side of the pot. Then take the lid off and **do not stir it again!** Seriously, walk away! Use that candy thermometer and let it bubble up until it hits exactly 250 degrees Fahrenheit. This is called the firm ball stage, and it’s our target for that perfect chewy bite. If you have trouble keeping up, feel free to check out this quick cooking guide for timing tips.
Finishing the Marshmallow Apples Coating
The second that thermometer hits 250°F, yank that pot right off the burner! Safety first, that stuff is volcanic. Quickly stir in your vanilla extract. Then, drop in the marshmallow creme. You need to mix this in fast but gently until everything is completely melted and smooth. It’s going to look thick and gorgeous, maybe smelling a little like toasted vanilla. Be careful when stirring because even off the heat, thick sugar syrups hold a lot of heat!
Dipping and Setting Your Marshmallow Apples
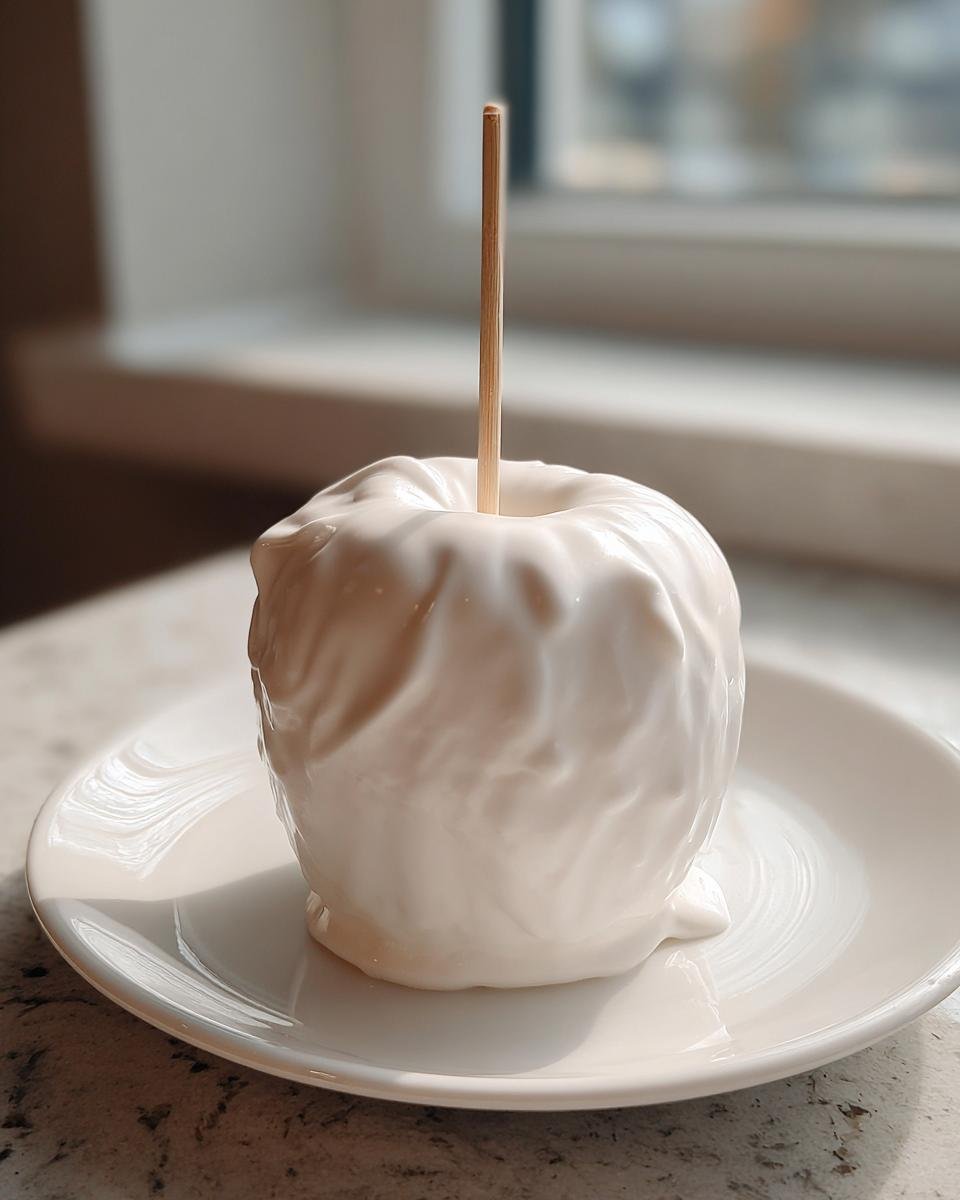
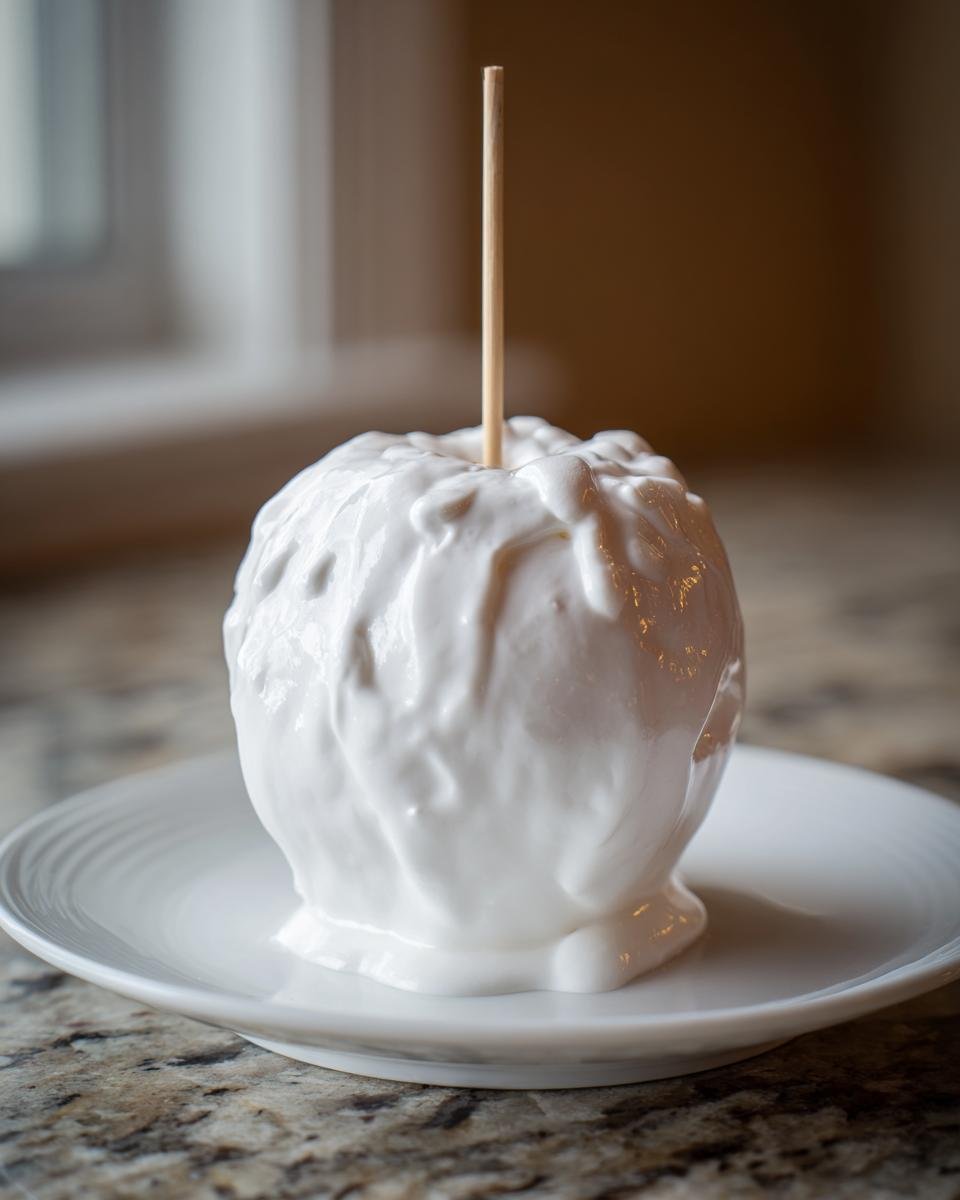
Now you work quickly! Take one apple at a time and dip it straight down into the mixture. Swirl it around just enough to get an even, thick coat all the way around. You want to angle the apple just slightly as you pull it out so the coating doesn’t stretch too thin on one side. Place the finished apple immediately onto parchment paper. Don’t try to scrape off the excess drip hanging off the bottom; just let it sit. Wait patiently now—they need to cool down completely before you dare touch them. Putting them somewhere cool, but not the fridge, helps them set up nicely!
Tips for Success When Making Marshmallow Apples
So, you’ve got the mixture heating up, maybe you’re wondering what happens if things go sideways? Don’t panic! Even the best cooks have moments where the sugar decides to be temperamental. The most important thing I learned is that high heat cooking is a race against cooling down. Once that marshmallow creme is swirled in, you need to move systematically. If the coating starts stiffening up in the pot faster than you can dip, just return the saucepan to the burner set to super low heat. Give it a gentle stir for maybe 30 seconds, just enough to loosen it up, then pull it right back off. Don’t boil it again; you just want it warm enough to flow.
Remember that note about the apples? I can’t stress it enough: firm apples are your best friend here. They need to stand up to the heat and the weight of that coating. Also, when you set them on the parchment paper, try not to nudge them while they cool. If you need to move them, wait until the outside is tacky, otherwise, you risk smearing the beautiful coating you just worked so hard to achieve. If you’re interested in other quick fixes in the kitchen, this simple sauce recipe is a savior on busy nights!
Variations for Your Marshmallow Apples
Once you nail the basic coating technique, these Marshmallow Apples become the absolute perfect canvas for customization! Honestly, the sky’s the limit here, but I always like to keep things simple so we don’t end up with a coating that refuses to set. If you’re feeling extra festive or you know a crowd that loves extra texture, try these easy add-ins. It’s almost as much fun planning the decorations as it is making the actual coating!
For example, right after you pull the dipped apple out of the marshmallow mixture, you can immediately tilt it sideways and roll the sticky side right through a shallow dish of your favorite sprinkles. Rainbow sprinkles are classic, but crushed up crispy cereal or even finely chopped nuts work wonders. Just make sure you sprinkle it on *before* the coating starts hardening, which happens fast!
Another fun trick involves chocolate. Once your marshmallow apples have cooled and set completely—I mean, totally firm—you can melt some semi-sweet or white chocolate chips. Drizzle that melted chocolate artfully over the top in thin lines. It adds a slightly bitter contrast to the sweetness, which I think is fantastic. It looks super fancy, too! If you’re looking for other fun ways to dress up simple treats to look like you spent hours on them, you have to try this cake dip idea.
And don’t forget about the apple type! While I swore by firm apples above, trying a softer variety like a Gala *if* you plan on eating them immediately (before they have a chance to get crushed in transport) gives a completely different flavor profile that some people love. Play around, see what combination of texture and flavor hits your sweet spot, and don’t be afraid to get a little messy!
Storing Leftover Marshmallow Apples
Right, so sometimes you make too many! Or maybe the group got full before everyone could snag one of these sweet treats. Now you’re wondering how to keep those pretty coated apples looking good until tomorrow. Here’s the absolute most important thing you need to know about storing homemade Marshmallow Apples: keep them away from the fridge!
I know, I know, putting sweet stuff in the fridge sounds like a safe bet, but trust me, condensation is the enemy of any crisp or candy coating. That moisture gets trapped, and what happens? Your perfect, slightly chewy coating turns into a sticky, weeping mess. We absolutely don’t want that, especially after all the care we took getting the temperature just right!
Instead, you want to find a relatively cool, dry spot in your kitchen. Lay them out on parchment paper or wax paper—again, never directly on a plate or container—and cover them loosely with plastic wrap. They actually hold up shockingly well at cool room temperature for a day or two. The texture remains best when they haven’t been chilled. If you absolutely, positively must refrigerate them because your kitchen is sweltering hot, just know that you need to pull them out at least an hour before you plan on eating them. Let them slowly come back to room temperature so that any surface dampness can evaporate a bit. Honestly, though, these sweet treats are so delicious, I rarely have leftovers!
Frequently Asked Questions About Marshmallow Apples
I get so many questions after people try this recipe because it seems too easy to be this good! I tried to cover everything in the steps, but sometimes you just need a quick answer. Here are a few things people always ask me about making these fantastic Marshmallow Apples. If you’re looking for another incredible dessert that’s both sweet and fun, you should definitely look into this gelatin recipe.
Can I use regular marshmallows instead of marshmallow creme for my Marshmallow Apples?
That’s a fair question! Marshmallow creme is superior here because it’s already a smooth, pourable liquid consistency when heated. It blends instantly with the hot sugar syrup, giving you that beautiful, uniform coating. If you use standard marshmallows, you’ll have to melt them first, and they often separate or get gloppy, meaning you’ll have to stir them quite a bit to combine them with the syrup. This stirring can introduce air or cause graininess. You *can* do it, but you’ll lose some of that perfectly smooth texture that makes these such a great sweet treat!
How do I prevent the coating from becoming sticky or runny?
That sticky coating is the bain of every candy maker’s existence, and it all boils down to two main things we discussed earlier: dryness and temperature. First, those apples need to be bone dry—I mean, wipe them down twice! Second, you absolutely must hit that 250-degree mark on your candy thermometer. If you pull the mixture off the heat any sooner, the sugar structure just isn’t stable enough to harden properly when it cools, so you get runny, sticky goo instead of that perfect chewy shell you get with proper candy apples. If it’s humid outside, slow down your dipping process just a tiny bit, and double-check that temperature!

Nutritional Information Estimate for Marshmallow Apples
Now, let’s talk about the reality of eating these amazing, fluffy treats. I know when I’m whipping up something this fun and sweet, I’m not thinking about macros, but I do like to give people a general idea of what they’re enjoying. Because these are primarily sugar and corn syrup coating a whole apple, the numbers are what you’d expect, so definitely keep these reserved for special occasions!
We used the standard measurements from the recipe, and these figures are just an estimate, so please remember that your exact results might look a little different depending on the size of your apples or the brand of marshmallow creme you pick up. If you are looking for lighter options that still keep the flavor excitement high, I often turn to this 250-calorie smoothie for a daily boost, but these Marshmallow Apples are pure indulgence!
Here is what we are usually looking at for one tasty apple:
- Serving Size: 1 apple
- Calories: 450
- Sugar: 105g
- Sodium: 5mg
- Fat: 0g
- Protein: 1g
See? Lots of energy packed into one serving! It’s important to remember these are a dessert, not an everyday snack. Enjoy them, take a picture, and don’t worry about the sugar content!
Share Your Marshmallow Apples Creations
Okay, my friend, that’s it! You’ve got the secrets, you know the temperature, and you know how to keep that coating fluffy and chewy instead of hard as a rock. Now it’s your turn to be the dessert hero! I absolutely love hearing how these simple recipes work out in *your* kitchen. Did you try the crushed cereal topping? Did you stick to that classic vanilla coating?
Please, please, please come back and leave a rating for this recipe down below. Even if you’re usually intimidated by candy making, I want to know that this version made it easy for you. Your feedback helps other readers feel confident trying these amazing Marshmallow Apples out.
If you snapped a picture of your finished batch—maybe the kids are holding them up proudly, or they’re sitting perfectly on your cooling rack—I would truly love to see them! Tag me on social media or, if you have any specific questions about your process, send a message over through my contact page. I always try to respond personally to everyone who reaches out. You can reach me directly here. Go get baking, and enjoy every single sweet, fluffy bite!
Print
Marshmallow Apples
- Total Time: 25 min
- Yield: 4 servings 1x
- Diet: Vegetarian
Description
A simple recipe for coating apples with a sweet marshmallow mixture.
Ingredients
- 4 medium apples
- 1 cup granulated sugar
- 1/2 cup light corn syrup
- 1/4 cup water
- 1 teaspoon vanilla extract
- 1/2 cup marshmallow creme
- 4 wooden sticks
Instructions
- Wash and dry the apples completely. Insert a wooden stick into the stem end of each apple.
- Combine sugar, corn syrup, and water in a saucepan. Heat over medium heat, stirring until the sugar dissolves.
- Stop stirring and boil until the mixture reaches 250 degrees Fahrenheit on a candy thermometer.
- Remove from heat. Stir in the vanilla extract and marshmallow creme until smooth.
- Dip each apple into the hot mixture, turning to coat evenly.
- Place the coated apples on parchment paper to cool and set completely.
Notes
- Use firm apples for best results.
- If the coating hardens too quickly, reheat gently over low heat.
- Prep Time: 15 min
- Cook Time: 10 min
- Category: Dessert
- Method: Stovetop
- Cuisine: American
Nutrition
- Serving Size: 1 apple
- Calories: 450
- Sugar: 105
- Sodium: 5
- Fat: 0
- Saturated Fat: 0
- Unsaturated Fat: 0
- Trans Fat: 0
- Carbohydrates: 112
- Fiber: 1
- Protein: 1
- Cholesterol: 0
Keywords: marshmallow apples, candy apples, sweet treat, apple dessert