
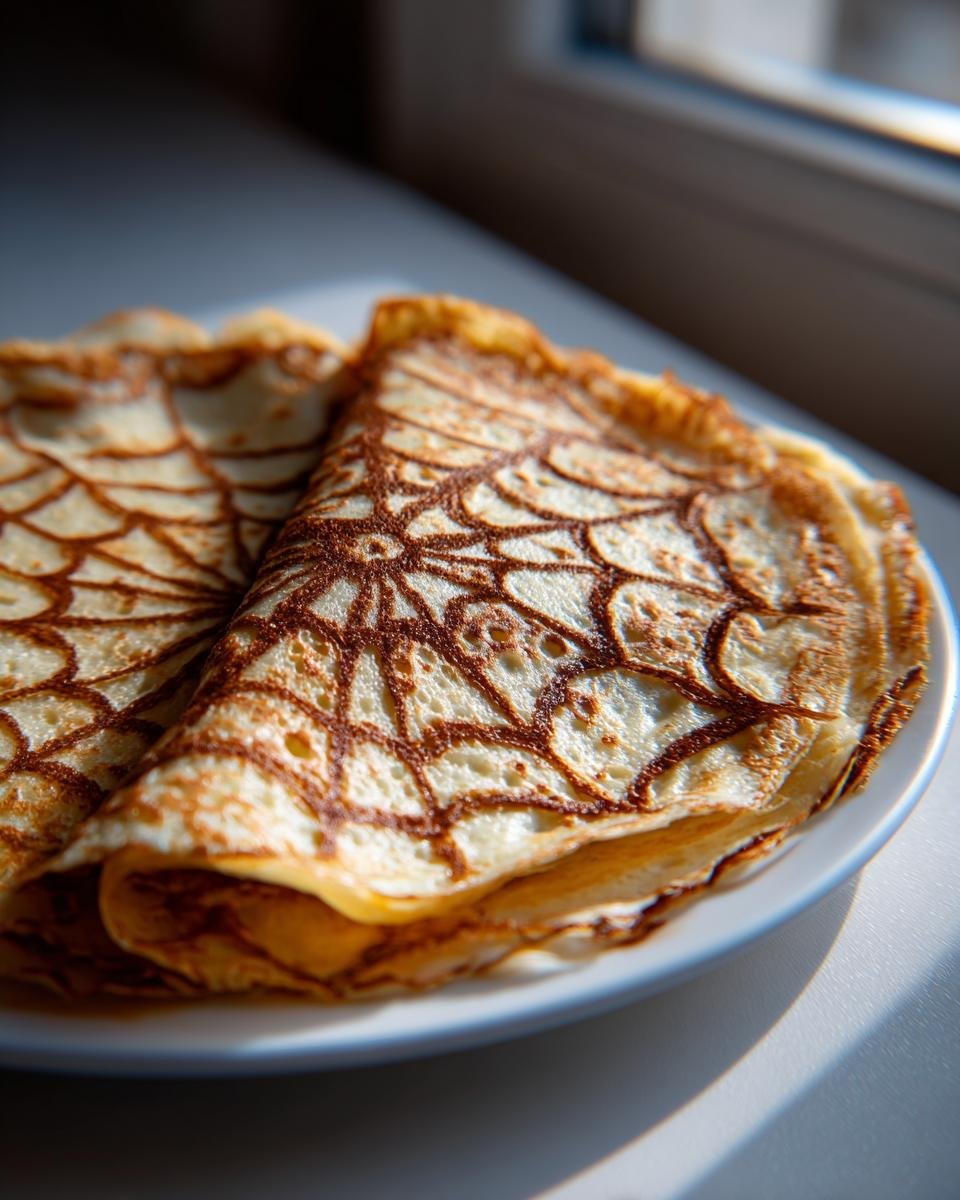
Forget boring, flat breakfast stacks for a minute, okay? I want to talk about taking something classic, like a delicate French crêpe, and making it totally unforgettable. These **Spiderweb Crepes** are my secret weapon when I need the morning spread to look like a little piece of edible art. Honestly, they look super complicated, like you needed professional pastry training, but trust me—they are shockingly easy. The magic trick involves just scooping a little bit of the main batter, turning it dark with cocoa, and using a squeeze bottle to paint on a tiny spiral. Then, one quick drag with a toothpick, and Shazam! You have a perfect, gossamer web.
I pull these out for everything. Sure, they are mandatory for Halloween brunch, but I also make them on random Tuesdays just to surprise my family. They taste exactly like beautiful, thin French pancakes, but the visual payoff is huge. If you’ve ever wanted to serve something that makes everyone stop talking for a second and just stare at their plate, this is it. Before we dive into the spooky details, if you’re looking for something delightfully fluffy instead of thin, you should check out my recipe for pillowy perfection pancakes while you’re here!
Why You Will Love These Spiderweb Crepes
Look, I know you might be eyeing those pictures thinking, “There is no way I can do that before coffee.” But that’s the absolute best part about these crepes! They trick everyone into thinking you spent hours slaving away in the kitchen, but really, they come together faster than you think. They satisfy that craving for a perfectly delicate pancake while adding a huge ‘wow’ factor.

- They taste incredible, truly light and eggy like the best French crêpes should be.
- The whole process from starting the batter to serving the first batch is shockingly fast!
- You get that amazing, artistic look without needing any special drawing skills.
- They are surprisingly sturdy, meaning they hold fillings like whipped cream or jam without immediately tearing and falling apart.
Quick Prep for Spiderweb Crepes
This is where a lot of recipes fall down for me—they demand too much active time in the morning. But seriously, the active mixing part for these **Spiderweb Crepes** is just about 10 minutes, total! Once the main batter is mixed with the water and milk, it just needs that 30-minute nap. Because the web batter is just a tiny portion you pull from the main batch, you aren’t juggling two totally different recipes. It’s genius, really.
Impressive Visuals for Spiderweb Crepes
The visual is everything here, right? You don’t need a master’s in art to get that perfect web look. The key is using a very thin stream of the dark cocoa batter piped in a simple spiral. Then, you just take a toothpick and *whoosh*—drag it from the center outward a few times. You’ll get those magnificent spokes of color crossing the light batter. It looks like an intricate lace doily, and no one will ever believe how little effort it truly took to achieve that effect.
Essential Ingredients for Perfect Spiderweb Crepes
You don’t need a pantry full of fancy stuff for these crepes, which is another reason why I love them so much! They use the same basic building blocks as any good thin pancake. But we do have two distinct mixes here: the main, light batter that forms the canvas, and the tiny bit of dark batter that becomes our spooky artwork. Make sure you have your amounts ready before you start whisking, because once that web batter is made, you have to work fast!
For the Main Crepe Batter
This is the part that makes them so wonderfully thin and slightly rich. Here’s what you need for the base:
- 1 cup all-purpose flour
- 2 large eggs
- 1/2 cup milk
- 1/2 cup water
- 1/4 teaspoon salt
- 2 tablespoons melted butter, plus more butter for the pan later on!
For the Cocoa Web Batter
This section is small, but it’s the whole visual show! You only need a couple of things, and importantly, you steal just a little bit of the plain batter we already mixed up.
- 1 tablespoon cocoa powder
- 1 teaspoon sugar
- 1 tablespoon of the plain crepe batter (just grab this from the main bowl before you mix everything else!)
Equipment Needed for Making Spiderweb Crepes
Honestly, if you’ve made pancakes before, you probably have 90% of what you need. There’s no need to run out and buy a bunch of specialized cooking gear just for these **Spiderweb Crepes**. However, there are two key pieces that make the visual magic happen smoothly, so if you don’t have them, a quick trip to the kitchen supply store might be in order. The right tools really help you control that delicate web design.
First, you absolutely must have a good, dependable non-stick skillet. I use my trusty 10-inch one. If your pan has uneven hot spots, the light batter will cook before you can get the web design on it, resulting in a blotchy mess instead of a crispy, lacy pattern. Make sure the bottom is flat and it heats evenly!
Second, for the web itself, you need a delivery system for the dark batter. Most people find using a squeeze bottle with a very fine metal tip is the easiest way to get that thin, controlled spiral. If you don’t have one, don’t panic! You can take an inexpensive Ziploc-style sandwich bag, put the cocoa batter inside, snip the absolute tiniest corner possible with scissors, and use that like a makeshift piping bag. It takes a little more careful squeezing, but it works just as well in a pinch!
Otherwise, just grab your standard whisk, a couple of good mixing bowls, and maybe a silicone brush if you want to apply the melted butter to the pan really lightly between each crepe. Preparation is everything with this recipe, so having these tools ready on your counter before you mix that batter will save you so much stress!
Step-by-Step Instructions for Spiderweb Crepes
Okay, now for the fun part—making the actual magic happen. You need to move through the initial steps fairly quickly, but the 30-minute rest time is your friend; don’t skip it! That rest allows the flour to hydrate, which is key for getting those perfectly thin, pliable crepes without tearing them apart later. When you get to the actual cooking, remember that time is of the essence so the web pattern sets correctly. You want to be ready with your squeeze bottle right next to the stove!
Preparing the Batters and Resting
First things first, get your dry ingredients into one bowl—that’s the flour and the salt. In a separate bowl, you’ll whisk up your eggs, milk, and water until everything looks happy and combined. Now, pour the wet stuff right into the dry and whisk it until it’s smooth. Don’t overdo it; just knock out the lumps! Stir in those two tablespoons of beautiful melted butter. Then, you must cover that bowl and let it rest on the counter for a solid 30 minutes. Seriously, walk away! While it’s resting, it’s time to mix up that special web color. In a tiny bowl, take about 2 tablespoons of your plain batter and mix it thoroughly with the cocoa powder and sugar until it’s a smooth, dark consistency. Then, you load that dark mixture into your squeeze bottle or piping bag. If you’re still looking for tips on making quick batters, I have a few extra tricks in my post on homemade pancake prep!
Creating the Signature Spiderweb Crepes Pattern
Once the main batter has rested, it’s game time! Heat up your 10-inch non-stick skillet over medium heat. You need it properly hot before the first drop of batter goes in, so drop a tiny bit of butter in and let it sizzle lightly. Now, pour about 1/4 cup of the plain batter right into the center of that hot pan. This needs to happen fast!
Immediately, before the bottom starts to set, grab your squeeze bottle and pipe a tight spiral pattern directly onto that wet center, moving outwards toward the rim. Don’t press too hard, you want a thin line! The second you finish the spiral, take a clean toothpick and gently drag it from the very center straight out to the edge. Do this maybe 6 or 8 times, creating those perfect spokes that turn your circle into a fancy web. Don’t worry if it smears a little; that just adds to the handmade charm!
Cooking and Finishing Your Spiderweb Crepes
This part takes quick action. Let that whole thing cook for just 1 to 2 minutes until you see the edges start to brown just slightly. Then, slide your spatula underneath—be gentle!—and flip it over. The dark cocoa side only needs about 30 seconds on the second side because it’s already mostly set from the heat below. Slide the finished **Spiderweb Crepe** onto a plate. Remember, right after lifting the finished one, you need to brush the pan lightly with a little more butter before you pour the next 1/4 cup for the next web. Keep moving!
Tips for Success When Making Spiderweb Crepes
Sometimes it’s not just the recipe, honey, it’s the timing! Even with these straightforward **Spiderweb Crepes**, a few little habits I picked up over the years can save you from a sticky mess. If you follow these three pieces of advice, you’ll be turning out perfect webs every single time. Don’t skimp on preparation here; a little planning saves a lot of flapping around with a toothpick!
First, let’s talk about that pan temperature constantly. This is the biggest secret to thin, evenly cooked crepes. You want medium heat, but you need to be ready to adjust it. If the first one looks pale after 90 seconds, the heat is too low—you need to bump it up a notch. If the plain batter sets before you can even finish your cocoa spiral, the pan is way too hot and you need to turn it down immediately! When the pan is perfect, the butter should sizzle nicely for just a moment when you brush it on, but not smoke away instantly. Consistency here is everything for a clean base layer!
Second, remember that batter rest is non-negotiable. I know waiting 30 minutes feels like forever when you’re hungry for breakfast, but that resting period for your main batter is crucial. It hydrates every speck of flour. If you skip it, your crepes won’t be as pliable. They might tear when you flip them, or worse, they might absorb your beautiful piped web pattern too quickly, making the lines look fuzzy instead of sharp.
Finally, work quickly once the batter hits the heat! Once you pour that 1/4 cup of base batter, you have maybe 30 seconds before it starts to set up, especially around the edges. Have your squeeze bottle ready to go—literally right in your hand—before the batter is even in the pan. Spiral, toothpick drag, done. Flip, 30 seconds, done. Brush butter, repeat. If you hesitate between steps, the base will firm up, and when you drag that toothpick, you’ll just drag the cooked batter instead of spreading the web the way you want it to.
Variations for Your Spiderweb Crepes
Now, since we’ve mastered the classic dark cocoa web look—which is great for a spooky theme or when you just really need that little hint of chocolate—I love experimenting with color for these **Spiderweb Crepes** the rest of the year. Sometimes I switch up the whole canvas! Instead of leaving the main batter plain (which is essentially vanilla flavored), you can add a splash of vanilla extract right into the whole batch, making it an extra fragrant vanilla canvas.
If you do that, you open up a whole world of web colors! You don’t have to stick with chocolate for the web element at all. My absolute favorite alternative for spring breakfasts is using a vibrant fruit puree. Try mixing a tablespoon or two of raspberry puree—you know, that bright, tart stuff—directly into the 2 tablespoons of batter you reserve for your web. It gives you this gorgeous, bright pink or red web against the pale vanilla base. It’s stunning, totally edible art!
Another fun idea is to use a tiny bit of matcha powder if you have it! That gives you a lovely soft green web, which is fantastic for a less spooky, more garden-themed breakfast. Just make sure whatever color agent you use, you mix it in *really* well so the web batter is consistently colored before it goes into your squeeze bottle.
Once you have your wonderful vanilla canvas ready, you can fill them with something rich and creamy. If you are feeling ambitious, homemade pastry cream is miles better than anything store-bought. You can check out my recipe for amazing homemade pastry cream if you want to elevate these crepes from a fun snack to a truly decadent dessert!
Serving Suggestions for Spiderweb Crepes
You’ve done the hard work! You’ve whipped up the batter, you’ve mastered the toothpick drag, and now you have a beautiful stack of these delicate, lacy **Spiderweb Crepes** cooling on the counter. Now, how do you serve them? Honestly, part of me just wants to fold them into perfect quarters and eat them plain because they smell so good fresh off the pan. But if you want to turn them from a fun breakfast treat into a real showstopper dessert, you’ve got options!
Remember how I said these crepes are surprisingly sturdy? That means they hold fillings really well without immediately ripping apart when you try to fold them. I usually keep things light because the crepe itself is so delicate. A smear of good quality fruit jam—raspberry or apricot works wonders against that slight cocoa flavor—is always a classic winner. You just spread a thin layer on one half, gently fold it over, and call it a day.
For weekend brunches, you can never, ever go wrong with fresh fruit and whipped cream. Think sliced strawberries, blueberries, or perhaps some thinly sliced bananas. Fold the crepe into a triangle or roll it up tight, top it with a dollop of freshly whipped cream, and maybe a light dusting of powdered sugar just to make it look like snow fell on top of your web. It’s simple, it’s elegant, and it lets the spiderweb design be the star.
If you’re making these for a real chocolate lover—and let’s face it, who isn’t?—you can lean into that cocoa flavor. Instead of a plain filling, try a thin layer of chocolate hazelnut spread. Don’t overdo it, though! A little goes a long way, especially when you roll it up. If you really want to push the decadent boat out, you could even pair these crepes alongside a thick, cold glass of chocolate goodness, like my recipe for an ultimate chocolate milkshake. They contrast perfectly: light and warm crepe versus cold, rich shake. Enjoy every single bite!
Storage and Reheating Instructions for Spiderweb Crepes
So, you made a huge batch of these glorious **Spiderweb Crepes**, which is what any smart cook does! They are so thin and delicate that storing and reheating them properly is actually super important if you want to keep that beautiful lacy texture intact. You definitely don’t want to end up grabbing a rubbery, cold crepe the next morning!
If you find yourself with leftovers—which I always hope for—refrigeration is the way to go for a couple of days. The trick here is preventing them from sticking together! Lay the cooled crepes flat on a baking sheet or plate. Once they are totally cool, place a square of parchment paper or wax paper *between* every single crepe. Then, gently wrap the whole stack in plastic wrap or tuck the whole thing into an airtight container. They should be good in the fridge for about two or three days.
Now, freezing them? Yes, you can totally freeze these! Just follow the same paper-layering technique: stack them with wax paper in between, wrap the stack tightly in plastic wrap, and then toss that whole thing into a large freezer bag. They’ll keep beautifully for about a month. Honestly, the thinness of these French pancakes makes them hold up better to freezing than thick American pancakes do.
The Best Way to Reheat Spiderweb Crepes
This is the critical part—we need heat, but we don’t want them going crispy or rubbery! Whatever method you choose, remember the goal is just to warm them through gently so they become pliable and ready for filling again.
Reheating from the Fridge
If they are coming straight from the fridge, I really recommend the skillet method. Heat your non-stick pan over *low* heat—and I mean low! Brush it with just a whisper of butter. Place one or two crepes in the pan at a time and warm them for about 20 to 30 seconds per side until they feel soft again. This little bit of warmth reactivates that lovely butter flavor from the first cook. If you’re reheating several, stack them on a plate and cover them with a clean dish towel while you finish the rest to keep the steam in.
Reheating from Frozen
For the frozen ones, you can skip thawing entirely if you are in a rush. Use the same low-heat skillet technique mentioned above, but you’ll need to allow a bit more time—maybe 45 seconds to a minute per side. You can check them by gently pressing the center; they should yield softly when they are ready. If you try to microwave these, they will instantly turn tough and chewy, and we worked too hard on that beautiful web design to ruin the texture now!
Frequently Asked Questions About Spiderweb Crepes
I always get a few questions after everyone tries this unique recipe for the first time! It’s normal, because while making a plain crêpe is easy, getting that spooky, detailed web pattern takes just a tiny bit of insider knowledge. Here are the things folks ask me most often about getting these **Spiderweb Crepes** just right.
Can I make the Spiderweb Crepes batter ahead of time?
That’s a great question for busy mornings! The main batter *needs* to rest for 30 minutes right after you mix it up—this is key for hydration, so don’t skip that initial bench time. If you want to make the main batter completely ahead of time, absolutely! If you store it in the fridge, it will thicken up quite a bit because of the flour and eggs. Before you use it, you’ll want to take it out about 45 minutes before cooking to let it warm up slightly and relax. If it still seems too thick to pour thinly, just whisk in a tablespoon or two of extra water or milk until it flows smoothly again. The dark web batter, though? I’d make that fresh right before cooking, as it’s best when it’s vibrant and ready to go!
What if I don’t have a squeeze bottle for the web?
Oh, trust me, I’ve been there! You don’t need to rush out and buy specialized tools just to make these fun pancakes. The fancy metal tips give you the best, thinnest line, but a common household item works in a pinch. Grab one of those small, heavy-duty Ziploc-style sandwich bags—not the really cheap, thin ones, or they might burst when you squeeze! Put your cocoa web batter inside, seal it tight, and then snip the absolute, tiniest hole you can manage at one corner with sharp scissors. You want the hole smaller than a pencil eraser. You have to squeeze gently and consistently, but you absolutely will get those beautiful little cocoa lines to create your **Spiderweb Crepes** pattern!
How do I keep the Spiderweb Crepes from sticking?
Sticking is the nemesis of any thin pancake, and since these are so delicate, it can ruin your beautiful web in an instant! It comes down to two things we talked about in the tips section. First, your pan temperature has to be correct—medium heat, nice and even. If it’s too cool, the batter just soaks up the butter without setting, which leads to sticking later.
Second, you have to treat every single crepe like it’s the first one. You *must* lightly brush the pan with melted butter between making each one. Don’t just pour the batter in cold. A quick swipe with a silicone brush dipped in butter keeps the surface slick and prevents those edges from grabbing onto the pan when it’s time to flip. If you nail that temperature and use just a tiny bit of butter each time, your crepes will slide out like they’re on ice!
Nutritional Estimates for Spiderweb Crepes
Hey, I know some of you are watching macros or just curious about what you’re eating, even when it comes to fun weekend treats like these **Spiderweb Crepes**. Before we get into the numbers, I have to put my usual disclaimer out there: these values are just estimates! They are based on the basic ingredients listed above, assuming you get exactly 8 crepes out of the batch, and they don’t account for what you might fill them with—because who are we to judge if you fill them with whipped cream?
Since these are thin, delicate pancakes, they are surprisingly light on the calories before fillings are added. You’ll be happy to know that just one crepe only clocks in around 110 calories, which is a fraction of what you’d find in a stack of buttermilk flapjacks! It’s all about that delicate texture, I guess. Here’s the breakdown for a single serving (that’s one crepe):
- Calories: 110
- Fat: 6 grams (Try to keep saturated fat around 3 grams!)
- Carbohydrates: 11 grams (This includes that tiny bit of sugar around 2 grams)
- Protein: 4 grams
The cholesterol count is about 45mg per crepe, which is generally pretty reasonable given that we use two whole eggs. The sodium is around 120mg, mostly coming from the salt we added to enhance the flavor. If you’re using these as the canvas for fruit and just a little bit of yogurt, they make for a fantastic, light base!
Share Your Spiderweb Crepes Creations
You’ve done it! You tackled the toothpick drag, you mastered the heat, and now you’re looking at a plate full of beautiful, lacy **Spiderweb Crepes**! I truly hope you and your family enjoyed making them just as much as eating them because that hands-on, artistic step is what makes this recipe so much fun.
But my kitchen adventures don’t stop here, and I always love seeing how you’ve adapted things! Did you use the raspberry puree variation? Did you manage to get the perfect, razor-thin lines with your squeeze bottle? Or maybe you filled them with something totally unexpected?
Please, please, let me know how it went! If you loved these, I’d be so grateful if you could hop back up to the top of the post and leave a quick star rating. It really helps other cooks know that this recipe is worth the effort. And if you took a picture (and you should have!), tag me on social media or send me a quick note through the contact page right here: Send me your feedback. I check every single comment, and I can’t wait to hear about your spectacular Spanish-themed breakfast!
Print
Spiderweb Crepes
- Total Time: 30 min
- Yield: 8 crepes 1x
- Diet: Vegetarian
Description
Thin French pancakes decorated with a simple web pattern.
Ingredients
- 1 cup all-purpose flour
- 2 large eggs
- 1/2 cup milk
- 1/2 cup water
- 1/4 teaspoon salt
- 2 tablespoons melted butter, plus more for the pan
- 1 tablespoon cocoa powder (for the web batter)
- 1 teaspoon sugar (for the web batter)
Instructions
- Whisk together flour and salt in a medium bowl.
- In a separate bowl, whisk eggs, milk, and water until combined.
- Pour the wet ingredients into the dry ingredients and whisk until smooth. Stir in 2 tablespoons of melted butter. Let the batter rest for 30 minutes.
- Prepare the web batter: Mix the cocoa powder, sugar, and 2 tablespoons of the plain crepe batter in a small bowl until smooth. Place this mixture into a small squeeze bottle or piping bag with a very fine tip.
- Heat a 10-inch non-stick skillet over medium heat. Lightly brush the pan with melted butter.
- Pour about 1/4 cup of the plain batter into the center of the hot pan. Immediately use the squeeze bottle to pipe a spiral pattern onto the wet batter, starting from the center and moving outward.
- Quickly drag a toothpick from the center of the spiral out to the edge in several places to create the web effect.
- Cook for 1 to 2 minutes until the bottom is lightly golden. Flip the crepe and cook for about 30 seconds more.
- Slide the crepe onto a plate. Repeat with the remaining batter, buttering the pan lightly between crepes.
Notes
- For best results, use a pan that heats evenly.
- You can fill these crepes with jam, fruit, or whipped cream before folding.
- Prep Time: 10 min
- Cook Time: 20 min
- Category: Dessert
- Method: Pan Frying
- Cuisine: French
Nutrition
- Serving Size: 1 crepe
- Calories: 110
- Sugar: 2
- Sodium: 120
- Fat: 6
- Saturated Fat: 3
- Unsaturated Fat: 3
- Trans Fat: 0
- Carbohydrates: 11
- Fiber: 0
- Protein: 4
- Cholesterol: 45
Keywords: crepes, spiderweb, breakfast, dessert, thin pancakes, cocoa