
Halloween means two things in my house: way too much candy and appetizers that make people scream (in a good way!). Seriously, nothing beats serving up something spooky but delicious, and these Spider Deviled Eggs are my absolute go-to party trick. They look way more complicated than they actually are. We’re talking about classic deviled eggs jazzed up with black olives to look creepy-crawly. Since most of the time is spent chilling them, these are surprisingly quick to get on the table!

Why You’ll Love These Spider Deviled Eggs
I know you’re busy planning the perfect spooky spread, and that’s why this recipe is a lifesaver. You need appetizers that wow people but don’t take hours of your precious party-prep time, right? These little creepy crawlies deliver!
- They are incredibly fast to assemble once your eggs are cooked and peeled. We are talking maybe fifteen minutes of actual decorating work. Honestly, the hardest part is slicing the olives!
- Talk about immediate party impact! These turn a boring classic into the star of your appetizer platter. Everyone stops and takes a picture before they eat them, I swear it’s true. They are perfect for kids and adults alike.
- You are essentially making a standard, delicious deviled egg recipe, so the taste is totally familiar and comforting. Nothing weird tasting here—just great flavor hiding under a spooky facade. You can even check out my guide on my all-time favorite vintage chocolate cake for another easy crowd-pleaser, if you need something sweet later!
Trust me, they are the easiest way to get big reactions at your Halloween bash!
Essential Ingredients for Perfect Spider Deviled Eggs
You need good, solid basics to make sure your spiders are structurally sound and taste amazing. Don’t skimp on the quality here, especially with the olives—they are doing a lot of heavy lifting visually!
Here’s exactly what you’ll need to gather. If you need a refresher on getting those eggs perfectly cooked and easy to peel, I walk through my favorite 10-minute method over here. Getting perfect hard-boiled eggs is the very first step!
- 12 large eggs (these need to be cooked, peeled, and cut in half, remember!)
- 1/2 cup of mayonnaise—use your favorite creamy brand; it makes the filling smooth.
- 2 tablespoons of yellow mustard, just for that classic deviled egg tang.
- 1/4 teaspoon of salt, and don’t forget the pepper!
- 1/8 teaspoon of black pepper—I like a little kick, but you can cut back if you prefer.
- 1/4 cup of paprika, which we’ll sprinkle lightly just to give the eggs a nice warm color before the spiders land on top.
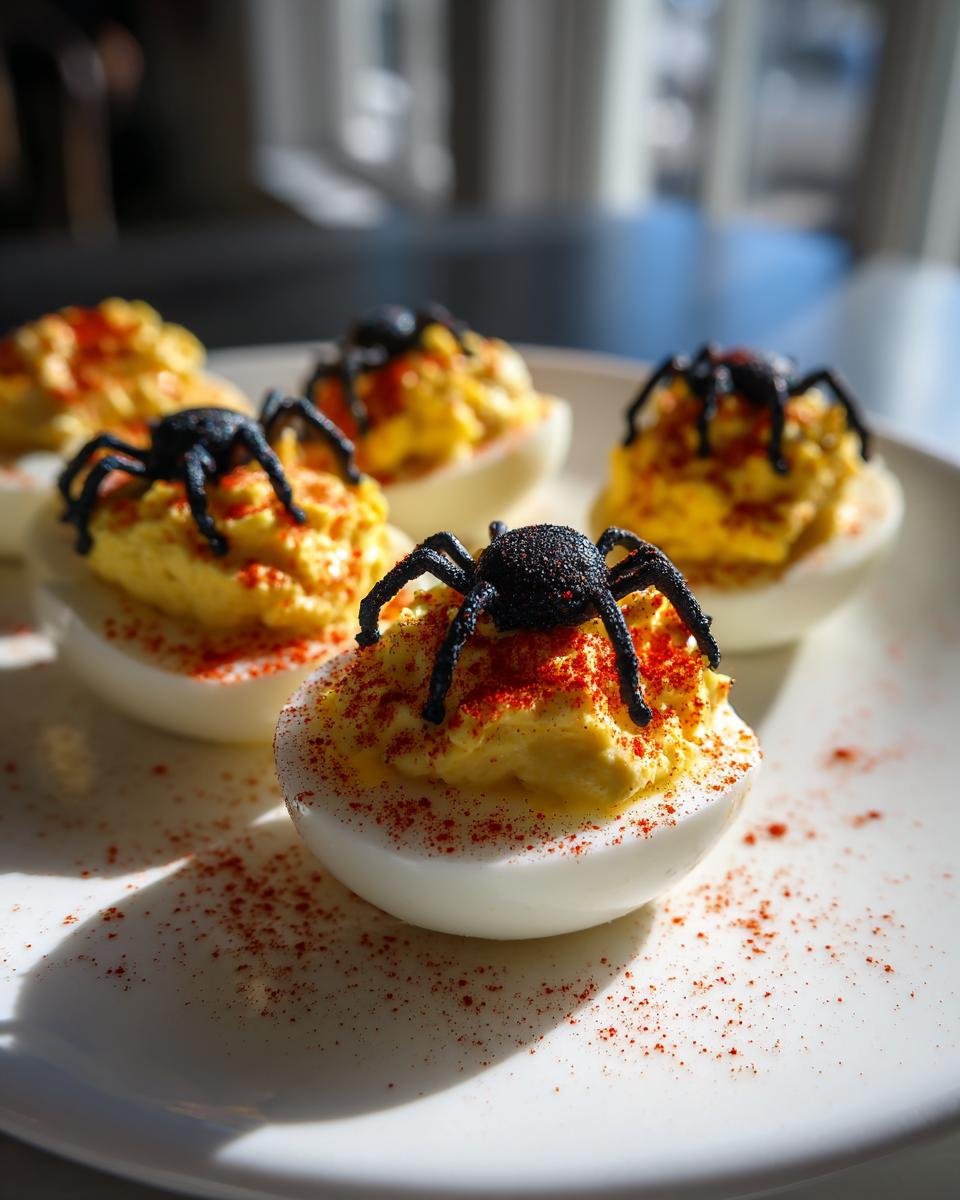
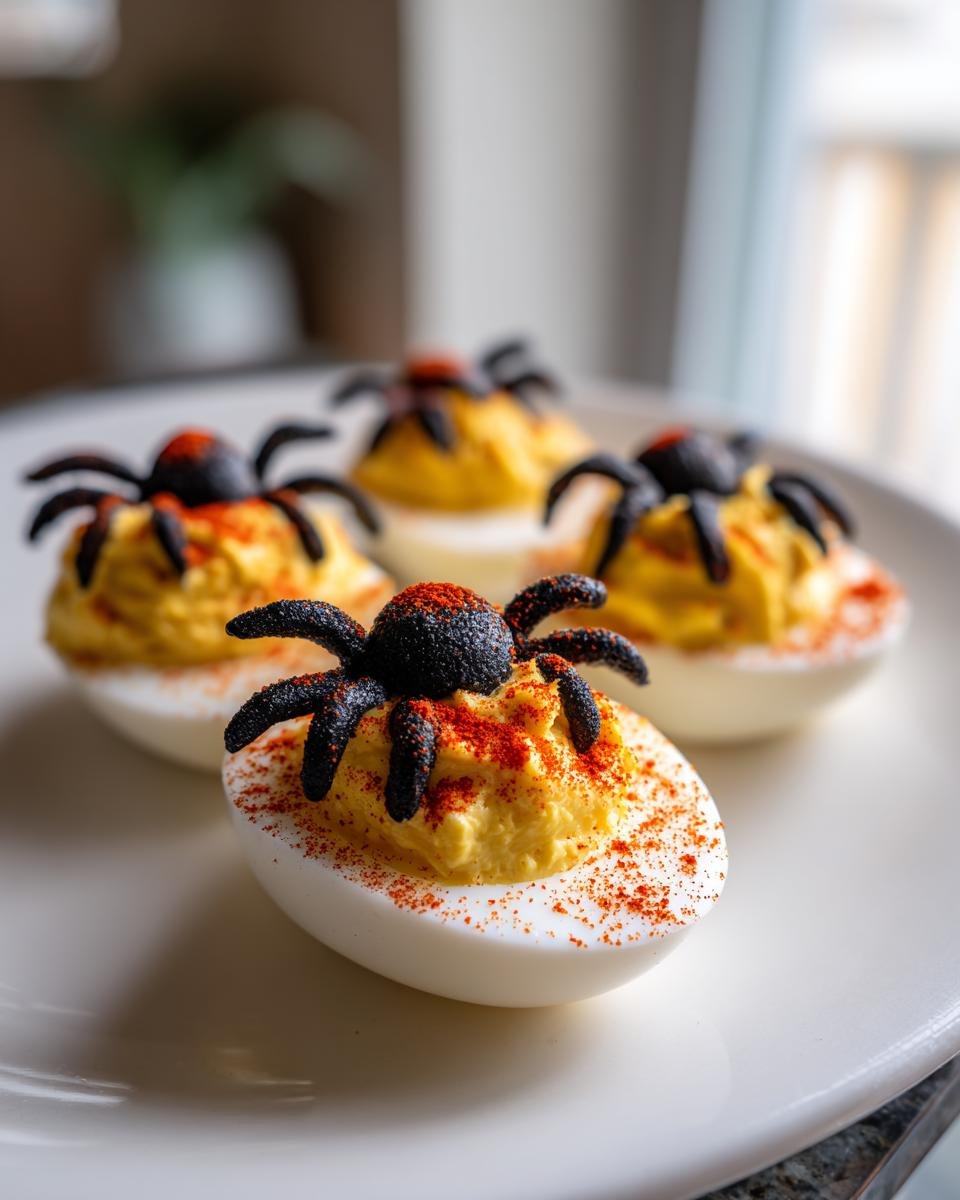
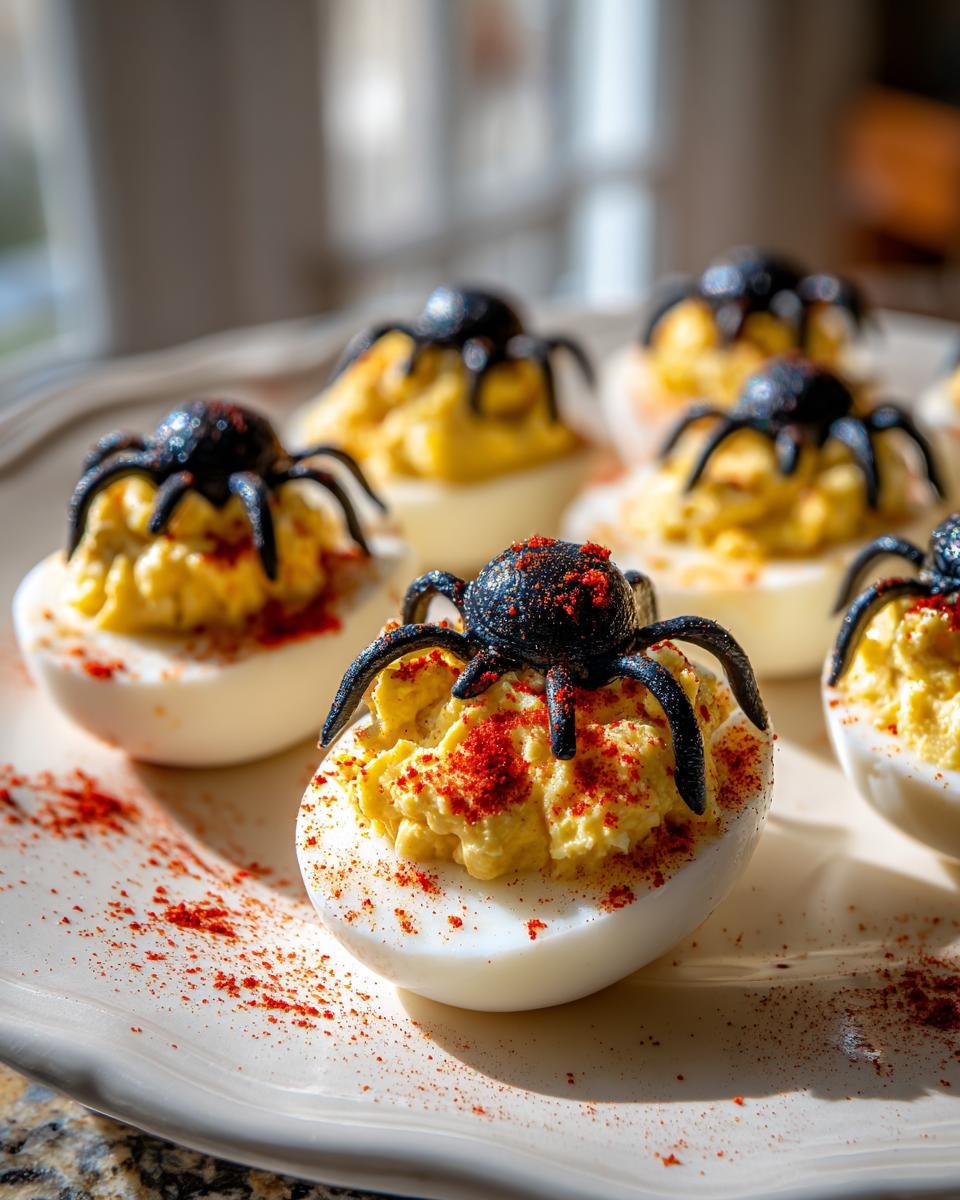
- 12 small black olives, halved lengthwise. This half becomes the spider’s head/body—make sure they are pitted, obviously!
- 24 thin strips of black olive, cut lengthwise into tiny slivers. These are your spider legs, so you need exactly two per side, 12 spiders total!
That’s it! Simple, standard ingredients that taste fantastic as a creamy deviled egg base, which means we can focus all our energy on the spooky assembly.
Step-by-Step Instructions to Make Spider Deviled Eggs
Okay, strap in, because this is where the fun starts! While boiling eggs can sometimes feel like a chore, this recipe cooks fast enough that you barely feel like you’ve spent any time in the kitchen. If you need a super helpful guide for making the perfect creamy base later, I’ve written out everything you need to know for an amazing deviled egg filling, but for now, let’s focus on the timeline.
Preparing the Hard-Boiled Eggs
First things first: the eggs have to be perfectly cooked. I put them in a regular saucepan and just cover them with cold water. Bring that water to a rolling boil, then instantly kill the heat, pop a lid on, and let them sit peacefully for exactly 10 minutes. Don’t peek! After that time, drain the hot water and immediately dump them into an ice bath. This stops the cooking right away, which helps with peeling later—yay! Once they are totally cold (run them under cold water while peeling if you need extra help), slice them carefully in half lengthwise. Scoop those gorgeous yellow yolks right out and into a bowl.
Creating the Creamy Yolk Filling for Spider Deviled Eggs
Now we mix the filling! Take those yolks and mash them up with a fork until they are super fine—you don’t want any big lumps hanging around. Then, beat in the mayonnaise, mustard, salt, and pepper. You want this ridiculously smooth. Whether you use a hand mixer or just keep churning with that fork, keep going until it looks creamy, fluffy, and ready to pipe. Taste it here! Does it need more salt? Go ahead and fix it now.
Assembling the Spider Deviled Eggs Decoration
This is the part that takes your appetizer from good to glorious! You need to gently spoon or pipe (I prefer piping for height!) that beautiful filling back into the empty egg white halves. Once they’re topped nicely, it’s time for the spiders. Take one of your halved black olives—the rounded side is the body—and gently place it right on top of the filling. Now for the legs! Take those thin olive strips and tuck two on each side of the olive body—careful not to press too hard! You need eight little legs per spider, so make sure you create that full count. Finally, just dust everything lightly with paprika for color, and pop them in the fridge to chill out for at least 30 minutes before company arrives.
Expert Tips for Next-Level Spider Deviled Eggs
I’ve made these so many times for parties that I’ve definitely learned a few tricks along the way. You want them to look great, taste amazing, and hold together when someone snags one off the platter. My biggest mistake early on? Trying to decorate them when I was running late! Don’t rush the assembly, and definitely respect the chill time.
If you love creamy classics, you should check out my recipe for creamy deviled egg macaroni salad—it uses a similar base filling but turns it into a full, satisfying side dish!
Piping vs. Spooning the Yolk Filling
You can absolutely just use a regular little spoon to mound the filling back into the egg whites, and they’ll still be tasty spiders! However, if you want them to look really, *really* professional—like they came from a bakery display case—you’ve got to use a piping bag. I only pull out my star tip for these!
Piping gives you those beautiful ridges that look like the spider is sitting proudly on its little base. If you don’t have a piping setup, just use a Ziploc bag, snip one corner off with scissors, and pipe that way! It works almost as well and is way less cleanup. Just make sure your filling isn’t too stiff, or you’ll end up fighting the bag, which leads to splatters everywhere!
Chilling Time for Spider Deviled Eggs
This is the most overlooked, but most essential, part of making any deviled egg, especially these creepy crawlies. You absolutely must chill them for at least 30 minutes—and honestly, 45 minutes is better. Why? Two big reasons. First, the chilling solidifies the filling; you want that yolk mix firm enough so the olive body doesn’t immediately sink right through the middle when you pick it up!
Second, it lets all those flavors—the mustard, the salt, the tang—really marry together in the cool environment. Cold deviled eggs always taste better, period. If you’re serving them outdoors or at a long gathering, keep them sitting on a nice chilled platter to hold that structure together longer.
Ingredient Notes and Substitutions for Spider Deviled Eggs
So, you’re ready to make these, but maybe you’re out of mustard, or maybe you’re trying to cut back on dairy? Totally understandable! The beauty of a classic deviled egg filling is that it’s pretty forgiving, but we need to be smart about changes because we need that filling to hold up the olive spiders!
If you find yourself out of classic yellow mustard, don’t panic! You can absolutely substitute it with Dijon mustard, but maybe start with just one tablespoon instead of two, as Dijon has a sharper taste. Another fun option—which gives a little zing that cuts through the richness—is using a teaspoon of prepared horseradish instead. It gives the filling a little surprise kick!
Now, let’s talk about the mayonnaise. Mayo is key because it brings smooth fat content which helps the filling stay creamy, even after baking. If you need to avoid mayo, Greek yogurt works in a pinch, but you MUST strain it first. Regular yogurt is too watery, and that’s how you get a runny mess that can’t support a spider. You want thick, nice Greek yogurt, otherwise everything will slump over—and nobody wants a sad, slumped spider!
My biggest tip, though, is where you buy your olives. For the bodies and the legs, you want whole, pitted black olives that are firm. Fancy Kalamata olives tend to be softer and might just mush when you try to slice them into those thin little legs. I always grab the most basic, canned small black olives because they tend to be firmer and slice into those perfect little sticks much easier. It’s one of those little secrets that makes the final presentation so much cleaner!
If you’re ever looking for a fantastic dipping sauce recipe that’s totally from scratch and super easy—you can check out my simple pasta sauce recipe for another day when you want to use your stove in a different way!
Serving Suggestions for Spider Deviled Eggs
These little guys are so fun, but they usually need some good friends on the platter to make a full snack spread! Since these Spider Deviled Eggs are rich, creamy, and look pretty dramatic, I always try to pair them with things that offer texture and maybe a bit of savory freshness to balance things out.
For a full Halloween vibe, presentation is everything! Think dark colors or unexpected harvest flavors. I usually try to serve them on a dark slate or black tray—nothing bright white! This makes the orange paprika and the black olive spiders really pop.
If you are doing a big party spread, here are some combinations that I swear by:
- Spicy Dips: Nothing chases the richness of a deviled egg better than something spicy or crunchy. If you want something that goes amazing with the Halloween theme, you must try my recipe for Ultimate Cowboy Caviar! It’s hearty, full of fresh veggies, and has a little kick that everyone loves. It looks great because it’s naturally colorful, too.
- Crunchy Veggies: Always have baby carrots, celery sticks, or tortilla chips nearby for scooping up any extra yolk mix that you couldn’t pipe! Plus, it gives guests something fresh to munch on between the richer bites.
- Hearty Chili Pairing: If you’re serving these as an appetizer before a big game night or a cool October dinner, they are the perfect cool-down side dish for a big pot of chili or some savory sloppy joes. They add that classic picnic comfort food feel, even when they look like monsters!
Honestly, once they hit the table looking like that, they disappear fast. Just make sure you put out plenty of napkins because everyone always grabs two!
Storage and Make-Ahead Advice for Spider Deviled Eggs
When I’m planning a gathering, I always try to do as much as possible the day before, right? Nobody wants to be frantically slicing olives when guests are knocking at the door! Luckily, this recipe is great for prepping ahead, but you have to be smart about it because these are highly decorated, delicate little things.
If you just make the regular deviled egg filling—the creamy yolk mixture—that part holds up beautifully for a full day in the fridge. I usually mix up a big batch, put it in an airtight container, and stick it right back in the refrigerator. It keeps everything nice and fresh! If you do this, you should probably check out some other great make-ahead meals like my easy chicken stir-fry meal prep ideas to keep your planning streamlined.
However, here is my biggest warning about the Spider Deviled Eggs: Do NOT assemble the spiders until the very last minute possible—seriously, within an hour of serving!
Why wait? A couple of things happen when you store the assembled eggs. First, the moisture from the filling starts leaching into the egg white, making it look soggy and wet. Second, and most critical for our little spiders, the olive strips are just sitting on top of soft filling. They can easily slide off or sink into the yolk base during refrigeration. Nobody wants to find a puddle of olive legs in the bottom of the container!
So, for the absolute best presentation, here’s my two-step plan for make-ahead work:
- Day Before: Make the yolk filling, store it covered in the fridge. Hard-boil and peel the eggs, store them cut-side up, covered tightly, in the fridge.
- Day Of: Pull the filling out about 20 minutes before you want to eat so it softens just a tad. Fill the egg whites, decorate with the olive bodies and legs, sprinkle the paprika, and then chill them for that last 30 minutes just to firm up before serving.
If you have leftovers (which is rare in my house!), they will last about two to three days in a well-sealed container in the fridge. They might lose a little bit of that fresh pop, but they’ll still be tasty deviled eggs!
Frequently Asked Questions About Spider Deviled Eggs
Whenever I post these little guys online, people have the best questions! It makes total sense, especially when you’re trying to get the decoration just right. Here are the things I hear most often about making sure these appetizers are perfect for your party.
Can I make the filling for the Spider Deviled Eggs a day early?
Yes, absolutely! Like I mentioned before, making the creamy yolk filling ahead of time is actually one of my best time-saving tricks. Just mix everything until it’s smooth, seal it tightly so it doesn’t dry out or absorb smells from the fridge, and keep it cold. Keep it separate from the egg whites, though! It stays perfect for at least 24 hours. But remember, don’t combine them with the egg whites until you are ready to pipe or spoon the filling back in.
What can I use instead of black olives for the spider decoration?
That’s a fun question! While the black olives really give the best visual pop for the little spider bodies and those spindly legs, if you have an olive aversion or need a different color scheme, you have options! For the body, you could use tiny dollops of dark red pimento spread, or even a small piece of purple grape cut exactly right.
For the legs, tiny little slivers of black food coloring-dyed mozzarella string cheese work in a pinch, though they don’t hold their shape as well as olives do once chilled. My favorite trick for a slightly different look is using tiny pieces of balsamic glazed onion for the body—they look dark and sticky, which is perfect, but remember they will add a strong flavor kick!
How do I prevent the yolk mixture from looking watery?
A watery yolk mixture is the absolute worst because it just oozes out of the egg white hole, which means your spider decorations slide right off! This usually happens because there’s too much liquid (mayo or mustard) or you didn’t mash the yolks enough.
My secret to stopping this is all about how you mash the yolks. Mash them with the fork until they are practically a powder *before* you add any liquid at all. Let the dry yolk absorb all the salt and pepper first. Then, add the mayo and mustard slowly, mixing gently but thoroughly. If you still feel like it’s too loose, the best fix is usually an extra teaspoon of dry mustard powder or a tiny pinch of cornstarch stirred in thoroughly! That will bulk it up just enough to hold its beautiful little peak.
If you’re looking for other great appetizer ideas that use simple mixing techniques, you might enjoy my guide on making easy stuffed bell peppers—they are another great make-ahead party food!
Nutritional Estimates for Spider Deviled Eggs
Okay, let’s talk fuel for a minute! While these Spider Deviled Eggs are mostly for fun and party snacking, I know some folks track their macros, or just wonder what they are actually eating when they grab three of these spooky little guys. I pulled the estimates from a standard nutritional calculator based on the ingredients, but you know how this goes!
Every brand of mayonnaise is different, and how big your olives actually are can change things slightly. So, take these numbers below as a great ballpark estimate, not gospel, especially if you’re making substitutions. If you’re looking for other lighter options, I have a great low-calorie recipe guide you might want to bookmark for your healthier meals!
Remember, these totals are based on ONE deviled egg half (since the recipe yields 12 halves total):
- Calories: Right around 90 calories per half. That’s fantastic for a rich-tasting appetizer!
- Fat: About 7 grams total. Most of this comes from the egg yolk and the mayo, which is where we get that glorious creaminess.
- Protein: About 5 grams. Eggs are powerhouses, and they help keep people satisfied through the party!
- Carbohydrates: Super low, less than 1 gram, which is basically just trace amounts from the mustard.
You’ll notice the sodium is a little up there (around 110mg), and that’s mostly from the salt we add to the filling and the saltiness inherent in the olives. If you are watching sodium, definitely skip adding any extra salt to the yolk mixture during your taste test!
Enjoy them guilt-free! They’re just eggs and olives, mostly, and they are totally worth the 90 calories for the sheer joy they bring to the party table!
Print
Spider Deviled Eggs
- Total Time: 30 min
- Yield: 12 deviled egg halves 1x
- Diet: Vegetarian
Description
A simple recipe for deviled eggs decorated to look like spiders for Halloween or themed parties.
Ingredients
- 12 large eggs
- 1/2 cup mayonnaise
- 2 tablespoons yellow mustard
- 1/4 teaspoon salt
- 1/8 teaspoon black pepper
- 1/4 cup paprika, for garnish
- 12 small black olives, halved lengthwise
- 24 thin strips of black olive, for legs
Instructions
- Place eggs in a saucepan and cover with cold water. Bring water to a boil, then remove from heat, cover, and let stand for 10 minutes.
- Transfer eggs to an ice bath to cool completely. Peel the eggs and slice them in half lengthwise. Remove the yolks and place them in a medium bowl.
- Mash the yolks with a fork until fine. Add mayonnaise, mustard, salt, and pepper. Mix until smooth and creamy.
- Spoon or pipe the yolk mixture back into the egg white halves.
- To make the spiders, take one half of a black olive (the rounded part) and place it on top of the yolk mixture to form the body.
- Insert two small strips of black olive on each side of the olive body to create eight legs.
- Sprinkle paprika lightly over the eggs for color.
- Chill the eggs for at least 30 minutes before serving.
Notes
- For easier peeling, crack the cooled eggs gently all over and peel under running water.
- You can use a piping bag with a star tip for a decorative look when filling the egg whites.
- Prep Time: 20 min
- Cook Time: 10 min
- Category: Appetizer
- Method: Boiling and Mixing
- Cuisine: American
Nutrition
- Serving Size: 1 egg half
- Calories: 90
- Sugar: 0.5
- Sodium: 110
- Fat: 7
- Saturated Fat: 2
- Unsaturated Fat: 5
- Trans Fat: 0
- Carbohydrates: 0.5
- Fiber: 0
- Protein: 5
- Cholesterol: 100
Keywords: deviled eggs, spider eggs, Halloween appetizer, party food, easy appetizer