
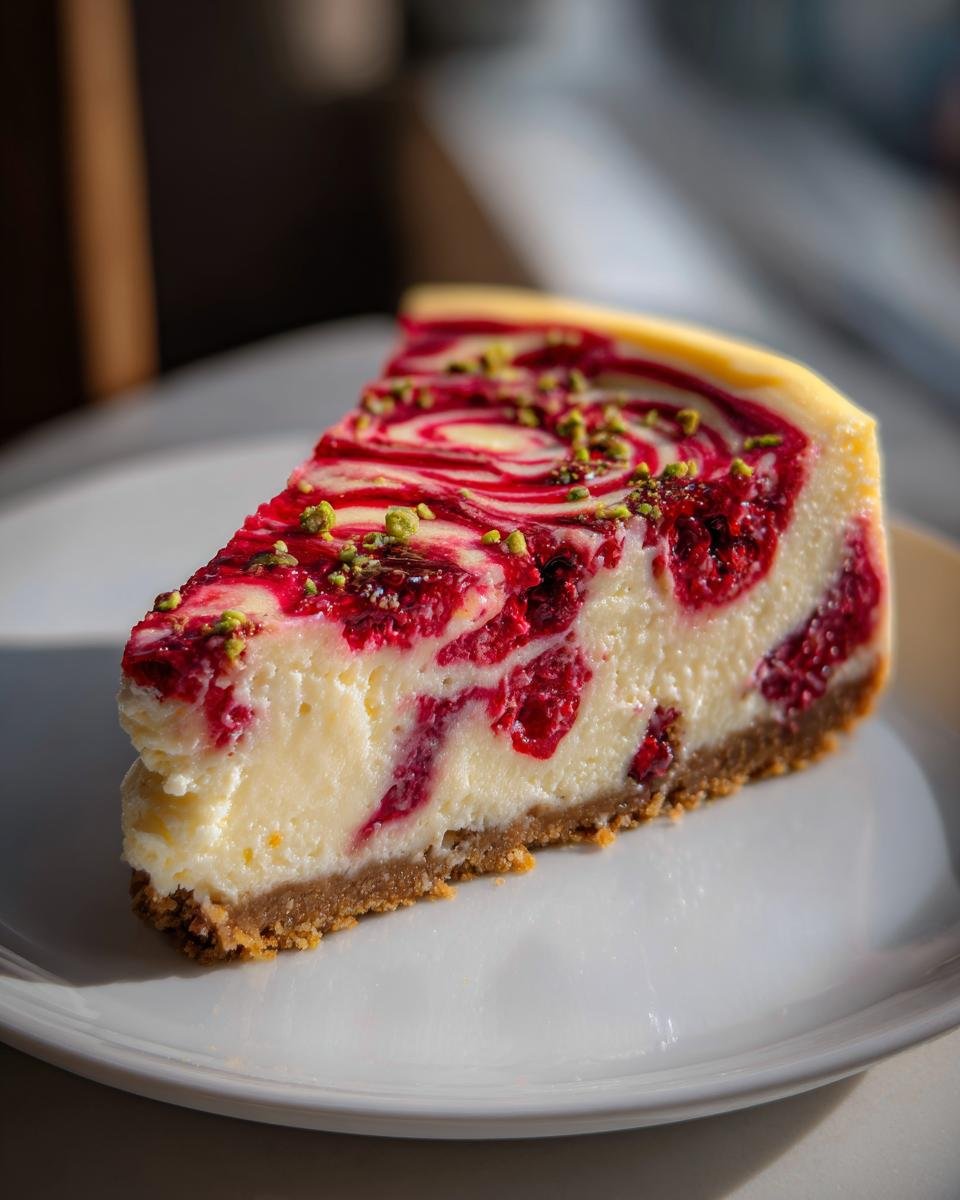
Oh, listen to me, when I say I have found the absolute pinnacle of creamy decadence, I mean it! If you think you’ve had cheesecake, think again. We’re taking it up about five levels today with this gorgeous, show-stopping Raspberry Pistachio Cheesecake. It’s got that fantastic balance—the salty crunch from the nuts, the sweet-tart punch from the fresh berries, and that rich, velvety smooth cream cheese filling.

This isn’t some flimsy no-bake thing; this is a truly baked masterpiece. I’ve spent way too much time in my kitchen wrestling with springform pans, I won’t lie. But trust me when I say that after making this recipe dozens of times, I finally mastered the water bath technique—seriously, it keeps the top absolutely flawless and crack-free. If you’ve struggled with that before, this recipe is going to be your game-changer. You’re going to love how everything comes together in this perfect slice. If you’re in the mood for other amazing fruit treats in a hurry, you should definitely check out my quick raspberry crumble cookies recipe!
Why This Raspberry Pistachio Cheesecake Recipe Works
Honestly, making a great cheesecake takes courage, but this recipe just makes it so easy. It hits all the right notes, which is why it always disappears first at every potluck I bring it to. You get that salty, earthy crunch right off the bat.
Here’s why I think this Raspberry Pistachio Cheesecake is seriously the best one you’ll ever attempt:
- The texture is unbelievable—it’s dense, yes, but it melts in your mouth, never heavy or gritty. That’s all down to the careful mixing, I promise!
- The flavor combination is pure sophistication. Pistachio is salty and rich, and it cuts through the sweetness of the cream cheese perfectly.
- The topping is genius! Cooking down those fresh raspberries with just a touch of lemon brightens up the whole rich dessert. It looks incredibly impressive with only minimal effort.
Gathering Ingredients for Your Raspberry Pistachio Cheesecake
Okay, let’s talk supplies! You absolutely cannot wing the ingredients here, especially the cheese. For the *Raspberry Pistachio Cheesecake* filling, your cream cheese MUST be perfectly softened—leave it on the counter for at least an hour before you even think about starting. I hate a lumpy cheesecake more than anything!
Getting the right proportions is key to that perfect creamy texture we talked about. If you’re looking for more fantastic ideas on using cream cheese, I have a whole post with 10 irresistible cream cheese recipes you might want to peek at later!
Here’s exactly what you need to line up for this beauty. Measure twice, bake once, right?
For the Pistachio Crust
This crust is what gives the first amazing pop of flavor. Make sure those pistachios are chopped nice and fine so they blend well with the crumbs! You’ll need:
- 1 1/2 cups graham cracker crumbs
- 1/2 cup finely chopped pistachios
- 1/4 cup granulated sugar
- 6 tablespoons unsalted butter, melted
For the Cheesecake Filling
Remember—room temperature cream cheese is your best friend here! The eggs should also be room temperature so they mix in smoothly without deflating your batter.
- 3 (8 ounce) packages cream cheese, softened
- 1 1/2 cups granulated sugar
- 1 teaspoon vanilla extract
- 4 large eggs
- 1/2 cup sour cream
For the Fresh Raspberry Topping
This topping cooks up so fast, but you want to make sure it cools completely before you pour it over that beautifully chilled cake. You’ll use:
- 1 cup fresh raspberries
- 1 tablespoon lemon juice
- 2 tablespoons granulated sugar (just for topping—don’t mix this in with the filling sugar!)
Step-by-Step Instructions for Perfect Raspberry Pistachio Cheesecake
Now for the good stuff—the actual baking! Cheesecake is all about patience and gentle handling, especially once that creamy filling goes in. Don’t rush things, and you’ll get that gorgeous, velvety slice. If you want to see a truly spectacular, low-stress cheesecake, you absolutely must check out my tutorial on Japanese Cheesecake—it’s a whole different world, but the patience lesson remains the same!
Preparing and Baking the Pistachio Crust
First things first: turn that oven on to 350°F (175°C). Grab your 9-inch springform pan and wrap the outside bottom and sides completely with heavy-duty aluminum foil. This protects it when we dunk it in water later! In a bowl, mix up your graham crumbs, those lovely chopped pistachios, the 1/4 cup of sugar, and the melted butter until it looks like wet sand. Press it down firmly into the bottom of that foil-wrapped pan. Pop it in the oven and bake it for exactly 10 minutes. Then, pull it out and just let it hang out and cool down a bit while you make the filling.
Mixing the Cream Cheese Batter
This is where we build the smoothness! Get that softened cream cheese in your mixer and beat it until it’s perfectly creamy and smooth—no lumps allowed. Now, gently beat in the 1 1/2 cups of sugar until it’s just combined, then the vanilla. Here’s the big warning: Add those four eggs one at a time! Mix only until each egg disappears into the batter. If you overmix once the eggs are in, you’re whipping in too much air, and that’s how you get those awful cracks on top. Finally, gently stir in the sour cream by hand. Pour that gorgeous mixture right over your cooled crust.
Baking the Raspberry Pistachio Cheesecake with a Water Bath
The water bath is non-negotiable if we want a creamy, crack-free Raspberry Pistachio Cheesecake. It creates steam in the oven, which cooks the cheesecake softly and evenly. Place your foil-wrapped springform pan inside a larger roasting pan. Then, carefully pour hot water into the roasting pan until it comes halfway up the side of the springform pan. Slide the whole setup into the oven and bake for about 50 to 60 minutes. You want the edges set firm, but the center should still have a tiny, slight jiggle, like perfect Jell-O. Turn the oven OFF, prop the door open a tiny bit, and let it cool down slowly in that warm environment for a full hour. This slow descent from heat is the second secret to saving it from cracking!

Chilling and Creating the Raspberry Topping
Once that hour is up, carefully remove the cake from the water bath and let it cool completely on a wire rack. Then, wrap it up tight and stick it in the fridge for at least six hours, but honestly, overnight is the best. While that’s chilling, make the topping simply. Gently mash the raspberries, lemon juice, and the 2 tablespoons of topping sugar in a small saucepan. Heat it over medium heat for about 5 minutes until the sugar dissolves and the berries just start to break down. You want them slightly soft, not completely pureed. Let this topping cool down to room temperature—or even chill it—before spreading it over your perfectly cold cheesecake. That’s it! Pure magic.
Tips for the Best Raspberry Pistachio Cheesecake Results
Listen, even with the water bath, sometimes cheesecakes decide they want to look like the surface of the moon! I’ve got a few tried-and-true methods that help me guarantee a perfect slice every single time. It’s all about gentle handling, really, from start to finish.
Here are my non-negotiable secrets for a flawless Raspberry Pistachio Cheesecake:
- Never skip letting those eggs and cream cheese come up to room temperature. Cold cream cheese fights the sugar, which forces you to overmix, and that brings the cracks. Seriously, don’t cheat this step!
- Use a thin, sharp knife dipped in hot water to cut the slices. Wipe the knife clean between every cut. This gives you those beautiful, clean edges you see in magazines instead of a messy crumble.
- Remember that slow cooling process inside the turned-off oven? That’s essential. If you yank it out the second you turn the heat off, the sudden temperature drop guarantees a sinkhole in the middle.
If you’re ever interested in a faster dessert and want to skip the baking and chilling altogether, you have to see my guide to amazing no-bake cheesecake recipes!
Storing and Serving Your Raspberry Pistachio Cheesecake
Okay, you’ve wrestled the perfect Raspberry Pistachio Cheesecake into the fridge, and now it’s beautifully set. The eternal question is: how do I keep it perfect until dessert time?
The best advice I can give you is to plan ahead; cheesecake really wants to be served cold. I know sometimes we get impatient, but trying to speed this up usually just ends in disaster. Seriously, the overnight chill is where the texture locks in and becomes absolutely heavenly.
Keeping It Fresh Until Serving Day
When it comes to storage, you need to protect that beautiful raspberry topping from drying out or picking up any weird smells from your fridge. Make sure the cheesecake is completely chilled before you cover it. I usually place strips of plastic wrap loosely over the top, making sure it doesn’t touch the raspberry layer if possible. If I’m storing it for a couple of days, I’ll sometimes use a cake carrier with a lid because it provides better structure than just cling wrap.
It lasts wonderfully in the refrigerator for about four to five days. But forget about reheating this! Cheesecakes are not meant to be warmed up; they lose all that gorgeous density and just turn into a puddle of sweet goo. Lean into the cold, creamy goodness.
The Secret to the Perfect Slice
Slicing this beauty is almost an art form, especially when you’re dealing with that luscious raspberry topping. If you just saw through it straight away, the topping smears, and the sides look messy. You want those clean restaurant-quality slices, right?
Here’s my trick, which is super simple: The hot knife technique! You need a really tall, thin knife—a carving knife works great. Before you cut, fill a tall glass with steaming hot water. Dip your knife deep into the hot water for about 15 seconds. Pull it out, use one smooth, even downward press to slice through the cheesecake, and then immediately wipe the blade clean and dry with a paper towel before you dip it again. See? Hot water cleans off the sticky raspberry topping and makes the creamy filling cut like butter. It seems like extra work, but trust me, it makes presentation 100 times better!
Raspberry Pistachio Cheesecake Variations
Once you’ve mastered the core recipe—and trust me, you will, because it’s foolproof once you nail that water bath—you might start feeling a little adventurous. That’s the way I feel every time I make this! The base is so sturdy and flavorful, it just begs for little twists and turns.
Don’t worry about sticking strictly to the recipe card; that’s just the starting point in my kitchen. If you feel like shaking things up but still want that gourmet feel, try one of these quick modifications. We’re keeping things elegant, but with a fun flair. You know, if you’re into other fantastic nutty flavors, you simply must check out my post on decadent hazelnut recipes for more inspiration!
Swapping Out the Nuts for an Almond Twist
Love the nuttiness but maybe you’re out of pistachios or just want a different vibe? Don’t panic! You can totally swap out the star of the crust. Almonds work absolutely beautifully here, giving the crust a slightly sweeter, warmer tone than the bright, earthy pistachio.
Just use finely chopped, blanched almonds instead of pistachios in the crust mixture. You might even want to toast them very lightly in a dry pan for about five minutes before mixing them with the crumbs—it brings out such a nutty depth! If you go this route, you could even toss a handful of sliced almonds into the raspberry topping right before you cook it; they soften up just enough to add a little textural surprise.
Adding White Chocolate to the Cream Cheese Layer
This variation is for my friends who think cheesecake can never be decadent enough! Adding white chocolate is heaven, because it complements both the raspberry tang and the pistachio base so nicely.
Here’s how I do it: Take about four ounces of good quality white chocolate chips. You need to melt them gently—either over a double boiler or in the microwave in short 20-second bursts, stirring in between, because white chocolate burns faster than you can say “cheesecake.” Once it’s perfectly smooth, stream it into the cream cheese batter right after you’ve mixed in the sour cream, but *before* you add the eggs. Mix slowly, just until it’s incorporated. It adds incredible richness and helps the center set up even firmer.
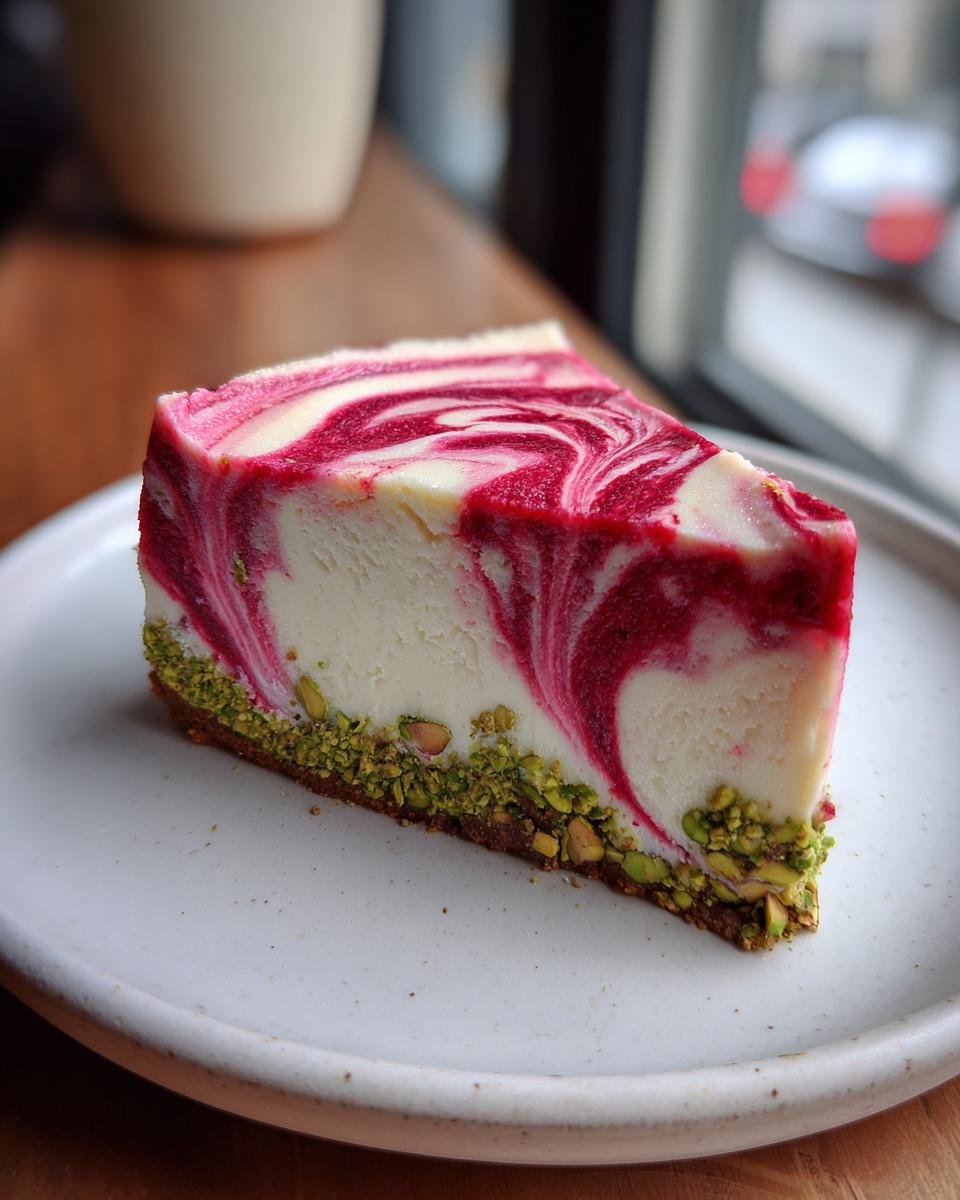
A Swirl Instead of a Topping
Sometimes I don’t want to wait for the cheesecake to chill fully before I can eat it—I know, I know, terrible patience! Swirling the fruit right into the batter means you don’t have to wait for that six-hour chill to get your fruit fix. This is great for texture, too!
Instead of making the cooked topping, take about half a cup of those fresh raspberries (you can mash them slightly or leave them whole) and drizzle them right over the top of the filling when you pour it into the crust. Take a skinny butter knife and gently swirl the berries down into the top layer of the batter—don’t push them all the way to the bottom! This gives you beautiful pink ribbons throughout the slice. Bake as normal, and then when you serve it, you can just dust the top with a little powdered sugar instead of the cooked jam topping.
Frequently Asked Questions About Raspberry Pistachio Cheesecake
I get so many questions when I post pictures of this stunning Raspberry Pistachio Cheesecake, so let’s tackle the most common ones right here! If you’re nervous about baking this for the first time, all your fears are about to be calmed down. Don’t hesitate to experiment once you get the basic method down, but read these first!
Can I make this cheesecake without a water bath?
Oh, honey, I really, truly wish I could tell you yes, but the answer is no, not if you want a silky smooth, crack-free cheesecake! The water bath is the entire reason this recipe stays so creamy and moist. Without that steam envelope, the edges bake way too fast while the middle is still liquid, guaranteeing a big crack right down the middle when it cools. You have to wrap that springform pan well and give it a nice, hot, steamy bake!
What kind of pistachios are best for the crust?
Make sure you are using raw, unsalted, shelled pistachios. If you use salted ones, your crust will end up way too savory and it fights the sweetness of the filling. Also, make sure they are chopped finely, not ground into a dust, but small enough pieces so they pack well into the bottom with the graham cracker crumbs. This gives you that perfect nutty crunch in every bite!
How far in advance can I make this Raspberry Pistachio Cheesecake?
This is a fantastic dessert for parties because you *have* to make it ahead of time! I find that the flavor actually deepens beautifully overnight. The minimum chilling time is six hours, but I always aim to have the finished, topped cheesecake ready the day before I plan to serve it. It stores perfectly covered in the fridge for up to five days, so you can totally get ahead of your hosting duties!
My batter broke after I added the eggs—can I save it?
If your batter looks a little separated or curdled after adding the eggs, don’t panic! It usually means your cream cheese either wasn’t soft enough, or you mixed the eggs in too aggressively. Try turning your mixer speed down to the absolute lowest setting and just gently fold it together for about 30 seconds. If it doesn’t come back together quickly, just go with it. The water bath is very forgiving! It usually bakes just fine, though you might have a slightly less perfect texture than mine.
Can I use frozen raspberries for the topping?
Yes, you absolutely can use frozen raspberries for the topping! They actually often work better than fresh ones because they give up their juices much faster when heated. Just toss the frozen berries in the saucepan with the lemon juice and sugar and it should cook down in just about the same amount of time. You might have to stir them a little more vigorously at the start to break up the ice crystals.
Estimated Nutritional Information for Raspberry Pistachio Cheesecake
Look, I am not a nutritionist, okay? I’m in the kitchen covered in cream cheese and raspberry stains! But for those of you who like to track things, I pulled the estimates from my recipe card for serving size. Honestly, who is counting calories when they are eating homemade cheesecake, am I right? Ha!
This section gives you a general idea of what’s in one generous slice of this decadent Raspberry Pistachio Cheesecake based on the recipe structure. Keep in mind that if you use full-fat sour cream or different types of nuts, these numbers will certainly shift a bit.
Here are the general estimates per serving:
- Serving Size: 1 slice
- Calories: 420
- Fat: 28g (Mind that saturated fat—it’s the cream cheese working hard!)
- Carbohydrates: 38g
- Sugar: 35g (A little indulgence never hurt anybody!)
- Protein: 8g
- Sodium: 250mg
- Cholesterol: 85mg
This is definitely a treat, not an every-day breakfast! I always tell people to just enjoy every single creamy, nutty, tart bite. These values are just estimates, so if you bake it, the actual nutrition depends on the brands and exact measurements you use. Happy indulging!
Share Your Raspberry Pistachio Cheesecake Experience
Well, folks, we made it! We’ve gone from crunching pistachios for the base to drizzling that sweet raspberry topping over a perfectly chilled slice of Raspberry Pistachio Cheesecake. I truly hope you’ve got a piece cooling in the fridge right now because I can’t wait for you to taste it!
Baking is always better when you share the results, don’t you think? I get so much joy seeing photos of your creations in my inbox or on social media. It reminds me that these recipes live on outside of my kitchen, and that’s the best feeling in the world.
So, after you’ve dug into that creamy, nutty perfection, I need to hear about it! Did the water bath work miracles for you? Did you try swapping in those almonds, or maybe you went full-on white chocolate crazy like I suggested?
Please, please, please leave me a star rating right below this section. A five-star rating means I can rest easy knowing I sent you off with the best recipe possible! And if you have any modifications, questions, or just want to gush about how amazing that pistachio crust was, use the comments section!
If you have photos you want to send me directly, or if you just need to get in touch about a specific baking emergency, you can always reach out through my contact page. Happy baking, and I can’t wait to see your gorgeous cheesecakes!
Print
Raspberry Pistachio Cheesecake
- Total Time: 7 hours 25 min
- Yield: 12 servings 1x
- Diet: Vegetarian
Description
A baked cheesecake featuring a pistachio crust and a fresh raspberry topping.
Ingredients
- 1 1/2 cups graham cracker crumbs
- 1/2 cup finely chopped pistachios
- 1/4 cup granulated sugar
- 6 tablespoons unsalted butter, melted
- 3 (8 ounce) packages cream cheese, softened
- 1 1/2 cups granulated sugar
- 1 teaspoon vanilla extract
- 4 large eggs
- 1/2 cup sour cream
- 1 cup fresh raspberries
- 1 tablespoon lemon juice
- 2 tablespoons granulated sugar (for topping)
Instructions
- Preheat your oven to 350 degrees F (175 degrees C). Wrap the outside of a 9-inch springform pan with heavy-duty aluminum foil.
- Combine graham cracker crumbs, chopped pistachios, 1/4 cup sugar, and melted butter in a bowl. Press the mixture firmly into the bottom of the prepared springform pan. Bake for 10 minutes. Remove from oven and let cool slightly.
- Beat the softened cream cheese with 1 1/2 cups sugar until smooth. Mix in the vanilla extract. Beat in the eggs one at a time, mixing just until combined after each addition. Stir in the sour cream.
- Pour the cream cheese mixture over the cooled crust. Place the springform pan in a larger roasting pan. Pour hot water into the roasting pan until it reaches halfway up the sides of the springform pan (water bath).
- Bake for 50 to 60 minutes, or until the edges are set and the center has a slight jiggle. Turn off the oven, prop the door open slightly, and let the cheesecake cool in the oven for 1 hour.
- Remove the cheesecake from the water bath and cool completely on a wire rack. Refrigerate for at least 6 hours, or preferably overnight.
- For the topping, gently combine raspberries, lemon juice, and 2 tablespoons sugar in a small saucepan. Cook over medium heat for about 5 minutes until the sugar dissolves and the berries soften slightly. Cool completely before serving.
- Spread the cooled raspberry topping over the chilled cheesecake before slicing and serving.
Notes
- Use unsalted, shelled pistachios for the best flavor in the crust.
- Do not overmix the batter once the eggs are added to prevent cracking.
- The water bath helps the cheesecake bake evenly and keeps it moist.
- Prep Time: 25 min
- Cook Time: 60 min
- Category: Dessert
- Method: Baking
- Cuisine: American
Nutrition
- Serving Size: 1 slice
- Calories: 420
- Sugar: 35g
- Sodium: 250mg
- Fat: 28g
- Saturated Fat: 16g
- Unsaturated Fat: 12g
- Trans Fat: 0g
- Carbohydrates: 38g
- Fiber: 1g
- Protein: 8g
- Cholesterol: 85mg
Keywords: cheesecake, raspberry, pistachio, baked dessert, cream cheese