
Listen up, because if you’re anything like me, sometimes you just need that massive sugar rush, and you need it fast—without turning on the oven! Cooking should be fun, not a 3-hour commitment, right? Well, I finally nailed the ultimate no-bake dessert that just screams decadent: this incredible Butterfinger Pie.
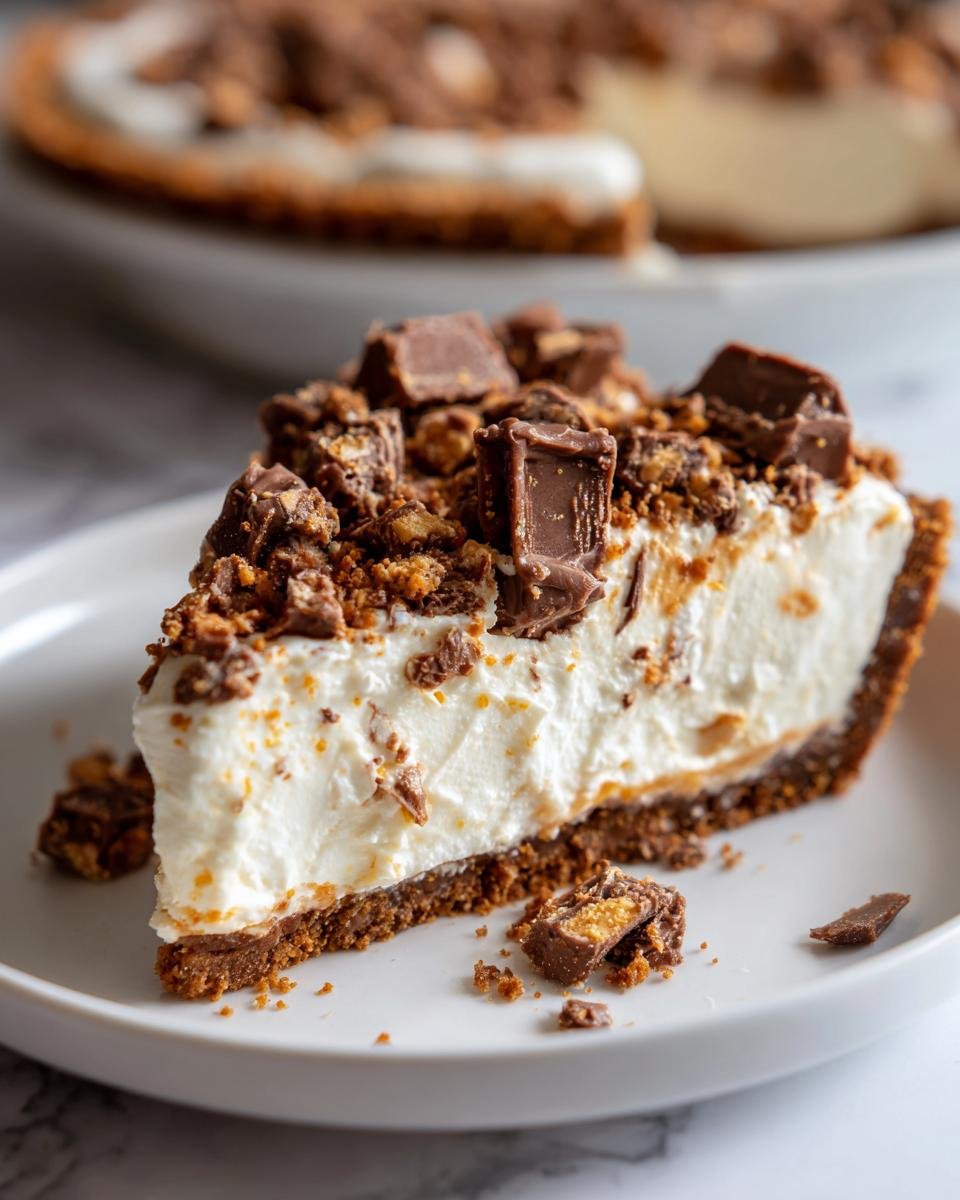
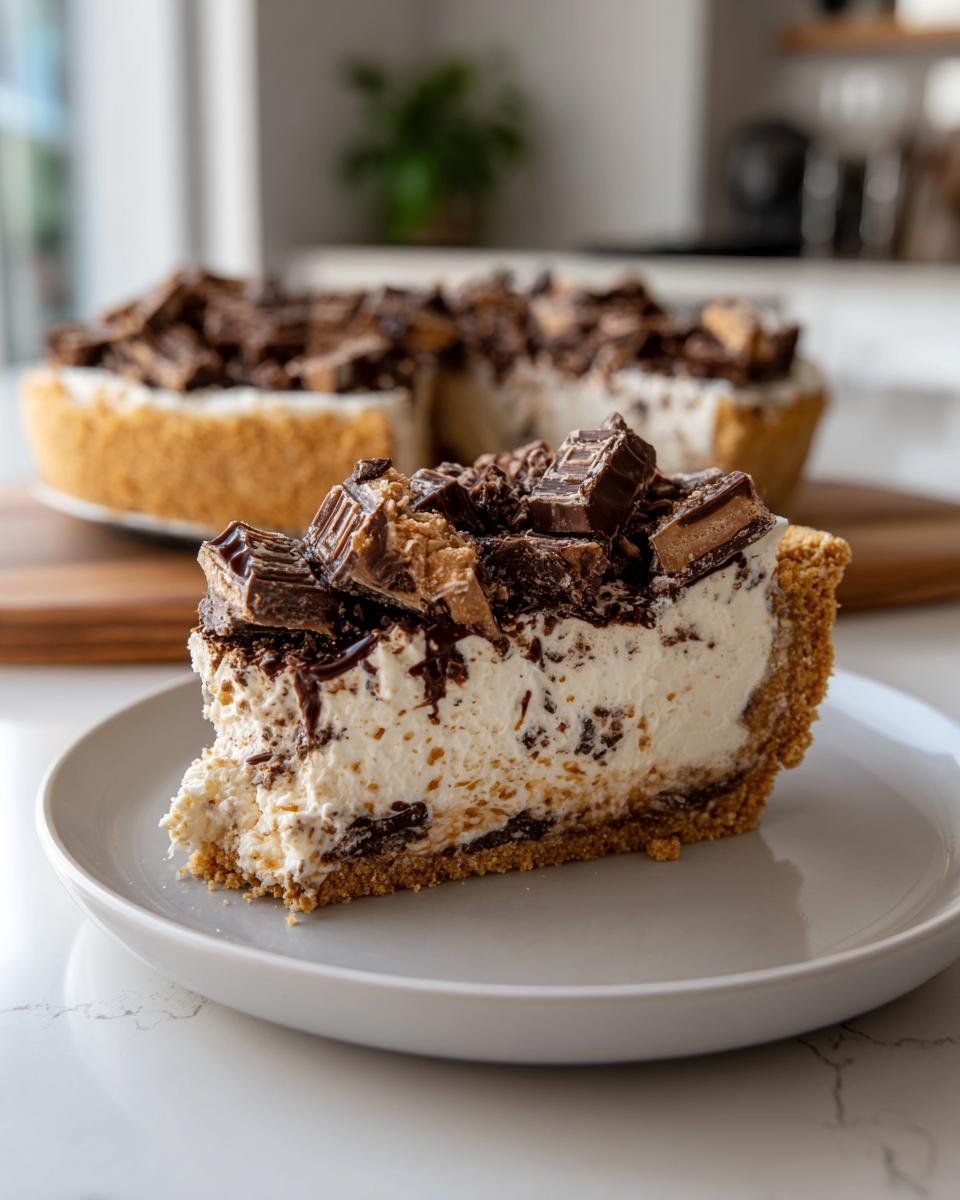
This isn’t some flimsy, watery pie, either. Oh no. We’re talking a truly crunchy, peanut butter candy crust hugging the creamiest filling you’ve ever dipped a spoon into. Every time I make this for a gathering, I get asked for the recipe about fifty times. I’ve tweaked the ratios on the cream cheese versus the whipped topping dozens of times over the past few years, trust me, I have this locked down.
The magic, as always, is in the texture—that perfect collision between the salty, sweet crunch of the Butterfinger bits and that silky, vanilla-laced filling. If you want people obsessing over your dessert at the potluck, this is the one. It’s foolproof!
Why You Will Love This Easy Butterfinger Pie
Honestly, who has time for fussy baking when you can whip this up? This Butterfinger Pie is one of those desserts that you’ll find yourself making on a whim because it’s just so darn easy. Here’s why it’s earned a permanent spot in my rotation:
- Seriously No-Bake: That’s right—no oven required! You just need a little patience while it chills, but absolutely no baking means zero stress on a hot summer day.
- The Ultimate Crowd-Pleaser: Seriously, who doesn’t love peanut butter and sweet, crunchy candy? It disappears at every single party, guaranteed.
- Prep in Under 20 Minutes: Once you have your ingredients lined up, getting this mixed and into the fridge takes practically no time at all. It’s my go-to for last-minute entertaining.
- Perfect Texture Balance: It has everything! That sturdy, slightly salty cookie crust, the cloud-like smooth cream cheese filling, and the amazing crackle of the crushed candy bars on top. It’s a textural party in a slice!
- It Pairs Perfectly with Other Easy Treats: If you’re planning a big spread, this is great alongside something lighter, like my No-Bake Funfetti Oreo Icebox Cake when you need a quick second dessert option!
Essential Ingredients for Your Butterfinger Pie
Okay, ingredient prep is the only real work involved here, and that’s saying something for a dessert this good! Because this is a no-bake showstopper, every ingredient matters. If you’re trying to cut corners here, you’re going to end up with a floppy mess. Trust me, I learned that the hard way in my earlier attempts at this Butterfinger Pie. You absolutely need that full-fat cream cheese—don’t even look at the low-fat stuff—and make sure your whipped topping is fully thawed!
If you’re looking for other amazing ways to use that cream cheese, you have to check out my recommendations for 10 Irresistible Cream Cheese Recipes!
For the No-Bake Crust
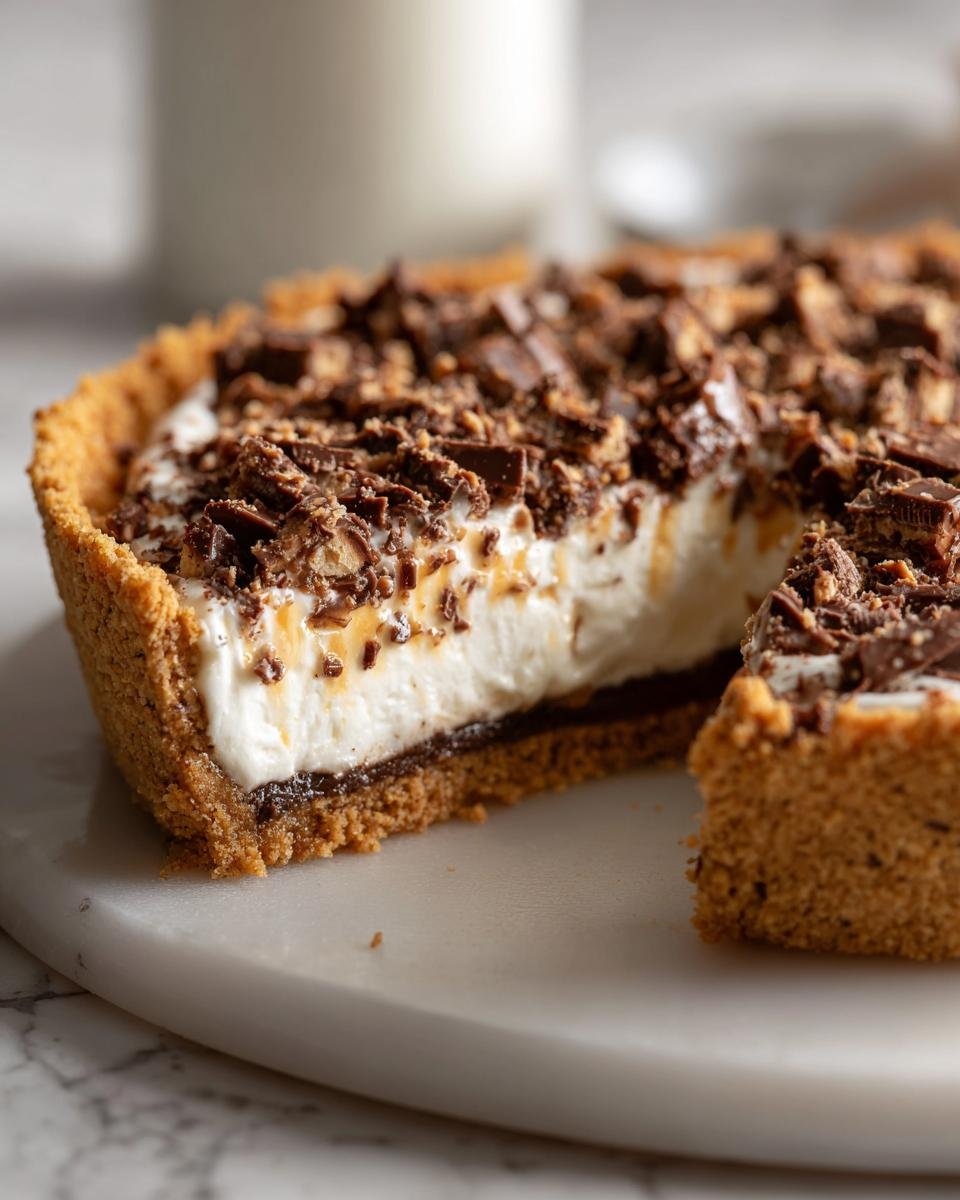
We need just two things here to build a sturdy base. You need 1 1/2 cups of shortbread cookies, crushed up finely, mixed with half a cup of good unsalted butter, melted down smooth. This combination sets up perfectly in the fridge.
For the Creamy Filling
This is where that silky texture comes from! Grab 1 cup of powdered sugar, 8 ounces of cream cheese that’s softened up nicely (room temp is key here!), 1 teaspoon of vanilla extract, and one 12-ounce container of frozen whipped topping that has been completely thawed.
For the Topping
The star of the show! You just need 1 cup of Butterfinger candy bars, all crushed up into varying sizes. We want chunks and smaller bits for the perfect bite!
Step-by-Step Instructions to Make Butterfinger Pie
This is where everything comes together! Since this is a no-bake creation, the most important thing you need is patience while it chills. If you rush the chilling, you risk a sloppy slice, and we absolutely do not want that for this majestic Butterfinger Pie. Follow these steps exactly, and you’ll have a perfect slice ready in a few hours.
Preparing the Crust and Chilling
First things first, let’s build our foundation. In a bowl, you’re going to mix up those crushed shortbread cookies and the melted butter until everything is evenly coated—it should look like wet sand. Then, press that mixture firmly into the bottom of your 9-inch pie plate. Make sure you push it up the sides a little bit to make a nice wall for the filling! Once it’s packed tight, pop that crust into the fridge for a good 30 minutes. It needs that time to firm up before we add the good stuff.
Creating the Smooth Cream Cheese Filling
While the crust chills, we make the filling! Grab your stand mixer (or just use a regular hand mixer—no need to be fancy) and beat the powdered sugar, softened cream cheese, and vanilla extract together. You are looking for absolutely smooth here; no lumps allowed! Scrape down the sides a couple of times until it’s totally silky. Now, here comes the delicate part: the whipped topping. You need to fold this in gently—and I mean gently. Use a spatula and cut down through the center and sweep up the side of the bowl. We’re trying to keep all those airy bubbles in the topping, so slow, deliberate folding is crucial to maintain volume in your filling.
Assembling and Chilling the Butterfinger Pie
Once the crust is nice and firm, take it out. Carefully spread that beautiful, creamy filling evenly right over the chilled crust. Try not to press down hard! Then, it’s time for the grand finale: sprinkle those gorgeous crushed Butterfinger candy bars all over the top layer. Now, this is the step that separates the impatient from the happy eaters: you must chill this pie for a minimum of four hours. Seriously, set a timer! It needs that time to fully set up so that when you slice into this no-bake dessert, it holds its shape perfectly. If you need something quick to enjoy while you wait, check out my recipe for the Ultimate Chocolate Milkshake Delight!

Tips for the Best Ever Butterfinger Pie
Honestly, once you get the basic assembly down, this Butterfinger Pie is almost impossible to mess up, but a few little secrets from my testing trips sure make the results more consistent! I want yours to be perfect the first time you try it because life is too short for mediocre desserts.
I always keep a bag of peanut butter chips handy when I make cookies, though, like these Irresistible Peanut Butter Chocolate Chip Cookies, so I know how important those little extras are!
The main thing people ask me about is substitutions and crushing technique. Let’s talk about getting that perfect texture!
Swapping out the Shortbread Cookies
While I absolutely adore the buttery flavor shortbread brings to the crust, if you don’t have any on hand, please don’t panic! You can easily substitute the shortbread cookies with an equal amount of graham crackers. That works great, or even vanilla wafers if those are what you have stored away. Just make sure whatever cookie you choose is crushed down really fine—you want that mixture to pack together tightly.
Mastering the Butterfinger Crush
So, you need crushed bars, but how do you get that perfect mix of powdery dust and crunchy chunks? I have two main methods, depending on how much I want to clean up afterward. If I’m feeling energetic, I throw those candy bars directly into the food processor and pulse them a few times until I see the size I like. Watch carefully, though; they go from chunky to dust in about two seconds! Oops!
My favorite low-mess trick is to put the candy bars into a sturdy, resealable Ziploc bag. Seal that thing tight—you don’t want dust flying everywhere when you start hitting it! Then, grab your rolling pin or even the bottom of a heavy saucepan and just go to town smacking them until they break down. This method gives you a slightly more varied texture, which I personally love for this peanut butter candy pie.
The Secret to Dealing with Cream Cheese Temperature
Remember how I emphasized using softened cream cheese? I want to stress that again! If your cream cheese is too cold, when you mix it with the powdered sugar, you end up with little hard clumps that refuse to blend into the smooth filling. Seriously, take it out about an hour before you plan to start. It needs to be soft enough that you can easily press a finger into it without resistance. That ensures a totally uniform, velvety texture in your finished pie.
Storing and Reheating Your Butterfinger Pie
Since this is a fantastic no-bake masterpiece built on cream cheese and whipped topping, we have to store it carefully. You can’t reheat this baby—it’s meant to be served cold straight from the fridge! But keeping it fresh is super important so that crust stays crisp and the filling stays firm.
Once your gorgeous Butterfinger Pie has chilled for those four hours and you’ve finished devouring the first slice, cover the pie plate tightly with plastic wrap. Be careful not to let the plastic touch the crushed Butterfinger topping, or it’ll stick! You can usually get away with just tucking the wrap around the edges.
This pie keeps wonderfully in the refrigerator for up to three days. Honestly, it rarely lasts that long in my house, but I know sometimes you need to prep dessert ahead of time! Don’t even think about leaving it out on the counter; that cream cheese filling will destabilize fast, trust me on this one.
Now, can you freeze it? Yes, but with a little caveat. Freezing is better if you leave the top layer unsprinkled. For the best results with this Butterfinger Pie, cover the filled, un-topped pie tightly and freeze it for up to a month. When you decide it’s time to eat it, thaw it in the fridge overnight, and then add your crushed Butterfingers right before serving. That keeps that top layer totally crunchy!
Butterfinger Pie Serving Suggestions
Phew! After all that delicious peanut butter and sugar, you’ll need something to wash down your slice, right? This is a decadent, rich dessert, so you don’t need much to go with it, honestly. When I serve this Butterfinger Pie, I usually aim for simplicity because the pie is doing all the heavy lifting!
When you cut this, you should get about 8 lovely slices—a perfect yield for a family gathering or a small party. Remember, a little slice goes a long way because it’s packed with flavor!
My absolute favorite pairing is a strong, hot black coffee. The slight bitterness of the coffee just cuts through the intense sweetness of the cream cheese and the candy, making every bite taste like the first. Don’t forget, if you need a cold drink to chase it down, check out my recipe for the Ultimate Chocolate Milkshake Delight—it’s great for the kids while the adults sip their coffee!
If coffee feels too intense, a very light, slightly tart fruit garnish can be amazing on the side of the plate. Think a few raspberries or maybe some thin slices of kiwi. Don’t put fruit *on* the pie, though; we want those beautiful Butterfingers to shine! Just a tiny bit of fresh fruit on the plate offers a nice visual contrast and a little palate cleanser between rich forkfuls.
Serve it chilled, grab a sturdy fork, and get ready for the compliments to start rolling in!
Frequently Asked Questions About This No-Bake Butterfinger Pie
It’s funny how many questions pop up when something is this easy! People sometimes overthink no-bake recipes, but I promise, this Butterfinger Pie is straightforward. If you’ve got questions about substitutions or timing, I’ve got answers based on the many times I’ve tested this recipe!
Can I use a different cookie for the crust in this Butterfinger Pie?
Absolutely, you can! Like I mentioned earlier, I prefer the buttery snap of shortbread cookies, but if you’re missing those, you have other great options. Graham crackers work wonderfully; they give the crust a slightly different, slightly saltier snap that is delicious. Vanilla wafers are another excellent choice if you want a super sweet and mild base. Just make sure you crush them down as finely as you can before mixing them with the melted butter!
How far in advance can I make this no-bake dessert?
This is the beauty of a no-bake dessert—you can totally make it ahead for parties! If you assemble the entire pie—crust, filling, and topping—and then stick it in the fridge, it’s usually best served within 24 hours. Why? Because that crust starts to absorb moisture from the filling over time. If you are making it further out, say 2-3 days ahead, I strongly recommend that trick I shared about leaving the Butterfinger crunch off until the very last minute. That keeps the crust really crisp!
What is the best way to crush Butterfinger bars?
You have two solid paths here, and it really depends on how much you hate washing dishes! For the quickest cleanup, I use my food processor. You just pulse it a few times! But watch it like a hawk, because those candies go from slightly broken to a fine powder instantly, and we actually want some texture in our peanut butter candy pie. If you don’t want to dirty the processor, put the bars in a heavy-duty, sealed plastic bag and just whack them with a rolling pin or a meat tenderizer. Either way, you get that great mix of chunky bits that make the topping awesome.
If you’re looking for another simple, make-ahead treat that involves chilling rather than baking, you should definitely take a peek at my Irresistible No-Bake Cherry Cheesecake Recipe!
Estimated Nutritional Snapshot for Butterfinger Pie
Since this is a rich, indulgent dessert, I always like to have a general idea of what we’re dealing with when someone asks for a second piece! Now, please remember, this is just an estimate based on the standard ingredients I used in my recipe, so your mileage might vary depending on the brands you grab.
I always look at the nutrition facts after I’ve served it up, just so I know what I’m in for. This recipe makes 8 generous servings, and here’s what I estimated for one slice of this gorgeous, creamy Butterfinger Pie:
- Calories: Hovering right around 380 calories. Worth it, every single time!
- Sugar: About 30 grams of sweet goodness here, mostly thanks to the candy and powdered sugar.
- Fat: You’re looking at about 24 grams of total fat, which includes 13 grams of saturated fat—that’s why we use the real cream cheese!
- Carbohydrates: Roughly 38 grams, coming from the crust and the filling base.
- Protein: A small boost of about 5 grams, primarily from the dairy components.
It’s definitely a treat, not an everyday snack, but that’s what makes it so special when you decide to indulge! Enjoy every bit of this amazing no-bake dessert!
Share Your Delicious Butterfinger Pie Creations
Whew! That’s the whole process for turning simple ingredients into the best Butterfinger Pie you’ve ever tasted. I’m so excited for you to try this recipe because it truly is a winner every single time. I really hope it becomes a staple for your quick dessert needs!
Now that you’ve made it, I want to see how they turned out! Did you decorate the top differently? Did you manage to stick to the 4-hour chilling time (or did you sneak a bite early)?
Please, if you loved this recipe as much as my family does, hop over to the comments section and leave me a star rating! Even better, take a picture of your beautiful, creamy, crunchy pie and tag me on social media. I absolutely love seeing your results! If you have any specific questions, you can always reach out to me directly through my contact page, too. Happy baking—or should I say, happy *no-baking*!
Print
Butterfinger Pie
- Total Time: 4 hr 20 min
- Yield: 8 servings 1x
- Diet: Vegetarian
Description
A simple, no-bake pie featuring a crunchy peanut butter candy crust and a creamy filling topped with crushed Butterfinger bars.
Ingredients
- 1 1/2 cups crushed shortbread cookies
- 1/2 cup unsalted butter, melted
- 1 cup powdered sugar
- 8 ounces cream cheese, softened
- 1 teaspoon vanilla extract
- 1 12-ounce container frozen whipped topping, thawed
- 1 cup crushed Butterfinger candy bars
Instructions
- Mix crushed cookies and melted butter. Press mixture into the bottom and up the sides of a 9-inch pie plate. Chill for 30 minutes.
- Beat powdered sugar, softened cream cheese, and vanilla extract until smooth.
- Fold in the thawed whipped topping gently.
- Spread the cream cheese mixture evenly over the chilled crust.
- Sprinkle the crushed Butterfinger candy bars over the top layer.
- Chill the pie for at least 4 hours before slicing and serving.
Notes
- You can substitute graham crackers for shortbread cookies if desired.
- Crush the candy bars using a food processor or by placing them in a sealed bag and crushing them with a rolling pin.
- Prep Time: 20 min
- Cook Time: 0 min
- Category: Dessert
- Method: No-Bake
- Cuisine: American
Nutrition
- Serving Size: 1 slice
- Calories: 380
- Sugar: 30
- Sodium: 250
- Fat: 24
- Saturated Fat: 13
- Unsaturated Fat: 11
- Trans Fat: 0.5
- Carbohydrates: 38
- Fiber: 1
- Protein: 5
- Cholesterol: 45
Keywords: Butterfinger pie, no-bake dessert, peanut butter candy pie, cream cheese pie