
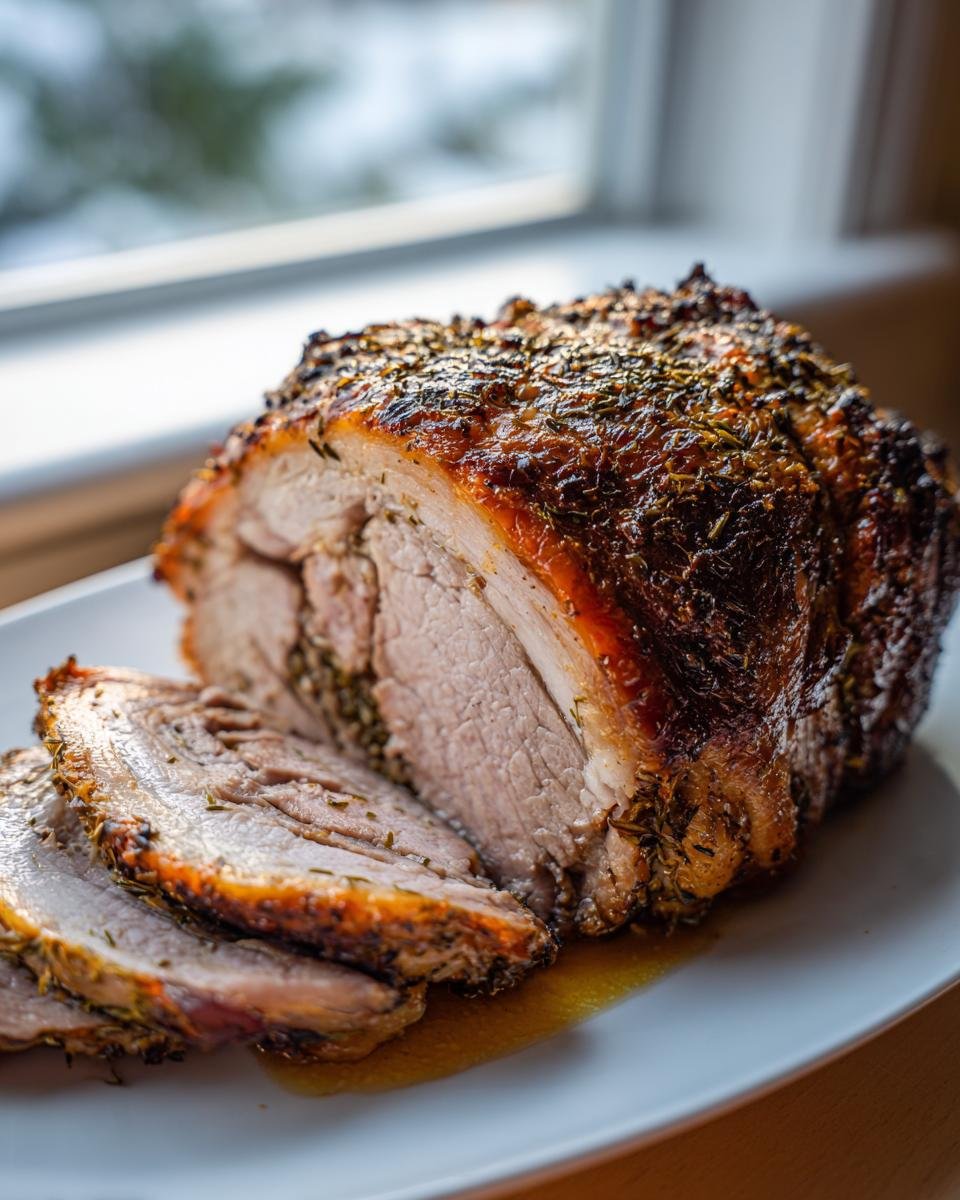
Oh, the Italian kitchen! It’s all about taking simple, incredible ingredients and treating them like royalty, isn’t it? Forget everything you think you know about fussy Sunday roasts, because I’ve cracked the code on the *ultimate* centerpiece meal that genuinely isn’t that hard: the Simple Porchetta Roast. When you pull this out of the oven, I promise you; that loud, shatteringly crisp crackle sound the skin makes? That’s the sound of victory, my friend. It’s pure magic!
I remember the first time I tried to roll one of these big slabs of pork belly, I nearly enlisted my husband just because I couldn’t get the initial twist right. But trust me, once you get the hang of rolling it tightly and securing it with kitchen twine, the rest is just glorious waiting. This recipe strips away the fussiness of the traditional method but keeps all the pungent, herbaceous flavor that makes a proper Italian roast pork so legendary. You absolutely need to try making your own porchetta at home; it makes everything else feel dull in comparison!
Why This Simple Porchetta Recipe Works So Well
I know what you’re thinking: Porchetta sounds like something only a very serious chef can tackle, right? Wrong! This recipe is designed to give you that show-stopping, incredible flavor without needing fancy equipment or a culinary degree. It’s all about working *with* the meat, not against it. When you get that perfect crispy chew, you’ll see why this porchetta will become your go-to special occasion roast. It’s so rewarding when it comes out perfectly.
Plus, the cleanup is surprisingly simple considering what you’re cooking. If you enjoy amazing roasts, you simply must check out this pork roast magic recipe; it shares a similar philosophy of building big flavor easily.
Achieving the Signature Crispy Skin on Your Porchetta
The secret to the crackling skin isn’t luck; it’s preparation and temperature control! You need to make sure the skin is bone-dry before you even think about seasoning it. Seriously, pat it down until you think it can’t get any drier. Then, we hit it hard and fast with a high temperature first. That blast of heat at 400°F? That’s what makes the skin puff up and turn into those wonderful crunchy blisters we crave in a perfect porchetta. Don’t skip that final crisping blast at the end, either!
Flavor Profile of This Italian Roast Pork
This isn’t a harsh, aggressive spice rub. It’s earthy and fragrant. We’re relying heavily on fennel—it’s what gives it that distinctly Italian flair. Coupled with the sharp scent of rosemary and the subtle herbaceousness of sage, you end up with a beautifully aromatic crust surrounding that rich, fatty pork. Smelling these herbs mixing together while it slowly roasts is honestly half the fun of making this Italian roast pork.

Essential Ingredients for the Perfect Porchetta
When it comes to glorious porchetta, you don’t need a sprawling grocery list. In fact, the beauty of this Italian roast pork is that the main star *is* the pork belly itself—and the skin attached to it! We need a nice, weighty piece, about five pounds, with the skin intact, because without that skin, you simply don’t get the crackling we worked so hard for.
For the flavor bomb, we’re using pungent stuff: crushed fennel seeds are non-negotiable, along with freshly ground black pepper and coarse salt. We’re adding the foundational Italian herbs—fresh rosemary leaves, roughly chopped, and sage leaves, also chopped. Don’t forget the garlic, minced up real fine so those little flavor bursts are evenly distributed!
Ingredient Notes and Substitutions for Porchetta
Listen, this is the most important thing: that pork belly *must* come equipped with skin. If you can’t find a good piece at your butcher, just ask! Tell them you’re making porchetta and need a five-pound slab with a fantastic layer of skin on top. They usually know exactly what you mean.
Now, about those herbs—fresh is truly best here. Rosemary and sage offer these bright, aromatic hits that really cut through the richness of the pork fat. If you are truly desperate and can’t find fresh, use dried herbs, but you’ll need to cut the amount way down—maybe one-third of what the recipe calls for—otherwise, your beautiful roast will taste dusty instead of dynamic.
Step-by-Step Instructions for Roasting Your Porchetta
Okay, now for the fun part where we turn that seasoned slab into the centerpiece of your dreams! This process is super straightforward, but you have to trust the timing, especially with those temperature shifts. We are essentially giving the meat a gentle cook initially and then blasting that skin for the crackle we talked about. If you’re planning ahead, you can actually make the spice rub and apply it the day before—just keep the meat uncovered in the fridge. That dry rub acts like a secret weapon for moisture management, which is fantastic for the final porchetta skin!
If you haven’t checked it out yet, this juicy grilled pork tenderloin recipe has some tips on meat handling that cross over nicely if you like learning methods that keep meat tender.
Preparing the Spice Rub for Porchetta
Grab a small bowl. We’re just mixing everything dry together. I mean, just toss in your crushed fennel seeds, your coarse salt, that freshly ground pepper, the minced garlic, your chopped rosemary, and the sage. Give it a good stir until it’s fragrant and evenly blended. Now, take your beautiful pork belly—and remember, this needs to be DRY—and rub that spice mix vigorously all over the flesh side. Don’t be shy; push it right into the meat!
Rolling, Tying, and Initial Roasting of the Porchetta
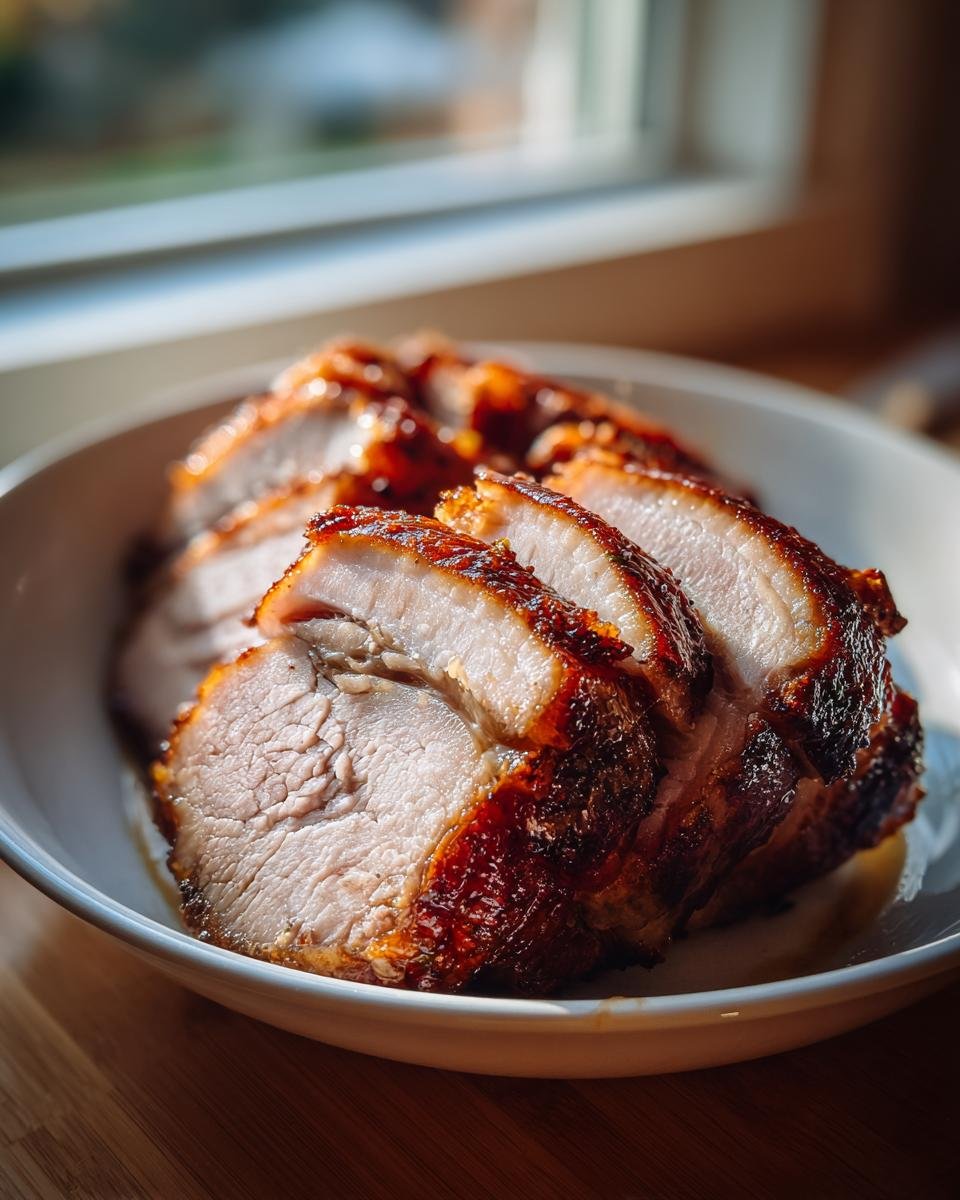
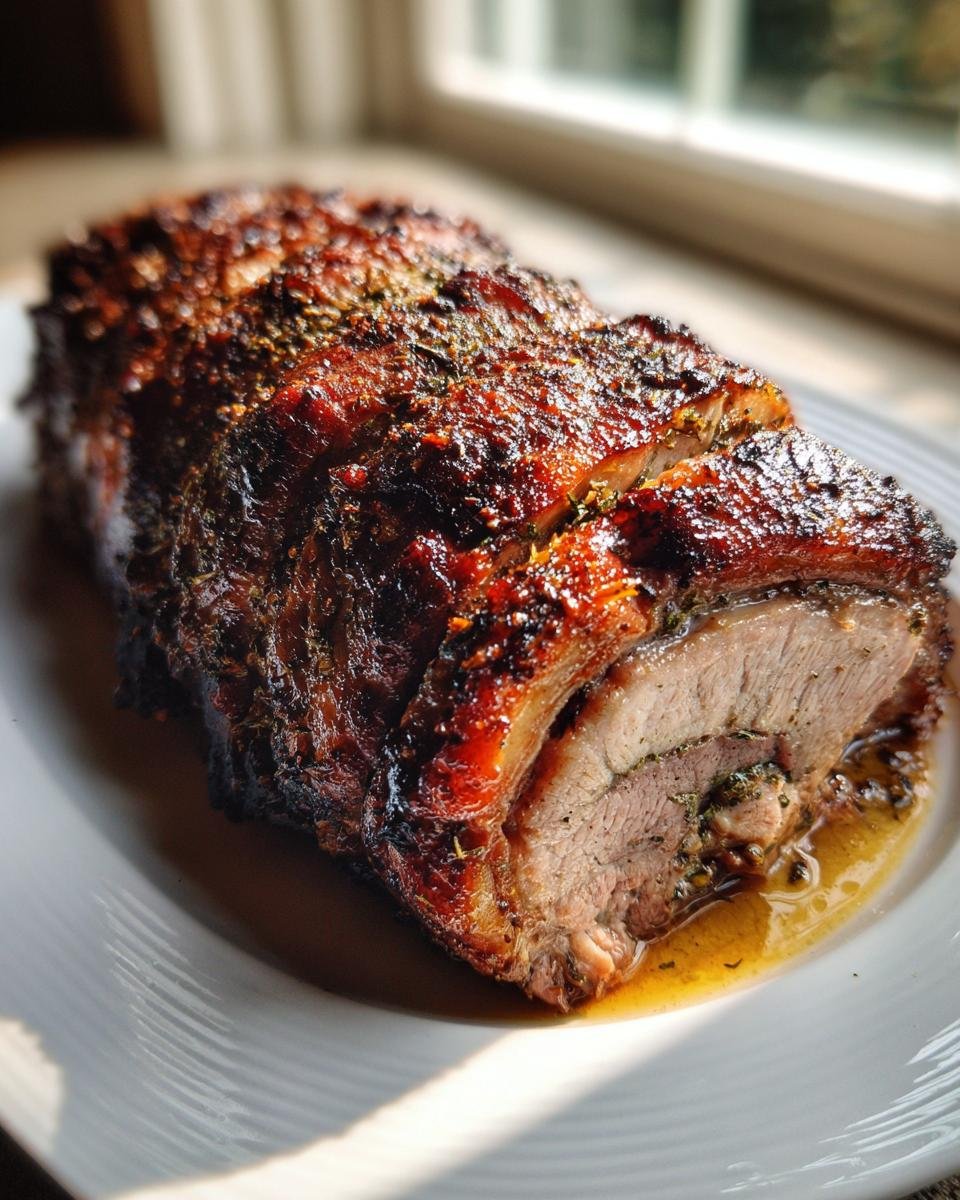
This is where your arm strength comes in, or maybe you just grab a helper! Starting from the rubbed side, you need to roll that belly up as tightly as you can into a cylinder, making sure that skin stays on the outside—that’s your crispy armor! Once it’s a tight log, you have to secure it. Take your kitchen twine and tie it firmly every inch and a half or so. Keep those knots snug! Place your tied porchetta seam-side down onto a rack set inside a roasting pan. Now, get that oven hot—preheat it to 400°F. We roast it here for exactly one hour.
Low and Slow Cooking Followed by the Crisping Stage
After that initial hour, you need to lower the heat immediately. Bring the oven down to 325°F. This is the phase where the fat renders beautifully and the meat cooks gently. Let it hang out in there for about two and a half to three hours. You’re aiming for an internal temperature of 150°F in the thickest part. Don’t pull it out early! Once that temperature is hit, stand back, turn the oven way up to 450°F, and let it roar for the final 20 minutes. This is crucial crackling time, but you MUST watch it like a hawk; high sugar rubs can burn fast!
Expert Tips for the Best Porchetta Results
So, you’ve got your spices mixed and your roast tied up looking handsome. Perfect! Now let me give you the little secret that moves this from ‘good’ pork roast to ‘oh-my-gosh-I-can’t-believe-I-made-this’ porchetta. When I’m feeling extra dedicated, I take a razor-sharp knife and lightly score the skin before I even apply the rub. I mean *lightly*—you want to cut through the skin and maybe a tiny bit of fat, but you absolutely cannot cut into the meat underneath. That scoring gives the heat tiny avenues to penetrate and guarantees the biggest, puffiest crackling.
Also, remember that note about applying the rub the day before? That’s a lifesaver. When you let that rub sit uncovered in the fridge, the salt in the mixture actually starts to draw moisture out of the surface of the skin, leaving it even drier for that final high-heat blast. It’s totally worth the extra planning time! If you’re looking for techniques to make other big roasts shine, this simple pork roast article has some great application tips.
Serving Suggestions for Your Italian Roast Pork
Now that you have successfully created the most flavorful, tender, and crackling porchetta imaginable, you need sides that can stand up to it! Honestly, this roast is so rich, you don’t need much fuss. My family always goes for simplicity. We roast some chunks of potato right in the drippings underneath the rack for the last hour of cooking—they soak up all that rosemary and fennel goodness!
If you want greens, keep them bright. A quick toss of bitter greens, like sautéed broccolini or perhaps some sharp arugula dressed with lemon juice and olive oil, is perfect. It cuts right through the fat and resets your palate for the next incredible slice of roast pork. For some other easy-to-prepare sides that pair beautifully with rich meats, check out these delicious roasted vegetables; they are so simple to manage while you’re dealing with the roast!
Storing and Reheating Leftover Porchetta
Oh, the leftovers! If you manage to have any of this amazing porchetta left over (which is a feat in itself!), storage is key to preserving that glorious crust. Let the roast cool down completely on the counter. Once cool, wrap the slices tightly in plastic wrap first, and then slip them into an airtight container. You want to keep the air out!
When it comes to reheating, we have to accept some sacrifice, but we can minimize it. Don’t microwave the meat unless you absolutely have to—it just turns the beautiful meat tough and steams the skin into submission. The best way, hands down, is to reheat those slices on a baking sheet in a hot oven (around 375°F) until they are warmed through. If you managed to save a few crispy skin pieces separately, lay them on the baking sheet too; they might recapture a little bit of their magic!
Frequently Asked Questions About Making Porchetta
I get so many questions after people try this recipe because, honestly, achieving that perfect roll and crackle can feel like sorcery! Let’s tackle the worries I hear most often when folks are making their first proper porchetta.
Can I use a different cut of pork instead of belly for Porchetta?
You certainly *can* try, but you’re going to lose the signature experience. The pork belly is the king here because you need that thick layer of fat underneath the skin to baste the meat as it cooks slowly, keeping everything impossibly juicy. Plus, the skin on the belly is thick enough to withstand that high-heat blast and puff up into genuine crackling. If you try using a leaner loin cut, the skin often burns before it crackles, and the meat dries out. Stick to the belly for authentic results!
How long does the Porchetta need to rest after cooking?
This is non-negotiable time, so please don’t try to rush it! As I mentioned in the instructions, you have to let that beautiful roast rest for a full 20 minutes once it comes out of the oven. If you cut into it immediately, all those delicious juices—the flavor carriers!—will run right out onto your cutting board, leaving you with dry meat. Resting allows the muscle fibers to relax and reabsorb all that moisture. If you’re interested in how resting beef compares, this simple fried pork chops article touches lightly on carryover cooking, which is related!
What if my skin isn’t totally crispy after the final blast?
Oh, that’s frustrating, but don’t panic! If you pulled it out and the skin is still chewy in spots, you can sometimes save it. If the internal meat temperature is already past the resting point, carefully remove the roast, wrap it loosely in foil, and let it rest. Then, place *just the skin* piece (or the whole thing if necessary) back into a 450°F oven for five to ten minutes, watching constantly. Sometimes it just needs a tiny bit more focused heat to pop!
Estimated Nutritional Information for Porchetta
Okay, let’s talk fuel! Since this is pork belly, it’s rich, which is why it tastes so amazing, but it’s important to know what’s in a typical serving of this porchetta. Based on my recipe breakdown, a 4-ounce serving clocks in right around 450 calories, with about 40 grams of protein—that’s a serious amount of dinner!
Now, remember these are just my best estimates! The exact fat and sodium content can shift depending on the specific cut of pork belly you grab from the butcher and how much salt ends up clinging to the skin during the roast. Always take these numbers with a small grain of salt, as they are exactly that—estimates for this Italian Roast Pork!
Share Your Crispy Porchetta Masterpiece
Honestly, nothing makes me happier than knowing one of my favorite recipes has made it onto your table! You’ve nurtured this beautiful piece of meat through the spice rub, the tying, and those careful temperature shifts, and now you deserve applause.
So, please, don’t be shy! If you tried this Simple Porchetta Roast, I would absolutely love to hear how it went. Did your crackling sound like popcorn or shattering glass? Tell me everything in the comments below. It truly helps other home cooks feel brave enough to try making their own porchetta!
If you snapped a picture—and you definitely should have, because it looks gorgeous—tag me on social media! Seeing your final Italian roast pork successes is the best motivation I could ask for. Happy cooking, and I look forward to reading your stories about that amazing pork belly!
Print
Simple Porchetta Roast
- Total Time: 3 hr 50 min
- Yield: 8 servings 1x
- Diet: Low Fat
Description
A recipe for making a flavorful, crispy-skinned Italian rolled pork roast.
Ingredients
- 5 lb pork belly with skin attached
- 2 tbsp fennel seeds, crushed
- 1 tbsp coarse salt
- 1 tsp black peppercorns, freshly ground
- 4 cloves garlic, minced
- 2 sprigs fresh rosemary, leaves chopped
- 1 sprig fresh sage, leaves chopped
Instructions
- Pat the pork belly skin very dry with paper towels.
- In a small bowl, mix the crushed fennel seeds, salt, pepper, minced garlic, rosemary, and sage.
- Rub this mixture thoroughly over the flesh side of the pork belly.
- Roll the pork belly tightly, with the skin on the outside, into a cylinder shape.
- Secure the roll tightly every 1.5 inches with kitchen twine.
- Place the roast on a rack in a roasting pan.
- Preheat your oven to 400 degrees Fahrenheit (200 degrees Celsius).
- Roast for 1 hour at 400°F.
- Reduce the oven temperature to 325 degrees Fahrenheit (160 degrees Celsius) and continue roasting for 2.5 to 3 hours, or until the internal temperature reaches 150 degrees Fahrenheit (65 degrees Celsius).
- Increase the oven temperature to 450 degrees Fahrenheit (230 degrees Celsius) for the last 20 minutes to crisp the skin. Watch carefully to prevent burning.
- Remove the porchetta from the oven and let it rest for 20 minutes before slicing.
Notes
- For extra crispy skin, score the skin lightly before applying the rub, being careful not to cut into the meat.
- You can prepare the spice rub one day ahead and apply it to the meat, then refrigerate uncovered overnight.
- Prep Time: 30 min
- Cook Time: 3 hr 20 min
- Category: Main Course
- Method: Roasting
- Cuisine: Italian
Nutrition
- Serving Size: 4 oz cooked
- Calories: 450
- Sugar: 0
- Sodium: 450
- Fat: 30
- Saturated Fat: 10
- Unsaturated Fat: 20
- Trans Fat: 0
- Carbohydrates: 0
- Fiber: 0
- Protein: 40
- Cholesterol: 120
Keywords: porchetta, Italian roast pork, crispy pork belly, rolled pork roast, fennel, rosemary