
If you’ve ever needed the perfect bite-sized treat that screams celebration, you need to stop what you’re doing and pay attention. Cake pops are magical, right? They’re cute, they travel well, and they don’t involve fussy slicing. But my absolute favorite version—the one that wins every time—is these sensational Red Velvet Cake Pops. Trust me, I was skeptical when I first tried making them at home, fearing they’d fall apart on the stick, but those fears are long gone!
Why are mine absolutely the best? Because we skip the stressful baking part and focus on mixing the perfected cake crumbs with rich cream cheese frosting. That combination makes these pops incredibly moist, dense, and flavorful. You get that deep, slightly tangy red velvet kick, followed by that satisfying snap of chocolate coating. They are utterly irresistible, and honestly, they always disappear first at any party I bring them to!

Why You Will Make These Red Velvet Cake Pops Again and Again
Honestly, there are so many reasons these cake pops have become an absolute staple in my kitchen! They look fancy, but they are ridiculously easy. You’ll be shocked at how quickly you go from baked cake to perfectly dipped dessert. Here’s why this recipe is truly a winner:
- They are surprisingly fast to assemble once the cake has cooled down. Seriously, the hands-on time is minimal!
- Forget dry, crumbly cake balls—the cream cheese frosting binds everything together perfectly, ensuring a supremely moist texture every single time.
- Using a good quality boxed red velvet mix means you get that consistent, signature flavor you love without having to worry about adjusting baking powder or soda ratios. It’s foolproof baking!
- The combination of tangy cake and sweet chocolate coating hits that perfect balance of flavor notes—it’s addictive, I won’t lie.
- These Red Velvet Cake Pops are inherently portion-controlled, which is great for satisfying that chocolate/cake craving in one perfect little mound.
- They look so fancy when they’re done, but honestly, the process is so simple, you’ll feel like a professional baker!
I mean, what’s not to love? They deliver huge flavor with minimal fuss, which is exactly what I need.
Essential Ingredients for Perfect Red Velvet Cake Pops
When making these pops, the ingredient list might look short, but every item plays a huge role in getting that bakery-quality result. You have to be precise, especially with the chocolate dipping part! Remember, you need that cake fully cooled—I can’t stress that enough, or you’ll end up with soup instead of crumbs.
The secret to that amazing, scoopable dough is the binding agent, and pre-made frosting works like magic because it’s already perfectly balanced. And for the chocolate? A tiny bit of oil—veg oil works great—is necessary to thin it just enough so you aren’t fighting it when you dip those precious chilled balls.
For the Red Velvet Cake Base
- One full 15.25 oz box of your favorite red velvet cake mix. No need to worry about measuring flour or sugar here; we keep it simple!
- One standard 8 oz container of cream cheese frosting. Stick to the pre-made tubs—they have the perfect thickness to bind the crumbs without making the mixture too wet.
For Dipping and Decoration
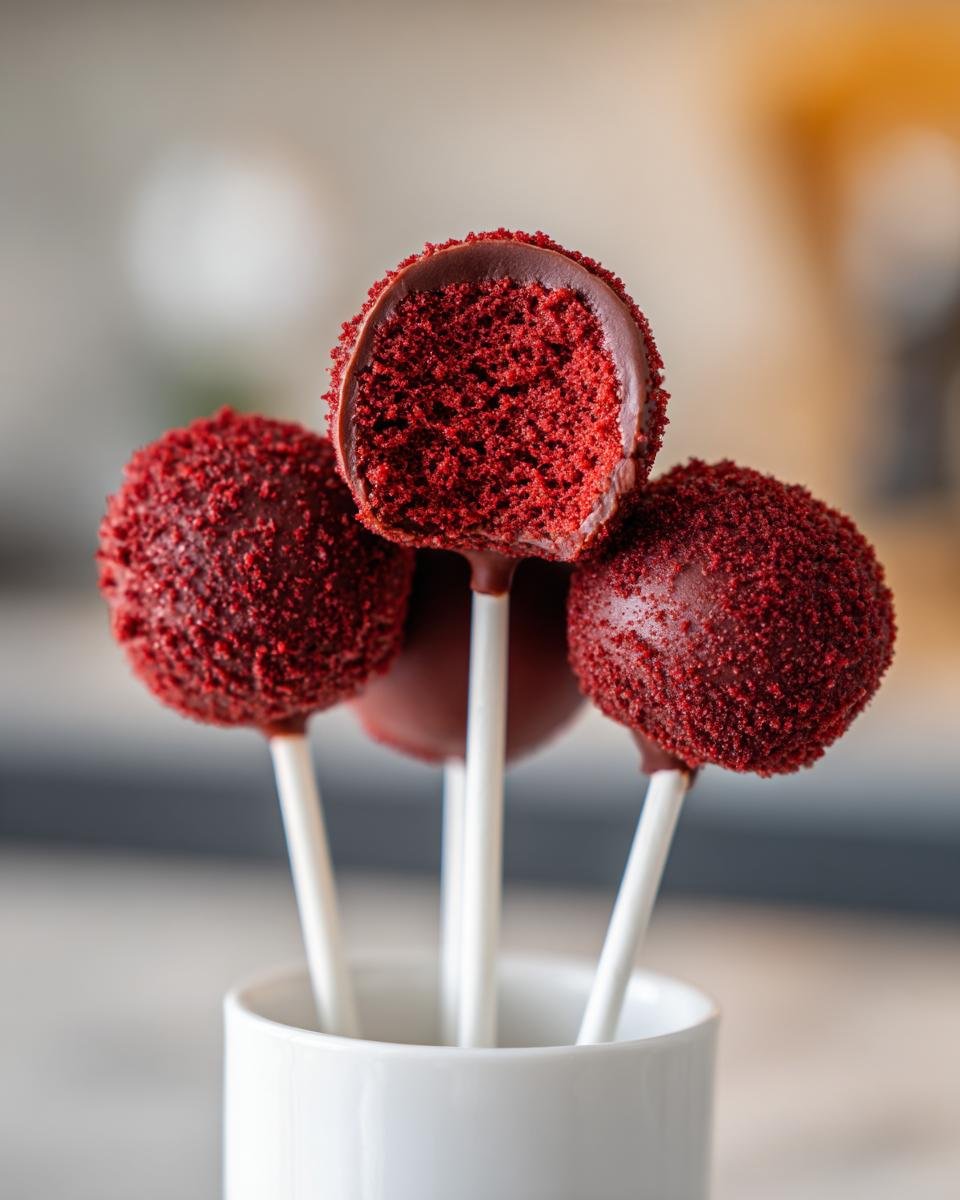
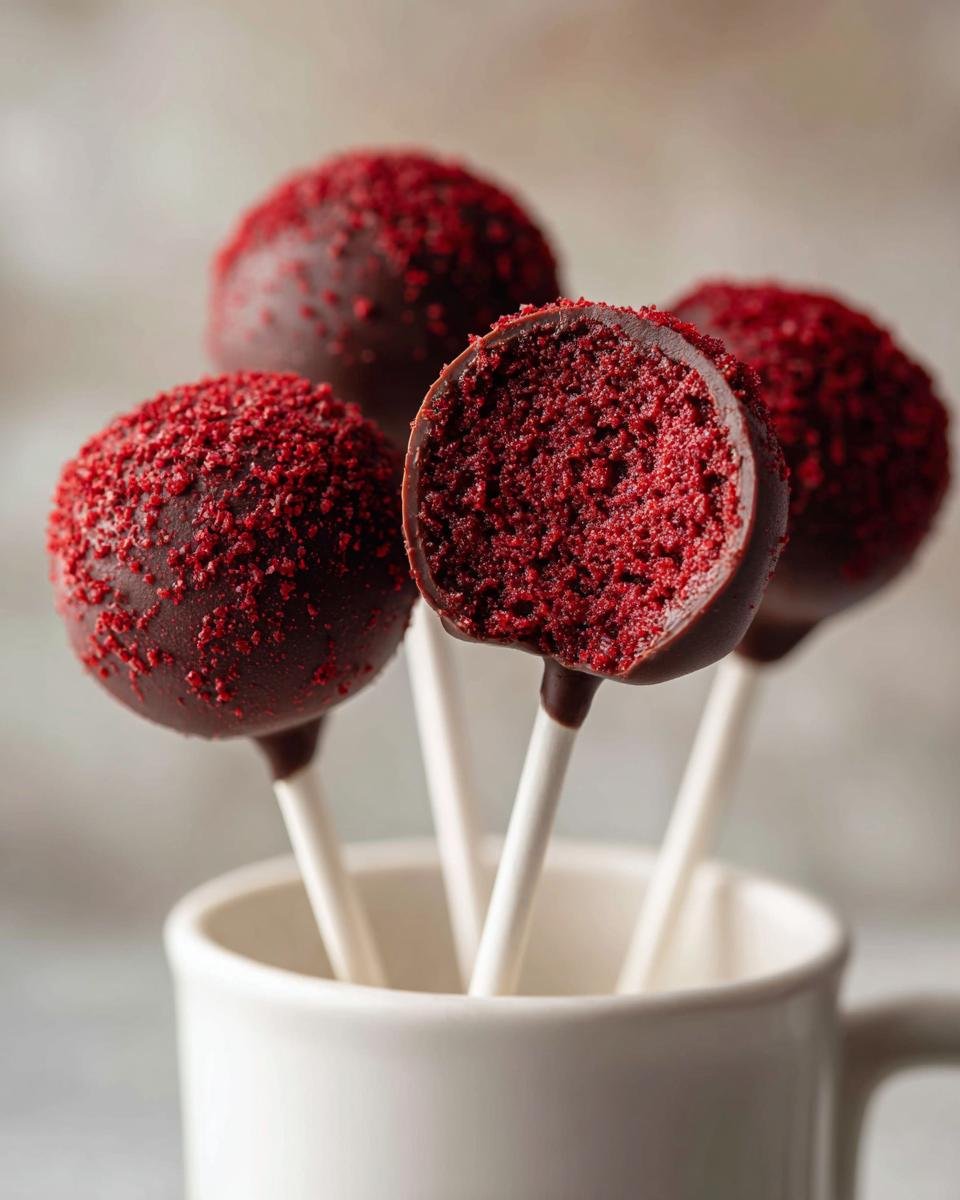
- 12 oz of white chocolate melting wafers. These create a beautiful, bright layer.
- 12 oz of dark chocolate melting wafers. I like using two types of chocolate because it gives you that classic color contrast.
- About 1 tablespoon of vegetable oil—just a little bit added to the melting chocolate later on!
- Your cake pop sticks! Don’t forget these vital architectural supports!
Step-by-Step Guide to Making Red Velvet Cake Pops
Alright, buckle up! This is where the magic really happens. Once you have your ingredients ready, it feels like you’re assembling something very fancy, but I promise you, you can do this with your eyes half-closed. The key is patience during the chilling phases, so don’t rush it, even if you’re eager to get those beauties dipped!
Baking and Creating the Red Velvet Cake Pop Dough
First things first, you need to bake that red velvet cake exactly according to the box directions—use whatever ingredients they call for. Once it comes out of the oven, you absolutely must let it cool completely. I actually prefer baking mine the day before so they are stone cold, which makes crumbling so much easier. Once cool, grab your biggest bowl and just start breaking that cake up! You want it looking like fine, moist sand. No big chunks allowed!
Now for the binder: pour in that tub of cream cheese frosting. You have to mix this thoroughly, maybe with sturdy hands or a hand mixer on low. You’re mixing until it’s all uniform and comes together when you squeeze a piece—it should feel like stiff play-dough. If you over-mix it at this stage, it can get a little tough later, so just mix until it’s combined, okay?
Shaping and Chilling the Red Velvet Cake Balls
When the dough is ready, it’s time to roll! I aim for balls about 1 inch in diameter. Try to keep them uniform so they look professional, but don’t stress too much if one is slightly bigger than the next. Pop these perfect little spheres onto a baking sheet lined with parchment paper. They need firm structure before they hit warm chocolate.
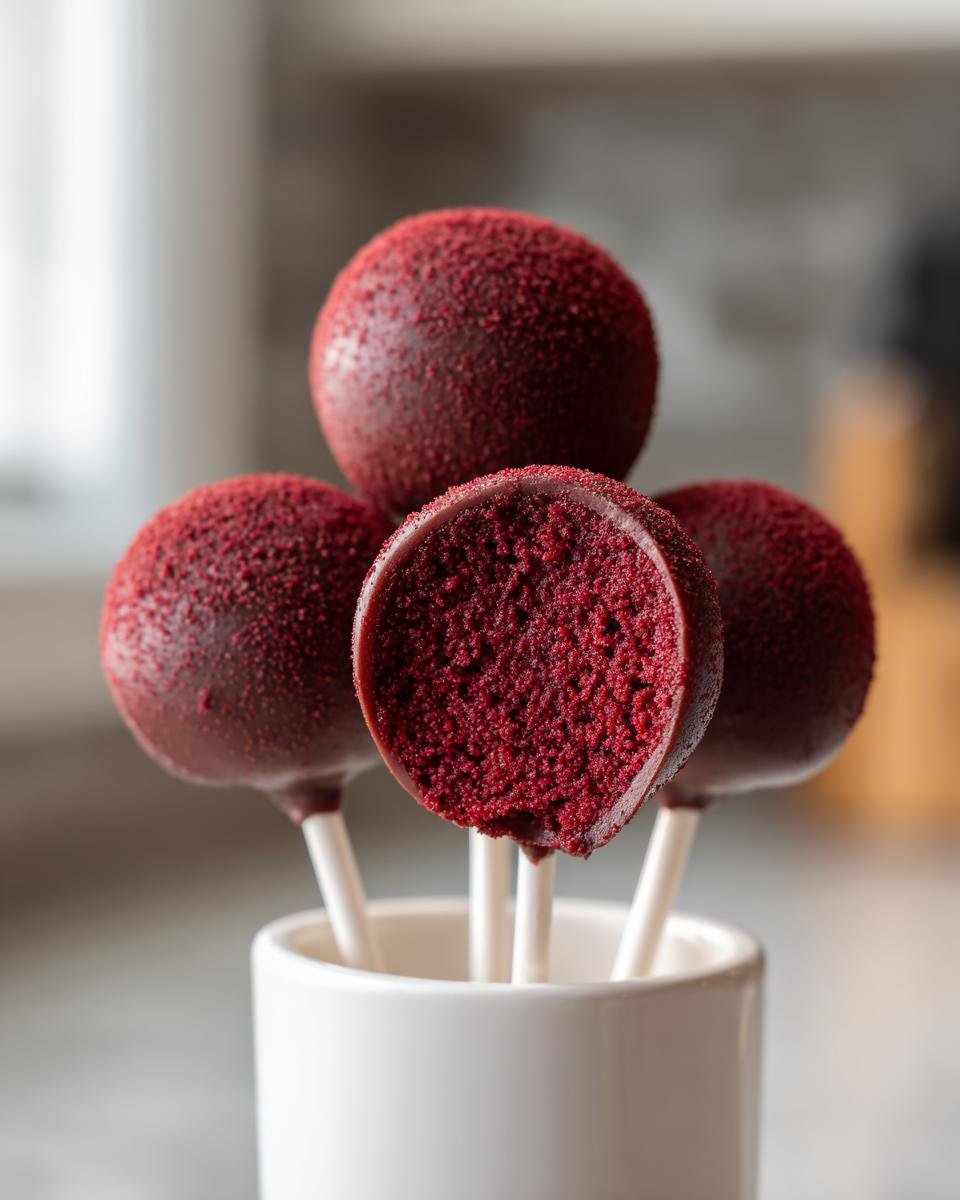
This next step is non-negotiable, trust me! They need to chill in the refrigerator for at least 30 minutes, sometimes more. Why? If they are even slightly warm, the coating melts right off, or worse, the ball sticks to the side of the stick when you lift it. Cold cake balls are sturdy cake balls. While they’re chilling, go ahead and melt your chocolates.
Mastering the Chocolate Coating for Red Velvet Cake Pops
Melt your white wafers and dark wafers separately—I usually use the microwave in short bursts—and remember to stir often. To get that nice, thin glaze that sets beautifully, add just a teaspoon of vegetable oil to each batch of melting chocolate. If you want an even thinner coating, you can stir in just a touch of shortening (though the oil usually does the trick!).
Now for the tricky part: stick insertion! Dip the tip of your cake pop stick into a little bit of the melted chocolate first—just the very tip—and then slide it about halfway into a chilled cake ball. This acts like glue! Pop the sticked ones back into the fridge for about five minutes so that chocolate hardens and locks the stick straight. This prevents disaster later! Once set, dip the whole ball, rotating it quickly. Gently tap the stick against the side of the bowl to shake off the excess coating. You can look at how I use that funfetti cake dip technique to make sure I get an even layer on everything I dip! Finally, stand them upright in a block of styrofoam or a dedicated stand. They need to dry completely before you touch them again!
Expert Tips for Flawless Red Velvet Cake Pops Dipping
Dipping is where everyone holds their breath, I know! You spend all that time crumbling and rolling, and then one warm cake ball can ruin the whole batch coating. It all boils down to temperature and viscosity, my friend. Keep things cold and keep your chocolate runny, and you’ll have no issues. I actually keep my melted chocolate in a small crockpot set on the lowest ‘warm’ setting, just to keep it perfect, much like when I make chocolate whipped cream—you want gentle heat.
Temperature Control for Dipping Red Velvet Cake Pops
The number one mistake people make is not keeping their cake balls frigid after setting the sticks in place. Those pops need to be refrigerator-cold, not just ‘cool,’ before they even touch the chocolate. If the cake ball is even a little warm, the heat will melt the chocolate coating in your bowl instantly, thickening it up fast. Plus, a warm ball can cause the coating to crack when it cools down. Keep checking the bowl—if the chocolate starts getting too stiff, zap it for 10 seconds!
Achieving the Best Chocolate Coating Consistency
We talked about that little bit of vegetable oil, but remember, if you want a coating that flows like silk, a tiny bit of shortening added to the wafers helps thin it out without affecting the flavor too much. If you want bright colors for a holiday party—maybe a pink coating instead of using the white wafers—just use pre-colored candy melts instead! They melt beautifully and hold their color way better than trying to dye melted white chocolate.
Storage and Serving Suggestions for Your Red Velvet Cake Pops
Once you’ve gone through the tricky dipping process, you want those beautiful treats to last, right? Store your finished Red Velvet Cake Pops in an airtight container at room temperature for up to three days. They stay perfectly fine sitting out, especially if the coating has fully hardened. Keep them out of direct sunlight, though, because that heat can cause sweating or even cracking in the chocolate shell!
If you need to keep them longer, the fridge is okay, but always let them come close to room temperature before serving. Cold cake pops have a stiff coating that might crack when bitten. These are perfect for Valentine’s Day, Christmas trays, or just when you need a fun pop of color on your dessert table!
Red Velvet Cake Pops FAQ
I get so many questions about this recipe once people start making their own pops! It’s totally normal once you dive into dipping; there are a few little tricks you need to know to make sure everything holds together perfectly. Whether you’re hoping to bring these to a party or just hide them in the pantry for yourself, I’ve got the answers you need right here.
Can I skip chilling the cake balls before dipping?
Oh, please don’t try this! Seriously, skipping the chill is the fastest way to turn your gorgeous, perfect little dough balls into a melted, sad mess. If the cake balls aren’t completely firm and cold from the fridge, they are way too soft when dipped. They might literally fall right off the stick and into your chocolate. Or, even if they stay put, the warm interior will melt the chocolate coating right away, giving you a thick, ugly shell instead of that beautiful, crisp coat we want on our Red Velvet Cake Pops.
What is the best way to store leftover Red Velvet Cake Pops?
This is great news: they store really well, which is why they are perfect for making ahead of time! For the best texture—that crunchy exterior and soft interior—I always keep my finished pops in a single layer in an airtight container stored at room temperature. I find that they stay perfectly good for about three days this way. If you absolutely have to refrigerate them, make sure the container is sealed tight to prevent them from drying out or absorbing fridge smells. Just let them sit out for about 20 minutes before serving so the chocolate coating isn’t rock hard!
Can I use a different frosting instead of cream cheese?
You can, but you’re messing with the core flavor profile of red velvet, and you have to be careful about consistency! The cream cheese frosting is ideal because it’s thick and tangy, which provides structure and flavor. If you use something thinner, like a standard buttercream, you might need way less—or you’ll need a lot more—to bind the crumbs, which can make the final pop too sweet or soft. If you must substitute, look for a very thick, dense frosting. Maybe try making your own thick vanilla buttercream and adding a tiny splash of lemon juice to mimic that cream cheese tang. By the way, if you’re looking for a totally different kind of red velvet treat, you have to check out my recipe for a red velvet martini!
Estimated Nutritional Snapshot for Red Velvet Cake Pops
Now, nobody is making these cake pops because they’re health food, let’s be honest! But I always get asked about the details, so here is a general idea of what you’re looking at for one beautiful, chocolate-dipped pop. Remember, this is just an estimate based on the ingredients we used, especially the type of chocolate coating you choose, so take it with a grain of salt—or maybe a sprinkle of nonpareils!
We’re aiming for about 24 pops total from this batch. If you manage to stop at just one (good luck!), here’s the typical breakdown:
- Calories: Around 250
- Fat (Total): About 15 grams
- Sugar: Roughly 25 grams—that’s the fun part!
- Protein: About 3 grams
- Carbohydrates: Around 28 grams
It’s a decent little treat, packed with flavor! Keep in mind that if you add extra sprinkles or drizzle them with more chocolate, those numbers will certainly creep up. But served just as they are described here, you get a fantastic little dessert for around 250 calories. Totally worth it, in my book!
Share Your Delicious Red Velvet Cake Pops Creations
Okay, now that you’ve baked, chilled, dipped, and probably eaten half the batch already, I absolutely need to see what you came up with! Making these Red Velvet Cake Pops is just the first step; the fun part of home baking is sharing the success with the community!
Did your chocolate coating get smooth as glass? Did you manage to get those sticks seated perfectly without any messy sinking? Tell me everything! Please, please leave a rating for this recipe right here on the blog—it tells me what’s working and helps other bakers feel confident trying it out. If you struggled with a step, drop a comment below, too; I try my best to answer everyone’s pressing questions about dips and temperature!
And if you took photos—and I know you did—please share them on Instagram or Facebook and tag me! Seeing your beautiful red velvet creations always makes my day. It’s so rewarding to know that my family’s favorite little chocolate-covered treat is showing up at your celebrations, too. Let’s keep these great recipes rolling!
If you have any other baking conundrums or want to suggest what I should tackle next, don’t hesitate to reach out through my contact page. Happy baking, everyone!
Print
Red Velvet Cake Pops
- Total Time: 75 min
- Yield: 24 pops 1x
- Diet: Vegetarian
Description
Simple recipe for making moist red velvet cake pops dipped in chocolate coating.
Ingredients
- 1 (15.25 oz) box red velvet cake mix
- 1 (8 oz) container cream cheese frosting
- 12 oz white chocolate melting wafers
- 12 oz dark chocolate melting wafers
- 1 tablespoon vegetable oil
- Cake pop sticks
Instructions
- Prepare the red velvet cake according to the package directions, using the ingredients listed on the box.
- Bake the cake and let it cool completely.
- Crumble the cooled cake into fine crumbs in a large bowl.
- Add the cream cheese frosting to the cake crumbs. Mix until fully combined and the mixture holds together when squeezed.
- Roll the mixture into small, uniform balls, about 1 inch in diameter. Place them on a parchment-lined baking sheet.
- Chill the cake balls in the refrigerator for at least 30 minutes.
- Melt the white chocolate wafers and dark chocolate wafers separately according to package directions, adding 1 teaspoon of vegetable oil to each batch for smoother consistency.
- Dip the tip of a cake pop stick into the melted chocolate and insert it about halfway into a chilled cake ball. Return to the refrigerator for 5 minutes to set the stick.
- Dip the entire cake ball into the melted chocolate, rotating to coat completely. Tap the stick gently against the side of the bowl to remove excess chocolate.
- Place the coated cake pop upright in a styrofoam block or stand to dry completely.
Notes
- For a thinner coating, add a small amount of shortening to the melted chocolate.
- You can use colored candy melts instead of white chocolate for different colors.
- Keep the cake balls cold before dipping for best results.
- Prep Time: 45 min
- Cook Time: 30 min
- Category: Dessert
- Method: No Bake (after initial baking)
- Cuisine: American
Nutrition
- Serving Size: 1 pop
- Calories: 250
- Sugar: 25
- Sodium: 150
- Fat: 15
- Saturated Fat: 8
- Unsaturated Fat: 7
- Trans Fat: 0.5
- Carbohydrates: 28
- Fiber: 1
- Protein: 3
- Cholesterol: 25
Keywords: Red Velvet Cake Pops, cake pops, chocolate dipped, dessert, party treat