
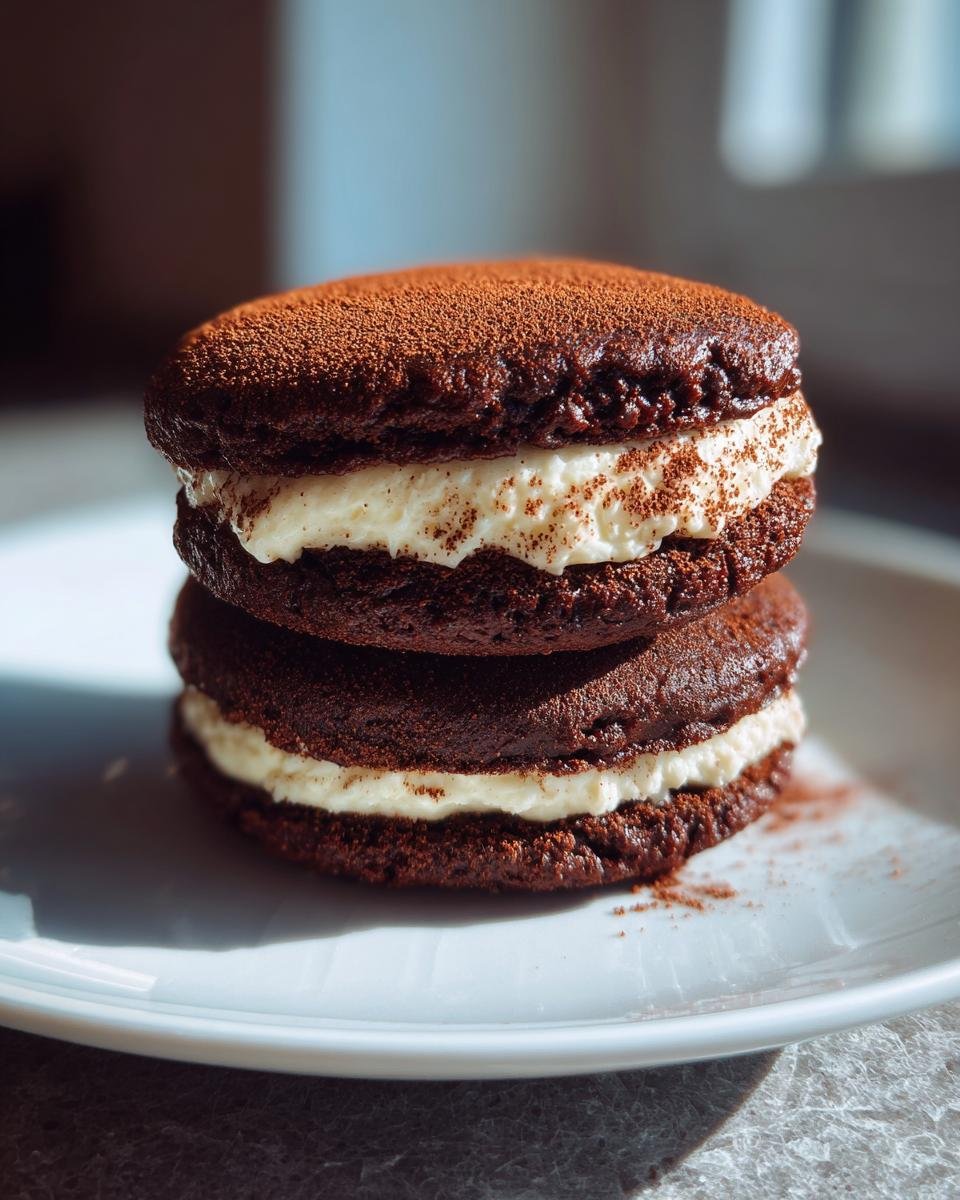
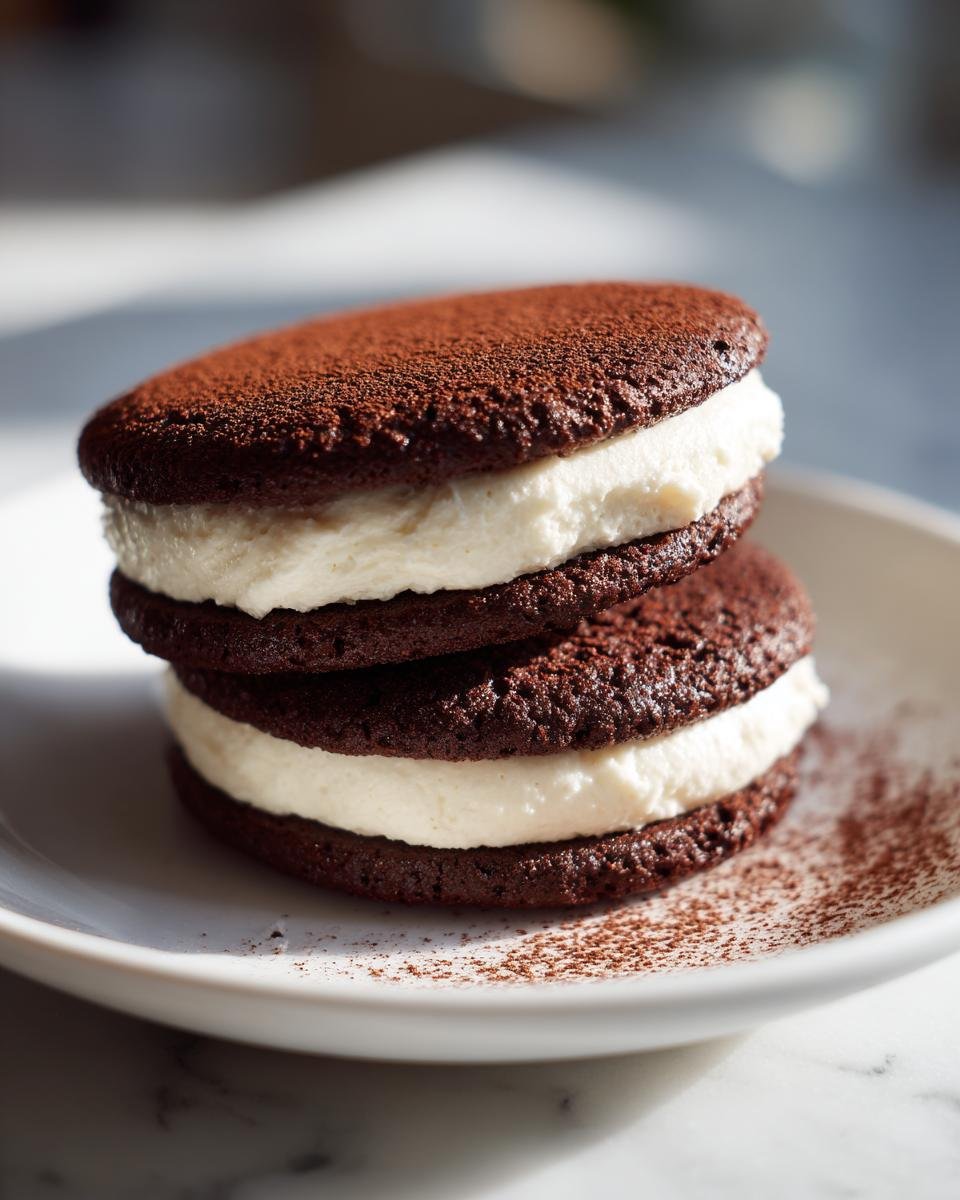
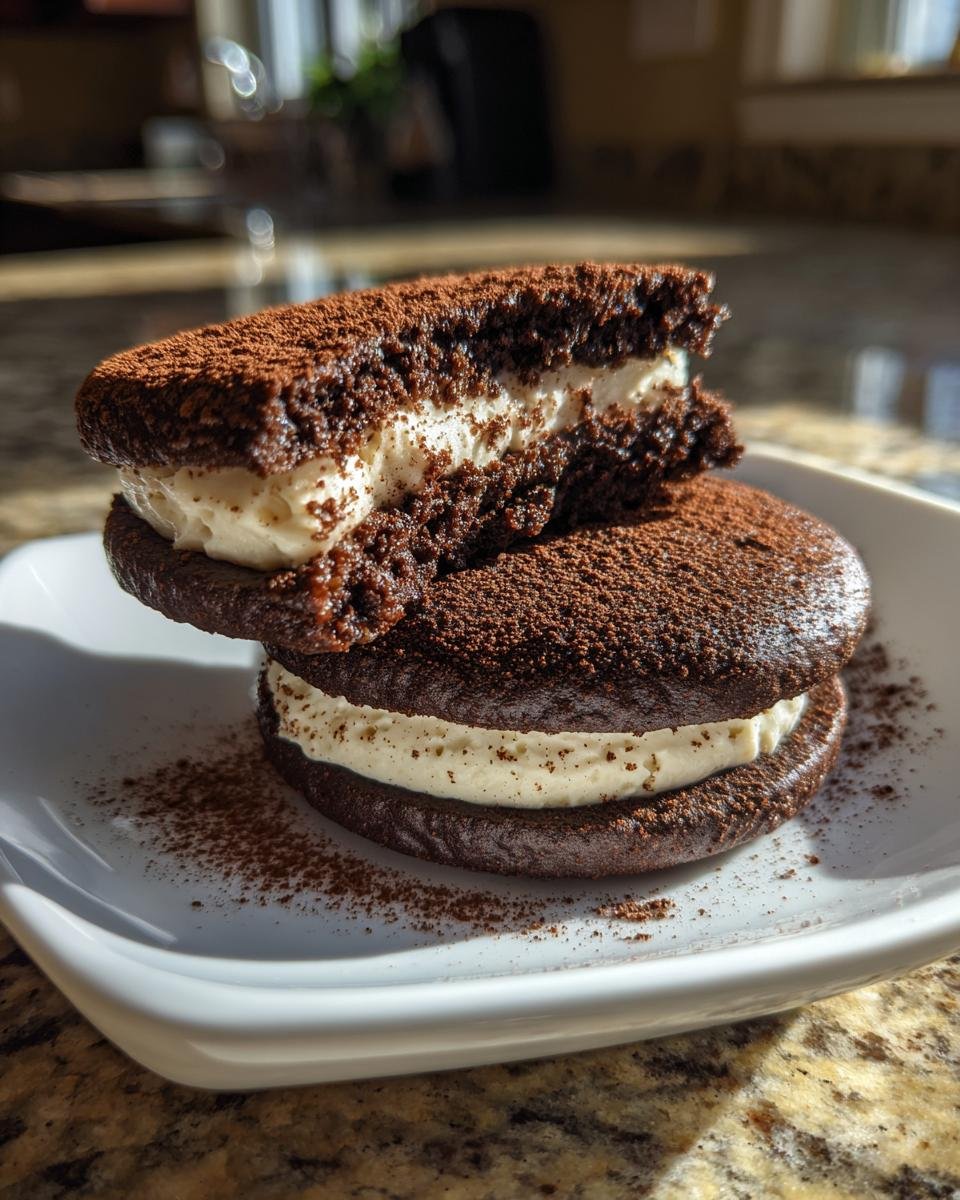
There is just something about a cookie that snaps when you bite into it, you know? Seriously, forget those store-bought ones that taste like cardboard mixed with regret. We are making the real deal today, the kind that takes you right back to childhood glee! I’m talking about my absolute favorite recipe for homemade Chocolate Sandwich Cookies. Trust me when I say, these cookies deliver that deeply dark, intense cocoa flavor you dream about, paired with a pillowy soft, sweet cream center.
I spent ages tweaking my great-aunt’s recipe because she insisted on using the cheapest cocoa powder available, and honestly, it always tasted flat. But I’ve cracked the code! These come together surprisingly fast—we’re looking at under 40 minutes total—and the satisfaction of peeling that rich chocolate cookie apart to show off the bright white filling? Unbeatable. It’s worth every single mix and scoop, I promise!
Why You Will Love These Chocolate Sandwich Cookies
Honestly, I wouldn’t bother sharing a recipe unless it was genuinely spectacular. These chocolate sandwich cookies are the kind that disappear before they even hit the cooling rack. They’re just that good! You get the perfect crackle of the dark, rich cookie shell followed by the fluffy, sweet center. It’s pure nostalgia in every pair.
We call these the ‘no-fail’ favorites because they always turn out right. Here’s why I think you’re going to ditch the box cracker aisle forever once you try this batch:
- They have a beautiful, deep chocolate color. We aren’t messing around with weak cocoa powder here; these are intensely dark!
- The filling isn’t sickly sweet. It’s light, creamy, and holds its shape perfectly so your cookies don’t slide apart.
- You spend almost no time waiting around. Seriously, the prep and bake time gets you finished in under 37 minutes total!
- They freeze beautifully, which means you always have a stash ready for unexpected visitors.
- They look professional, but they taste authentically homemade—that’s the magic combo!
Perfectly Balanced Flavor
The key here is that incredible contrast. The cookie itself is baked until it’s just crisp (not hard, never hard!), which gives you that satisfying snap. That sharp, slightly bitter note from the unsweetened cocoa powder is the absolute perfect foil for the filling. Speaking of the filling, I make sure mine is whipped until it’s almost like buttercream—it melts in your mouth the moment you bite through that chocolate shell. It’s a flavor tango, and they both dance perfectly!

Simple Steps for Classic Chocolate Sandwich Cookies
I know some baking recipes look scary with endless ingredients, but this one is straightforward, I promise! We use standard pantry staples because true cookie magic shouldn’t require a specialty store run. We cream the butter and sugar, mix the dry, mix the wet, and bam—you’ve got dough! The whole process, including whipping up that heavenly cream filling while the cookies cool, keeps our total active time down to about 37 minutes. You get maximum payoff for minimum effort.
If you happen to make a huge batch and want to try a similar but slightly fluffier treat, check out my recipe for old-fashioned whoopie pies! They are cousins to these sandwich cookies, but a little softer!
Essential Ingredients for Perfect Chocolate Sandwich Cookies
Okay, this is where we build the foundation for those amazing chocolate sandwich cookies you’ve had in your dreams! Getting the ingredients right, and prepping them correctly—that’s half the battle won right there. I always keep my pantry stocked better for cookie making than for actual meals, truth be told. We divide this into two main squads: the dark, intense cookie bases and the fluffy white filling that holds them together.
If you want that deep, genuine cocoa punch, you can’t skimp here. These ratios are tried and true, inspired by a little trip down memory lane to my favorite classic chocolate chip recipe. Check out the ingredients list below; it shows exactly what you need for the dough and the filling. Pay attention to the ‘softened’ notes—they matter so much!
For the Rich Chocolate Cookie Base
These are the components that give us that perfect snap and intense flavor:
- 1 cup unsalted butter, make sure it’s softened up nice!
- 1 1/2 cups granulated sugar—we need that smooth sweetness.
- 2 large eggs, room temperature is best here.
- 1 teaspoon vanilla extract.
- 2 1/4 cups all-purpose flour.
- 3/4 cup unsweetened cocoa powder—don’t grab the sweetened kind, or it gets weird!
- 1 teaspoon baking soda.
- 1/2 teaspoon salt to balance everything out.
For the Creamy Sandwich Filling
This is the sweet, pillowy center that melts in your mouth. It whips up so quickly!
- 1 cup powdered sugar, which I highly recommend sifting first (we’ll talk about that later!).
- 1/2 cup unsalted butter, softened—again, make sure it’s proper room temp!
- 1 teaspoon vanilla extract.
- 2 tablespoons milk—we use this little bit to get the perfect creamy texture.
If you love figuring out how different fats affect texture, you should check out my post on making classic chocolate chip cookies. Butter is king, no matter the recipe!
Expert Tips for Making Chocolate Sandwich Cookies
Wow, baking is fun, but sometimes it fights you back, right? Especially when cookies spread into thin, crinkly sad circles instead of the neat discs we need for our beautiful chocolate sandwich cookies. Don’t worry, I’ve been there, staring sadly at an overloaded baking sheet. But I’ve learned a few tricks over the years that make all the difference between an okay cookie and a show-stopping, perfectly paired sandwich cookie.
My biggest piece of advice is patience, even though we are in a rush! A few extra minutes up front saves you heaps of hassle later. Remember, we need that butter to be firm enough to hold its shape but soft enough to cream properly. It’s a delicate balance, but when you get it right, your cookies will look exactly like the ones on the bakery shelf!
Dough Handling for Optimal Chocolate Sandwich Cookies
This is my number one guardrail against spreading pancakes! If your kitchen is warm, or if you just whipped that dough together really fast, the butter inside is probably too soft already. It needs to firm up before it hits the heat. So, here’s what you do: Pop the whole bowl of cookie dough, or even just your scooped balls, into the fridge for about 30 minutes! Chilling the dough is crucial because it lets the butter solidify a bit, which stops the cookie from melting too fast in the oven. When the butter is firm, the cookie spreads less, so you get those lovely, thick, satisfying discs perfect for sandwiching!
Achieving the Smoothest Cream Filling
You want that filling to be fluffy, light, and utterly smooth, right? Nobody wants to bite into a crunchy bit of unmixed powdered sugar stuck in the center of their luscious chocolate sandwich cookie! That’s why I always, always, always sift my powdered sugar before I even think about adding it to the softened butter. Sifting breaks up those tiny, hard clumps that inevitably form when powdered sugar sits in the bag. It makes creaming easier and guarantees that perfectly velvety texture we are aiming for. Don’t skip this step; it’s the simplest path to silky filling perfection!
If you’re looking for other ways to amp up your butter creams, I always talk about my favorite techniques over on my post about gooey chocolate chip cookies. Butter texture is everything!
Step-by-Step Instructions: Baking Your Chocolate Sandwich Cookies
Alright, time to roll up our sleeves! This is where that gorgeous, deep chocolate dough comes to life. We’re moving quickly, but remember, a little care in the mixing phase guarantees a beautiful final product. Preheating is non-negotiable, so get that oven warmed up to 350 degrees F (175 degrees C) right now. Line those baking sheets with parchment paper too—trust me, cleaning is half the battle, and parchment makes cleanup a breeze!
Preparing the Cookie Dough
Grab your big bowl! First, we need to cream that 1 cup of softened butter with the 1 1/2 cups of sugar until it looks light, fluffy, and almost pale yellow. This process is key for trapping air, so don’t rush it, even if you’re using a stand mixer! Next, beat in your eggs one at a time, making sure each one is incorporated before you add the next, followed by that teaspoon of vanilla extract.
Now, switch bowls! Whisk together your dry stuff: the flour, the dark cocoa powder, the baking soda, and the salt. Don’t dump the dry into the wet all at once! Gradually add the dry mixture to your creamed butter mixture, stopping mixing just as soon as you see everything come together. Overmixing develops gluten, and we want tender cookies, so stop right there!
Finally, drop rounded teaspoons of dough onto those prepared baking sheets, making sure to give them about 2 inches of space to spread out while they bake.
Baking and Cooling the Chocolate Cookie Discs
Time for the heat! These bake surprisingly fast. Pop those babies in the oven at 350 degrees F (175 degrees C) for only 10 to 12 minutes. You need to watch them closely because they go from perfect to overdone quickly!
The cooling process is almost as important as the baking. When you pull them out, do *not* try to move them yet! Let the chocolate cookie discs rest right there on the baking sheet for a full 5 minutes. It allows them to set up so they won’t crumble when you pick them up. After those 5 minutes, gently transfer them using a spatula to a wire rack so they can cool down completely. They absolutely must be stone cold before we move on to filling them, or the cream filling will turn into chocolate soup!
Assembling Your Finished Chocolate Sandwich Cookies
While those little chocolate discs are cooling, whip up that filling! Beat the softened butter for the filling until it’s smooth, then slowly add the sifted powdered sugar. Once that’s combined, whip in the vanilla and the 2 tablespoons of milk until the whole mixture looks incredibly light and creamy. Taste it! Seriously, you should be tempted to eat it with a spoon!
Once the cookies are completely cool—and I mean no warmth left at all—it’s assembly time. Take the filling and spread it generously on the flat side of one cookie. Then, take your second cookie and gently press it down on top. That’s it! You’ve made spectacular chocolate sandwich cookies! For more baking inspiration, swing by my guide on making chocolate chip cookie delight!
Storage and Reheating for Fresh Chocolate Sandwich Cookies
Now that you’ve made these perfect chocolate sandwich cookies, we have to talk about keeping them tasting fresh! The main hurdle here is the creamy filling. If you put them straight into the fridge, the cookies might absorb moisture and get soft faster than we want, losing that crucial snap.
The best spot for these beauties is an airtight container at cool room temperature. They should stay good for about three days this way, still holding that lovely balance between crisp cookie and soft filling. If your kitchen is really warm, you *can* chill them, but you have to let them sit out for about 20 minutes before serving so the filling softens back up. And if you ever need a quick clean solution after all that baking fun, check out my tips on homemade cleaning sprays!
Variations on Classic Chocolate Sandwich Cookies
When you’ve mastered the classic, you gotta play around a little, right? These chocolate sandwich cookies are so versatile! While I love them standing alone as the perfect duo, sometimes you just need an extra little *oomph*. Don’t feel limited to just the vanilla filling, either—the dark chocolate cookie base is just begging for some fun additions. These simple tweaks really show off how creative you can get in the kitchen, even when following a classic recipe like this one.
Flavor Twists for the Cream Filling
Think about what flavor pairs well with dark chocolate! Peppermint is my go-to for the winter holidays. Just add a drop or two of peppermint extract when you mix the filling—it gives the sandwich a cool, refreshing finish that is just amazing. Or, if you’re feeling nutty but you can’t use nuts, a splash of almond extract totally changes the profile! It makes the filling taste richer and almost like marzipan.
Dipping Your Chocolate Sandwich Cookies
For an extra layer of decadence, try dipping the finished, assembled cookie into something glorious! I keep a bowl of melted high-quality dark chocolate on hand (just melt it low and slow over a double boiler). Dip half the cookie, let the excess drip off, and then set it on parchment paper to fully set. White chocolate works beautifully too, giving you that classic yin-yang look! It’s a little extra work, but wow, do these look professional when done. If you’re looking for another fun cookie remix, you have to try my snickerdoodle cake mix cookies!
Serving Suggestions for Homemade Chocolate Sandwich Cookies
What goes best with a homemade, intensely dark chocolate sandwich cookie? Something cold and creamy, obviously! These cookies are rich enough to shine on their own, but when you pair them just right, it’s heaven. My hands-down favorite way to enjoy these is dunked ever so slightly into a tall, frosty glass of cold milk. It softens the cookie just enough without making it soggy.
If you’re feeling ambitious, pair them with a thick, decadent dessert drink. I whip up big batches of my famous ultimate chocolate milkshake whenever I make these cookies. The intense cocoa flavor of the cookie plays so well against that cold, sweet shake. Honestly, the combination is too good to be legal!
Frequently Asked Questions About Chocolate Sandwich Cookies
I know you might have a few lingering questions! When you’re working with that gorgeous dark cocoa dough, consistency is everything, and I totally get it if you need that extra bit of reassurance before you bake. I gathered some of the most common things people ask me about these sandwich cookies, especially when they are trying to replicate that perfect texture.
Don’t worry if you’re wondering about swaps or how to make sure your cookies look perfectly uniform—I’ve got the answers right here, gleaned from years of happy baking mishaps and triumphs!
Can I use a substitute for cocoa powder in these Chocolate Sandwich Cookies?
Oh, that’s a tough one! You *could* substitute, but I strongly advise against it for this particular recipe. The reason these Chocolate Sandwich Cookies have that specific deep, intense blackish-brown color and slight bitterness that balances the sweet filling is because we use real, unsweetened cocoa powder. If you swap it out for something like melted chocolate chips, the fat content changes drastically. Melted chocolate changes how the cookie sets up, and you’ll end up with a much cakier, less crisp cookie base that won’t match the filling right.
How do I get perfectly round Chocolate Sandwich Cookies?
You want those pristine circles, don’t you? Perfect for pairing! If you’re scooping the dough (which is easier and faster), my trick is just to use a very consistent small scoop and roll each ball gently between your palms until it’s perfectly smooth and round *before* placing it on the sheet. They spread quite a bit, so rolling them consistently makes the final baked cookies look uniform.
If you really need absolute precision, you can try this: After the cookies bake and are still hot out of the oven (but firm enough to move—about 30 seconds after they come out), place a small round cookie cutter around a warm cookie and rotate it gently to cut a perfect circle. Be super careful, though, as they are fragile when they’re hot! If you’re interested in playing with doughs without baking, check out this fun recipe for irresistible edible cookie dough!
What is the best way to soften butter for the cream filling?
This is probably the most common question for *any* buttercream-style filling! If you forget to leave your butter out overnight, don’t panic and certainly don’t melt it completely. You want it pliable, not greasy. The absolute best way is to cut your necessary amount of cold butter into small, one-inch cubes and let them sit on the counter for about an hour. That usually does the trick.
If you’re really in a pinch and need the filling right now? Take the cubed butter and microwave it on power level 2 (or 30%) for just 5 seconds at a time, turning the cubes every time. Stop the very second you can press your finger into it easily and feel no resistance. If you hear it start to *sizzle* or look slick, you’ve gone too far, and you’ll need to start over!
Estimated Nutrition Facts for Chocolate Sandwich Cookies
I always feel a little guilty looking at these numbers after eating about six of these delicious chocolate sandwich cookies in one sitting, but here we go! Remember that these estimates are based purely on the ingredients I listed up above, and exact values can change depending on your specific brands and how heavy your hand is with that creamy filling. So treat this as a good guideline!
- Serving Size: 1 cookie
- Calories: 220
- Sugar: 18g
- Fat: 12g (Saturated Fat: 7g)
- Protein: 2g
Don’t sweat these too much, though! The most important number is how happy they make you. Enjoy your homemade treats!
Print
Chocolate Sandwich Cookies
- Total Time: 37 min
- Yield: 24 cookies 1x
- Diet: Vegetarian
Description
Make classic chocolate sandwich cookies with a creamy filling.
Ingredients
- 1 cup unsalted butter, softened
- 1 1/2 cups granulated sugar
- 2 large eggs
- 1 teaspoon vanilla extract
- 2 1/4 cups all-purpose flour
- 3/4 cup unsweetened cocoa powder
- 1 teaspoon baking soda
- 1/2 teaspoon salt
- 1 cup powdered sugar (for filling)
- 1/2 cup unsalted butter, softened (for filling)
- 1 teaspoon vanilla extract (for filling)
- 2 tablespoons milk (for filling)
Instructions
- Preheat your oven to 350 degrees F (175 degrees C). Line baking sheets with parchment paper.
- In a large bowl, cream together the 1 cup butter and 1 1/2 cups sugar until light and fluffy.
- Beat in the eggs one at a time, then stir in 1 teaspoon vanilla extract.
- In a separate bowl, whisk together the flour, cocoa powder, baking soda, and salt.
- Gradually add the dry ingredients to the wet ingredients, mixing until just combined.
- Drop rounded teaspoons of dough onto the prepared baking sheets, spacing them about 2 inches apart.
- Bake for 10 to 12 minutes. Let the cookies cool on the baking sheets for 5 minutes before transferring them to a wire rack to cool completely.
- To make the filling, beat the 1/2 cup butter until smooth. Gradually beat in the powdered sugar until combined.
- Add 1 teaspoon vanilla extract and 2 tablespoons milk. Beat until the filling is light and creamy.
- Once cookies are cool, spread filling on the flat side of one cookie and top with another cookie, pressing gently.
Notes
- For a smoother filling, sift the powdered sugar before mixing.
- You can chill the dough for 30 minutes before scooping to prevent spreading.
- Prep Time: 25 min
- Cook Time: 12 min
- Category: Dessert
- Method: Baking
- Cuisine: American
Nutrition
- Serving Size: 1 cookie
- Calories: 220
- Sugar: 18g
- Sodium: 85mg
- Fat: 12g
- Saturated Fat: 7g
- Unsaturated Fat: 5g
- Trans Fat: 0g
- Carbohydrates: 28g
- Fiber: 1g
- Protein: 2g
- Cholesterol: 35mg
Keywords: chocolate cookies, sandwich cookies, homemade cookies, cocoa cookies, cream filling