
Oh my gosh, if your kitchen isn’t smelling like pure Christmas cheer yet, you are officially behind the curve! Seriously, there’s nothing that screams ‘Holidays!’ louder than that sharp, cool blast of peppermint, right? That’s why I live for getting these incredibly festive Candy Cane Cookies into the oven every single December. Forget fussy rolled-out sugar doughs; these beauties whip up super fast. I used to think making those iconic red and white stripes was some kind of baking wizardry, but trust me, they are surprisingly simple and always the first thing gone at any cookie exchange I host.

Why You Will Love Making These Candy Cane Cookies
I’ve tried dozens of holiday bakes every year, but these always make the cut. They are just too much fun and honestly, they’re a lifesaver when time is tight. Here’s why you absolutely need these in your rotation:
- Instant Festivity: That red and white swirl is just gorgeous! They look like they took hours when they really didn’t. They instantly dress up any platter.
- Quick Dough Assembly: The base cookie dough is a simple, sturdy drop-style dough—no fancy chilling or rolling required until we get to the shaping part. It’s so quick to whip up the base while you’re sipping your coffee.
- Perfect Peppermint Punch: We use peppermint extract, not flavoring, so the flavor cuts through beautifully. They aren’t just pretty; they pack that essential minty holiday flavor.
- Ideal for Sharing: Because they hold their shape so well and look professional, they are my absolute go-to for cookie swaps or gifting. They travel really well too! You can check out my recipe for Christmas Butter Cookies if you need another classic staple for your tins, but these peppermint ones are truly unique.
- Great for Little Helpers: Twisting the ropes is a perfect little job for slightly older kids. It feels like playing with playdough, but you get cookies at the end!
Essential Ingredients for Perfect Candy Cane Cookies
Okay, listen up, because the magic here is in the simplicity of the dough itself. We’re not dealing with complicated extracts or zests—it’s all about getting the ratios right so the dough is pliable enough to twist! You’ll need:
- One cup of unsalted butter, and yeah, it has to be softened. Not melted, softened. That’s key for that creamy, fluffy base.
- A full cup of plain granulated sugar—this gives the cookie its classic snap.
- Just one large egg and a teaspoon of vanilla extract to give it that traditional sugar cookie depth.
- The dry team: 2 3/4 cups of all-purpose flour, a half teaspoon of baking powder, and just a pinch of salt to balance everything out.
- The star flavor! We need that 1/4 teaspoon of peppermint extract. If you want them super punchy, you can bump that up later, but start here!
- Of course, we need a couple of drops of red food coloring—gel drops work best for vibrant color without thinning the dough too much.
That’s mostly it until the end when we dust them with powdered sugar. Don’t worry about brown sugar here; this recipe keeps it clean so the peppermint shines. If you’re looking for other simple, yet amazing baked goods, you might want to check out my guide on 12 Ways to Make Amazing Homemade Bread Rolls for your holiday table!
Step-by-Step Instructions for Shaping Candy Cane Cookies
This is where the magic happens! Once the dough comes together, it’s all about getting those beautiful stripes. The oven needs to be ready, so start by preheating to 350 degrees F (175 degrees C). Line your baking sheets with parchment paper—trust me, this makes cleanup a dream, which is essential when you’re baking batches of holiday cheer.
Preparing the Candy Cane Cookie Dough Base
In a big bowl, you’re going to cream that softened butter and sugar until it looks light and happy—like fluffy mashed potatoes, but sweet! Then add your egg and vanilla. In a separate bowl, whisk your dry stuff: flour, baking powder, and salt. Now, don’t get too eager! Add the dry mixture to the wet mixture a little at a time, mixing only until those last flour streaks disappear. Overmixing this dough? That’s the fastest way to lose out on that tender bite we love. You want it just combined!
Creating the Red and White Swirl for Your Candy Cane Cookies
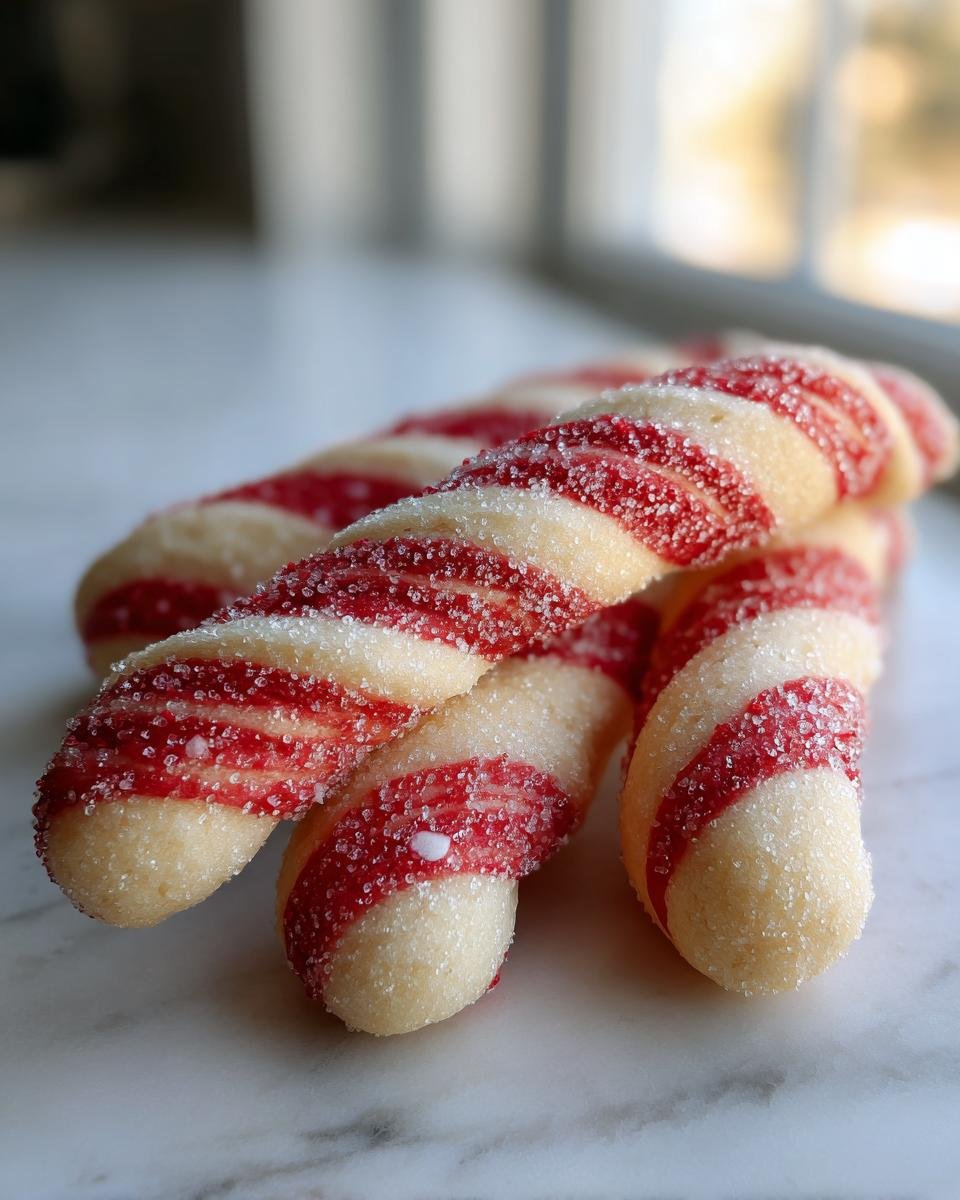
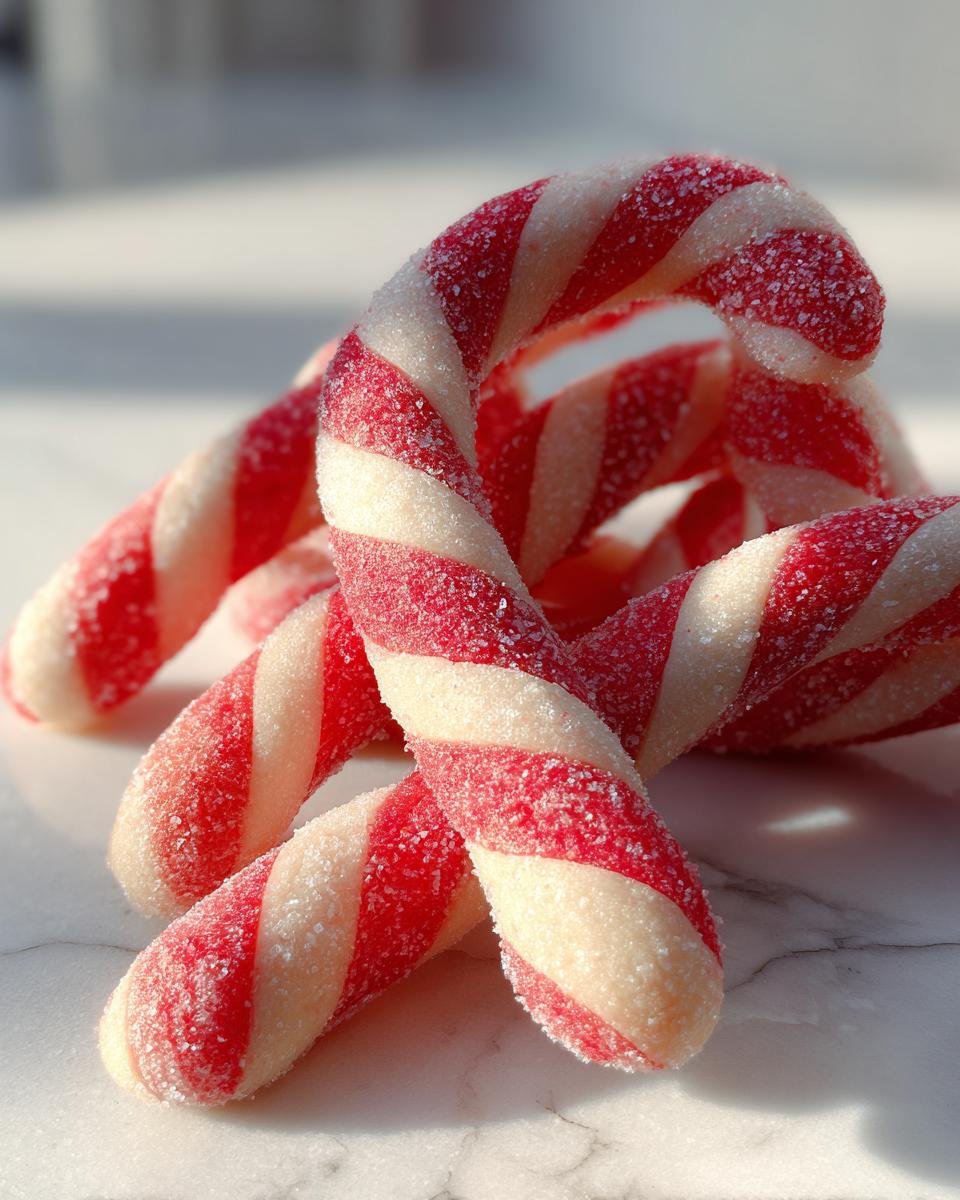
This is the fun, slightly messy part! Divide your finished dough right down the middle. Keep one half plain—this is your white dough. To the other half, add just a few drops of red food coloring. I use gel coloring because it packs a punch. Mix until it’s that perfect festive red color. Now, grab a tiny bit of the white dough and a tiny bit of the red dough. Roll each piece into a rope, maybe about four inches long. Lay them side-by-side and give them a gentle twist together. Think of braiding hair, but simpler. After twisting, carefully bend the top end down to make that classic candy cane hook shape. This technique ensures your Candy Cane Cookies look authentic! If you’ve ever struggled with mixing speeds in other recipes, like my take on Funfetti Cake Mix Cookies, remember that for these, gentle mixing during the final phases is everything.

Baking and Finishing Your Festive Candy Cane Cookies
Place your twisted beauties on the parchment-lined sheets, remembering they’ll spread just a tiny bit, so give them some elbow room. Pop them into the preheated oven for 8 to 10 minutes. You’re looking for the edges to just kiss the light golden stage—if they get too brown, they’ll lose that beautiful color contrast. Let’s talk cooling: leave them right on the hot baking sheet for about five minutes. If you move them too soon, they might get floppy. Once they firm up slightly, transfer them gently to a wire rack to cool completely. Right before you serve them, dust them liberally with powdered sugar. Instant snow! If your dough gets too soft while you’re twisting, pop the whole batch into the fridge for 15 minutes. That chill time makes twisting so much cleaner.
Expert Tips for Perfect Candy Cane Cookies Every Time
Even though this recipe is quite straightforward, those little professional touches can take your Candy Cane Cookies from good to absolutely legendary! I’ve picked up a few tricks over the years of wrestling with this dough, especially when dealing with the stickiness factor.
First thing’s first: that peppermint extract. The base recipe calls for 1/4 teaspoon, which gives you that nice, clean mint flavor. But if you’re like me and want that intense, almost biting peppermint you get from actual candy canes, I highly recommend bumping it up to 1/2 teaspoon. Just be careful! Peppermint is potent, and too much can taste medicinal really fast. Start small, test a tiny bit of dough, and see if you need that extra zing.
Here is my biggest piece of advice, which comes straight from the Notes section: If you are baking in a warm kitchen—and let’s face it, holiday houses get warm fast—your dough might get too soft to handle when you’re trying to twist those ropes. Don’t panic and don’t start adding more flour! Take the whole bowl of dough, cover it, and pop it into the fridge for about 15 minutes. Chilling makes the butter firm up just enough so the ropes hold their shape beautifully when you twist them together. It makes such a difference in getting those clean lines.
When it comes to the food coloring, you only need a tiny bit of the red to get a vibrant color next to the white. If you use too much liquid coloring, it throws off the moisture balance for that specific half of the dough. I always suggest using gel coloring if you have it because it’s super concentrated. Also, don’t stress about getting your twists perfectly even; that irregularity is part of their charm, honestly. They aren’t manufactured! They look homemade—which is exactly what we want.
If you ever find yourself running low on ingredients, especially flour, remember that you can sometimes make your own substitutes in a pinch. You can find my notes on how to make a simple cake flour substitute if you need to adapt other recipes, though for these cookies, sticking to standard all-purpose works best to keep that sturdiness for twisting.
Ingredient Substitutions for Your Candy Cane Cookies
Now, I’m the first person to tell you that if you don’t have exactly what the recipe calls for, you can usually make a glorious substitution—but we have to be smart about it, especially with strong flavors like peppermint!
Let’s talk about the biggest hurdle: peppermint extract. If you are all out of that essential ingredient, what do you do? You can try a tiny bit of pure vanilla extract if you want a basic, delicious sugar cookie, but you lose the candy cane spirit! If you want to stay minty but don’t have extract, you can crush up some actual peppermint candies or peppermints, maybe about a half cup, and stir them into the dough right before coloring. Be warned, though: crushed hard candy has sugar, so it might affect the texture slightly. If they melt too much while baking, your cookies won’t hold their twist as nicely. Trust your instincts!
What about the butter? Real butter is my absolute best friend in baking because of the richness it gives, but I know not everyone keeps it on hand or avoids dairy. If you must swap, you can try using a high-quality vegetable shortening, but you might lose some of that wonderful buttery flavor compound. If you use shortening, try adding an extra 1/4 teaspoon of vanilla to compensate. If you swap for margarine, make sure it’s the stick variety, not the tub stuff—the water content throws off the balance of the flour too much.
For the coloring, if you only have liquid drops instead of the gel type I prefer, just be cautious. Add the color one drop at a time until you get the hue you like. You want that red to really pop against the white background, but adding too much liquid can make that red portion of the dough sticky and sloppy, which makes twisting a nightmare!
When you’re playing mix-and-match, always remember the rule: butter adds flavor and structure, while extracts add intense flavor without altering bulk. If you’re looking for another classic holiday bake where ingredient swaps can be tricky, you should definitely look up my recipe for Simple Homemade Cinnamon Rolls; they need that specific yeast action that’s hard to mimic!
Storage and Freezing Instructions for Candy Cane Cookies
We’re making these festive Candy Cane Cookies for the holidays, which means we really need to know how to keep them tasting fresh! After all that twisting and perfect baking, the last thing you want is a stale cookie halfway through December.
The good news is that because these are essentially sturdy, buttery sugar cookies, they hold up really well at room temperature. Once they are completely cooled—and I mean totally cool, otherwise condensation will make them soggy—you can store them in an airtight container. I usually stack them with a layer of wax paper or parchment paper between the layers. This keeps the powdered sugar dusting from getting messy and stops any residual peppermint flavor from transferring.
In an airtight container on your counter, these cookies stay perfectly delicious for about a week. Seriously, a full week of crisp edges and that lovely mint flavor! If you’re baking ahead for a big party or want them ready right after Thanksgiving, freezing is definitely the way to go.
For freezing, here’s my method to avoid freezer burn and keep that swirl looking sharp. First, make sure the cookies are fully cooled and dusted (or wait to dust them until they thaw, if you worry about the sugar getting clumpy from freezer moisture). Place the cookies on a baking sheet, making sure they aren’t touching, and freeze them uncovered for about an hour. This flash freeze step is important because it locks in their shape before they get squished amongst other goodies!
Once they are solid little peppermint rocks, transfer them into a heavy-duty freezer bag or an actual airtight freezer container. Squeeze out as much air as you can before sealing them up tight. They keep beautifully in the freezer for up to three months. When you’re ready to serve them, just pull them out! Let them thaw overnight in the container on the counter. Don’t open the container until they’re fully thawed, or condensation will form and make them sticky. It’s the same trick I use when freezing my leftover Christmas Cake Truffles!
Serving Suggestions for Your Candy Cane Cookies
Honestly, these Candy Cane Cookies are perfect all by themselves, but you know what makes them truly spectacular? The right drink pairing! Since these are packed with that cool, invigorating peppermint, they cry out for something rich and creamy to scoop them into.
First stop: Hot Chocolate! Nothing beats dipping a perfectly crisp, minty cookie into a mug of rich, dark hot chocolate. The sweetness of the chocolate meets the sharpness of the minty dough, and it’s absolute winter bliss. If you’re looking for a non-hot option that still hits that chocolate note, I have a ridiculously easy recipe for an Ultimate Chocolate Milkshake Delight that tastes fantastic paired with these cookies, too!
For the grown-ups hanging around the kitchen while the baking happens, these are wonderful alongside a strong cup of coffee or maybe even a nice espresso. The bitterness of the coffee is just heavenly against the sugar cookie base and the peppermint finish.
And of course, if you’re serving these to the kids on Christmas morning, standard cold milk is never a bad idea. Dunking is mandatory, I think! They look so pretty on a platter next to some simple shortbread or maybe some peanut butter cookies if you actually manage to bake anything else after these steal the show.
Frequently Asked Questions About Candy Cane Cookies
I get so many lovely messages about these Candy Cane Cookies once the holiday baking starts up, and some questions just pop up every year! Don’t feel silly asking—getting that perfect swirl can take a little practice. Here are some of the most common things folks ask me about making these peppermint cookies.
Can I skip the red food coloring?
You absolutely can! If you skip the food coloring, you’ll end up with beautiful, simple vanilla peppermint twist cookies. The dough will just be plain white and the flavor signature comes entirely from the peppermint extract. They won’t look exactly like a traditional candy cane, but they’ll taste just as wonderful. Personally, I think the red is part of the fun, but bake what makes you happy!
My twists keep coming undone when I bake them! What am I doing wrong?
Oh, that’s frustrating, isn’t it? This almost always happens for one of two key reasons. First, the dough wasn’t cool enough when you were twisting. If the butter is too soft, the ropes are floppy and they just smooth out in the oven. Make sure you chill the dough for at least 15 minutes before you start rolling and twisting. Second, you might be twisting the ropes too tightly. You want a gentle twist so there is still some separation between the red dough and the white dough left in the final curve.
Can I use actual crushed candy canes in the dough instead of just the extract?
You can! I mentioned this when talking about substitutions, but it bears repeating here because it’s a popular idea. If you want that extra crunch and pop, stir about 1/2 cup of finely crushed hard peppermint candies into the base dough before you divide it for coloring. However, you need to be aware that the hard candy melts a bit during baking, so you might lose some of the distinct swirl pattern as the colors bleed together slightly. It’s a trade-off between intense flavor and the clean two-tone look.
Why do my cookies look more pale yellow than bright white?
That’s usually down to the butter and vanilla! If you used salted butter or if your vanilla extract is darker, the final white dough won’t be pure white. To get that true, stark white color that really makes the red pop, try using pure white vegetable shortening instead of butter for the *cookie base* (but never for the glaze, if you make one!). If you stick with butter, just know that the slight yellow hue is totally normal and doesn’t affect the taste one bit. For extra crispness, you might also want to check out my tips on using Christmas Cake Truffles in a different way—though I admit, that’s a stretch!
Nutritional Snapshot of These Candy Cane Cookies
Alright, let’s talk numbers! I know most of us aren’t making these cookies for their health benefits—they’re a holiday treat, after all! But for those of you keeping track, I dug up the estimates based on the ingredients we used. Just remember, this is a rough guess based on how much everyone eats!
This information is based on a serving size of just one cookie, which, let’s be honest, is never just one cookie when you’re in a holiday mood, right?
- Serving Size: 1 cookie
- Calories: Around 140 calories. Not too bad for a festive bite!
- Fat: About 7g total fat. Four of those grams are saturated, which is mostly from that lovely butter we used.
- Carbohydrates: You’re looking at about 18g of carbs per cookie.
- Sugar: This clocks in around 12g of sugar. Sweetness is required for delicious cookies, that’s just science!
- Protein: A modest 2g of protein.
- Cholesterol: Roughly 25mg.
Just a friendly little heads-up, though: these figures are just estimates. If you use margarine instead of butter, or if you decide to pack in extra peppermint extract, these numbers will shift a little! But for a classic, homemade peppermint cookie, that’s a pretty solid snapshot to keep in mind while you’re stacking them high for Santa.
Print
Candy Cane Cookies
- Total Time: 40 min
- Yield: 2 dozen 1x
- Diet: Vegetarian
Description
A simple recipe for festive, peppermint-flavored cookies shaped like candy canes.
Ingredients
- 1 cup unsalted butter, softened
- 1 cup granulated sugar
- 1 large egg
- 1 teaspoon vanilla extract
- 2 3/4 cups all-purpose flour
- 1/2 teaspoon baking powder
- 1/4 teaspoon salt
- 1/4 teaspoon peppermint extract
- Red food coloring
- 1/2 cup powdered sugar for dusting
Instructions
- Preheat your oven to 350 degrees F (175 degrees C). Line baking sheets with parchment paper.
- In a large bowl, beat the softened butter and granulated sugar until creamy.
- Beat in the egg and vanilla extract.
- In a separate bowl, whisk together the flour, baking powder, and salt. Gradually add the dry ingredients to the wet ingredients, mixing until just combined.
- Divide the dough in half. Mix the peppermint extract into one half.
- Add a few drops of red food coloring to the second half of the dough and mix until the color is uniform.
- Take a small piece of the white dough and a small piece of the red dough. Roll each piece into a rope about 4 inches long.
- Twist the red and white ropes together gently. Bend one end of the twisted rope to form the hook shape of a candy cane.
- Place the cookies on the prepared baking sheets, leaving space between them.
- Bake for 8 to 10 minutes, or until the edges are lightly golden.
- Let the cookies cool on the baking sheet for 5 minutes before transferring them to a wire rack to cool completely.
- Dust with powdered sugar before serving.
Notes
- For a stronger peppermint flavor, you can increase the peppermint extract to 1/2 teaspoon.
- If the dough is too sticky to handle, chill it for 15 minutes before shaping.
- Prep Time: 30 min
- Cook Time: 10 min
- Category: Dessert
- Method: Baking
- Cuisine: American
Nutrition
- Serving Size: 1 cookie
- Calories: 140
- Sugar: 12
- Sodium: 45
- Fat: 7
- Saturated Fat: 4
- Unsaturated Fat: 3
- Trans Fat: 0
- Carbohydrates: 18
- Fiber: 0
- Protein: 2
- Cholesterol: 25
Keywords: Candy Cane Cookies, peppermint cookies, Christmas cookies, holiday baking, sugar cookies