
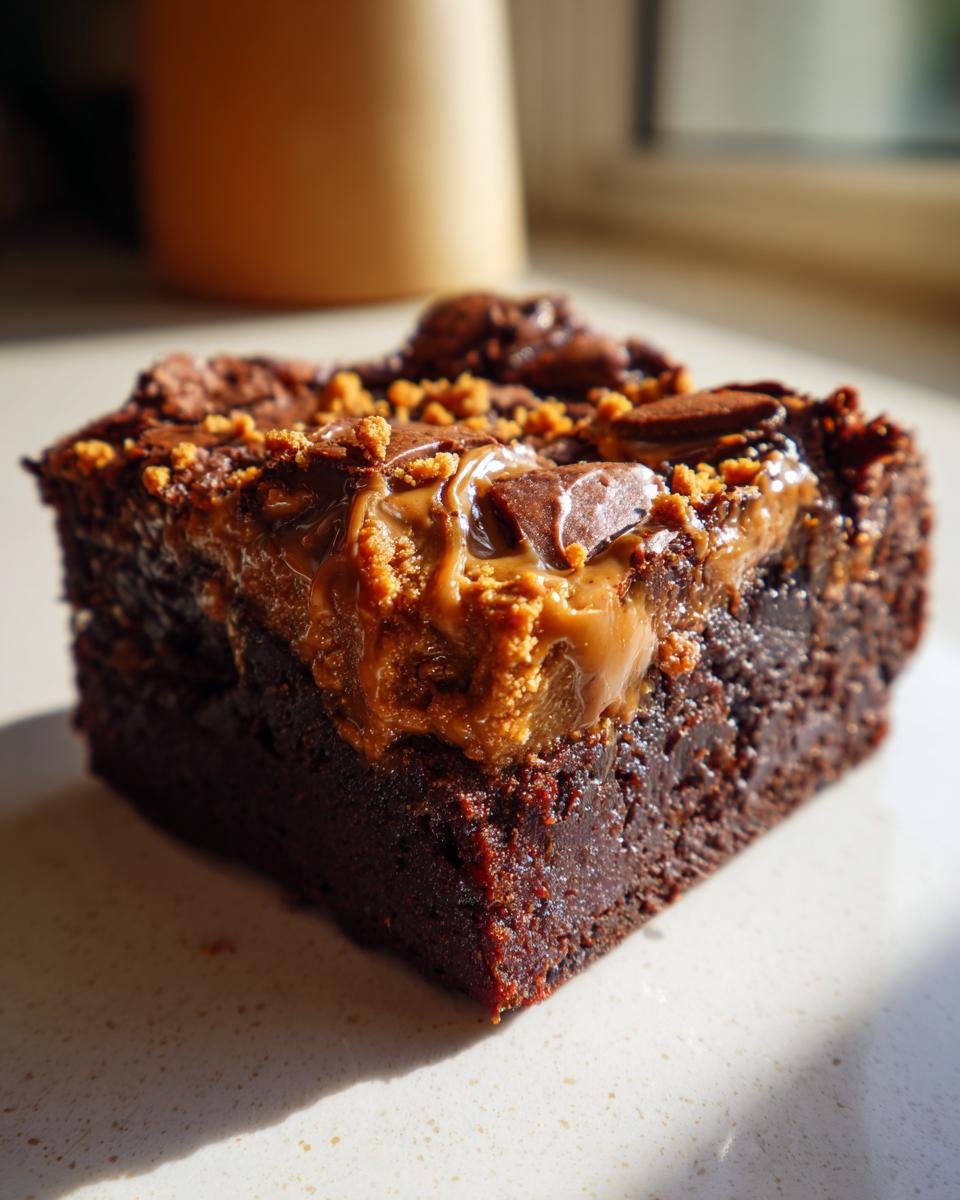
Forget everything you thought you knew about baking brownies because these? These are on another level! We’re talking about the ultimate fudgy, deeply chocolatey dessert, but the real star is that cinnamon-spiced cookie butter swirl. I’m not exaggerating when I say these Biscoff Brownies are the richest and easiest ones you’ll ever whip up. Seriously, the process is shockingly fast, and you don’t even need a stand mixer for the base!
This recipe came from my long, slightly obsessive quest for the perfect dense brownie base—you know, the kind that sticks to your fingers and practically melts when you bite into it. When I finally layered that creamy, slightly spiced Biscoff spread right into the gooey chocolate, I knew I had nailed it. They truly taste like they took hours, but trust me, you’ll have these ready for the oven in under 20 minutes. Get that butter melting!

Why You Will Love These Biscoff Brownies
I get why people sometimes mess up brownies—they can turn cakey or dry super easily. But these? They are my fail-safe method for perfect fudgy goodness every single time. If you love intense chocolate and that beautiful caramel spice flavor, you need this recipe in your life. Look at all the delicious reasons why these will become your go-to:
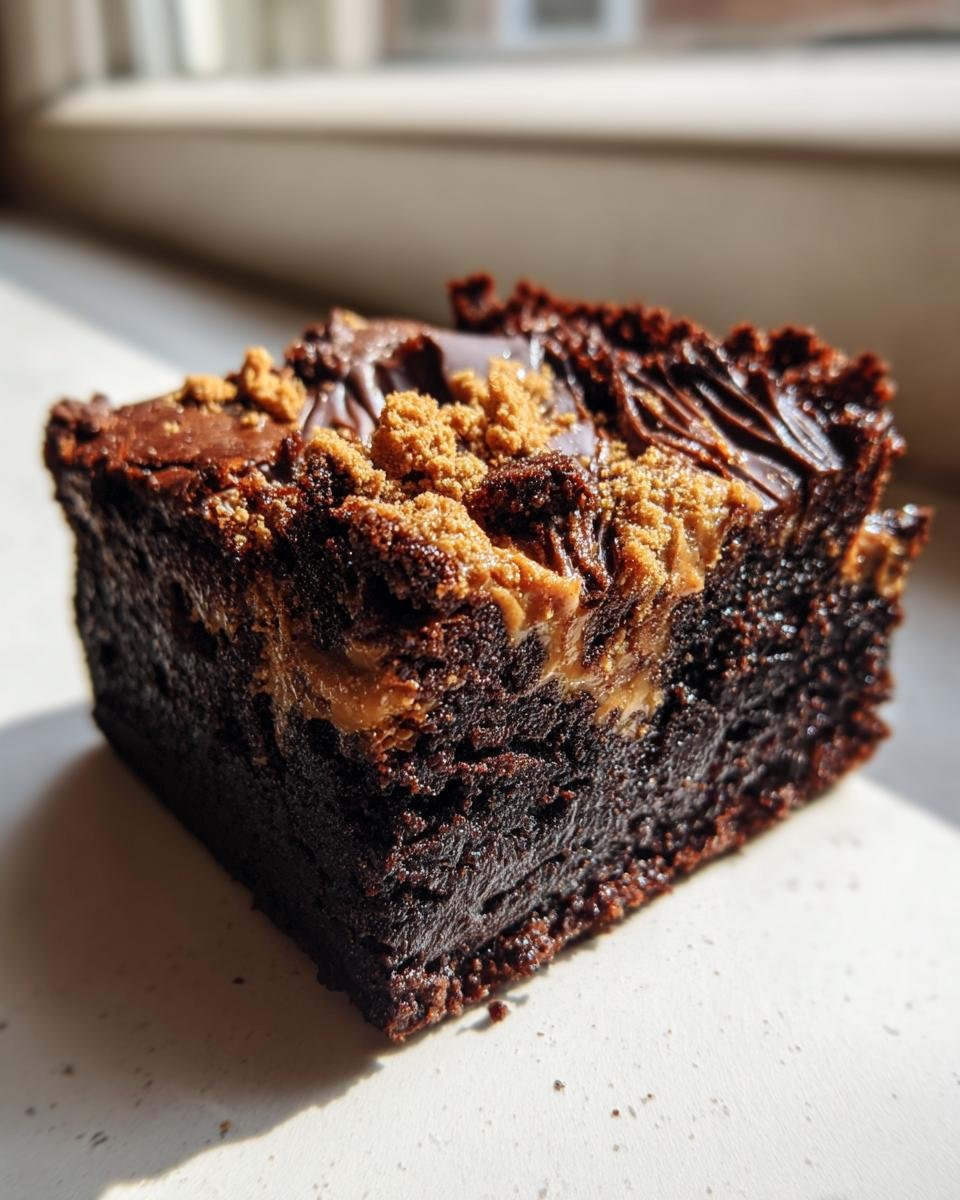
- They are unbelievably fudgy. We aren’t messing around with cakey textures here; these stick to your fork!
- The double layer of flavor is everything: rich dark chocolate mixed with a creamy baking magic from the cookie butter swirl.
- They are surprisingly quick to mix up. You use melted butter, which cuts down on creaming time significantly.
- Those crushed cookies on top give you the best textural contrast. That little crunch against the melted fudge layer? Perfection.
Essential Ingredients for Perfect Biscoff Brownies
Okay, since these rely on that incredible texture, the ingredients matter so much. You can’t fake the chocolate flavor here, so use the best cocoa powder you have! The recipe uses a mix of both white and brown sugar, which I adore because the brown sugar really brings in that deep, slightly molasses note that plays so nicely with the spice from the cookies.
And of course, the stars are the Biscoff components. You’ll need smooth cookie butter—we warm some of it up for mixing and swirling. Then, you absolutely need actual Biscoff cookies, which you’ll crush up. If you happen to have some extra cookie butter on hand, you can always make an even bigger swirl, but stick to the measurements below for the first try!
- One cup of unsalted butter that you’ll melt down for the base.
- A total of two cups of sugar: one cup granulated and one cup packed dark brown sugar.
- Four large eggs and one teaspoon of good vanilla extract.
- The dry stuff: three-quarters cup of unsweetened cocoa powder, half a cup of all-purpose flour, and just half a teaspoon of salt.
- The magic: half a cup of smooth Biscoff cookie butter, plus a little extra just for drizzling over the top. Don’t forget one full cup of Biscoff cookies, roughed up into small pieces—I just crush them in a ziplock bag with a rolling pin! See how amazing these chocolate chip delights are too?
Equipment Needed for Your Biscoff Brownies
Part of what makes this recipe so fuss-free is that you don’t need a ton of fancy gadgets. You likely have all of this sitting in your drawers already! Getting your tools ready beforehand is half the battle, trust me. If you have everything set out, the mixing goes so smoothly, you’ll be amazed at how fast this comes together.
Here is what you need to gather up before you start melting that butter:
- A sturdy 9×9 inch baking pan. This size gives us the perfect thickness for fudgy bars.
- Parchment paper! This is non-negotiable for me. You need enough to line the pan completely, leaving an overhang on two sides. This little flap is your handle for lifting the whole slab out later—a lifesaver!
- A small saucepan for melting the butter gently. Keep the heat low; we aren’t trying to fry anything!
- A whisk for the initial sugar and butter mixing, and then a good sturdy rubber or silicone spatula.
- Two mixing bowls: one large one for combining the wet and dry ingredients, and one smaller dish just to whisk your dry powders together.
- A measuring cup set and spoons, obviously. Accuracy helps when you are aiming for that perfect fudge texture.
Step-by-Step Instructions to Make Fudgy Biscoff Brownies
This might be the easiest brownie recipe you’ll ever make, but because we are aiming for that dense, fudgy center, the order you mix things in really matters. Remember, the key to homemade brownies that taste like they came from a fancy bakery is mixing these ingredients just until they come together. Don’t rush the layering part—that’s where all the delicious Biscoff magic happens!
You’ll want to grab your ingredients list and make sure everything is measured out before you even turn the stove on. If you follow these steps exactly, you’ll end up with those incredibly dense, shiny-topped bars that everyone fights over. You can check out my tips for making epic homemade brownies for comparison, but I promise, these take the prize!
Preparing the Pan and Oven
First things first: get that oven humming at 350°F (175°C). Take your 9×9 pan and line it completely with parchment paper. Make sure you leave a good overhang on opposite sides—this is your handle later! Don’t skip this; it makes moving your cooled, fudgy slab out so much easier.
Mixing the Biscoff Brownies Batter Base
Melt your butter gently in the saucepan, then take it off the heat. Whisk in both the granulated and brown sugars until they look happy together. Now, beat in your eggs one by one—don’t dump them all in! While that’s happening, quickly whisk your cocoa powder, flour, and salt in a separate bowl.
Here’s the most important part: add the dry ingredients to the wet ingredients gradually. Mix ONLY until you see no more streaks of flour. If you overmix, you start developing gluten, and poof! Gone is your fudge factor. We want dense, not chewy!
Layering the Biscoff Goodness
Pour exactly half of your chocolate batter into that prepared pan. Now, warm up that half-cup of Biscoff spread—just 15 seconds in the microwave makes it perfectly drizzle-able. Drizzle half the spread over the first layer of batter, and sprinkle half of your crushed cookies right over that. Then, top it all off with the second half of the batter, the remaining drizzle, and the rest of the crushed cookies.
Baking and Cooling Your Biscoff Brownies
Bake for 30 to 35 minutes. You are looking for a toothpick inserted near the edge to come out with moist, sticky crumbs attached—if it’s totally clean, you’ve gone too far, my friend! Resist the urge to cut them immediately. You absolutely must let these cool completely in the pan. Slicing warm brownies just results in a gooey mess. Patience brings the perfect fudgy squares!

Tips for Achieving the Best Biscoff Brownies Texture
You’ve got the layers right, but if you want that absolute top-tier fudgy texture—the kind that sinks a little under the weight of the Biscoff topping—you need a few extra tricks up your sleeve. It’s all about temperature control, really!
Honestly, don’t even think about using eggs straight from the fridge. Letting them sit out for 20 minutes gets them to room temp, which helps them emulsify better into the sugars. That smooth blend is what keeps the structure soft, not tough.
Oven Calibration and the Bake Time Game
You have to trust your oven, but check it with a separate thermometer now and then! If your oven runs hot, those 35 minutes will turn your fudgy dream into a hockey puck. Also, remember that slightly underbaking is your friend here. A toothpick shouldn’t pull out clean; it should have gooey, wet crumbs—that’s the secret for fudgy bars. If you want to see a radically different, fast version, check out my single-serve mug brownie hack!
Do Not Overmix the Cocoa
I stressed this before, but it bears repeating: once the cocoa and flour hit the wet stuff, you’re on the clock! Mix just until the flour disappears. The streaks vanish on their own during baking. Overmixing after adding the dry ingredients is the number one reason brownies turn cakey. We want dense and moist, not light and airy!
Biscoff Brownies Substitutions and Variations
Even though this version of Biscoff Brownies is pretty close to perfect as is, I always love playing around with ingredients, especially when I’m missing one key item! Life happens, right? Don’t panic if you’re out of Biscoff, or maybe you want to make these a little extra decadent.
The great news is that cookie butter is pretty versatile. If you don’t have the specific brand, most other brands of speculoos cookie butter work just as well. They all have that amazing cinnamon and spice profile that we are looking for. If you’re looking for a different flavor bomb, try using peanut butter or almond butter for the swirl layer instead! It changes the flavor dynamic completely, but it’s still delicious.
Swapping Out the Cocoa Powder
Sometimes I run out of cocoa powder, and I have to pivot quickly. If you find yourself in that same spot, you can swap the cocoa powder for an equal amount of high-quality melted bittersweet chocolate. You’ll need to melt about 4 ounces of chocolate chips with the butter for the base mixture. It adds a smoother, richer chocolate flavor compared to the sharper taste cocoa gives you. Just make sure that melted chocolate is cooled slightly before adding your sugars!
Adding Texture and Flips
The crushed cookies on top are fantastic, but you can always level up. My favorite simple addition is sprinkling a tiny bit of flaky sea salt right over the Biscoff drizzle before baking. That little salty pop cuts through the richness of the chocolate and the sweetness of the spread beautifully. It just makes these Biscoff Brownies taste ten times more gourmet!
Another fun thing to try is folding in some mini chocolate chips or chopped pretzels into the batter right alongside those crushed Biscoff cookies for a salty-sweet crunch. If you’re interested in playing with veggies in your baked goods, you should check out my zucchini chocolate brownies for sneaking in some extra greens!
Storing and Reheating Your Biscoff Brownies
This is where patience comes in again, but this time, it’s about waiting to eat them tomorrow! Since these brownies are so super fudgy, sometimes they actually taste even better the next day once they’ve fully set up. You really want to resist cutting into them straight away, but if you must, just cover them loosely in the pan after they’ve cooled for an hour or two so they don’t harden too much on the edges.
When it comes to storage, you have options depending on how quickly you plan on demolishing this batch. Don’t worry; these keep beautifully, which is great because that means you can bake them ahead of time for parties!
Room Temperature Storage
If you think you’ll eat them all up within three or four days, keeping them on the counter is the easiest route. Just make sure you cut them first—it’s easier to manage when they’re fully cooled, remember? Place the squares in an airtight container. I like putting a layer of wax paper or parchment between the layers of brownies so the sticky Biscoff topping doesn’t glue them all together into one giant brick. Keep the container in a cool, dark spot, away from any heat sources.
Refrigeration for Longer Freshness
Want them to last a whole week? Pop that airtight container right into the fridge! The cold will make them even denser, which some people actually prefer—it gives them that super chewy, almost candy-like texture. They firm up nicely, which is great if you like your chocolate treats very firm.
Freezing for Future Cravings
Listen, if you make a double batch (which you absolutely should), freezing is your best friend! Once the squares are completely cool and cut, wrap each piece individually in plastic wrap first. Then, tuck those wrapped squares into a heavy-duty freezer bag. They’re good in the freezer for about three months, no problem.
When you’re ready to eat one, just pull it out of the freezer bag and let it thaw on the counter for about an hour, still in its plastic wrap. If you’re in a massive rush, you can microwave it for just 10-15 seconds, but be careful! You don’t want to melt that beautiful Biscoff swirl right off the top.
Frequently Asked Questions About Biscoff Brownies
I get so many messages asking little tweaks or troubleshooting tips! It makes perfect sense; everyone wants their Biscoff Brownies to be exactly how they picture them in their head, which for me means super fudgy and loaded with that cookie swirl. Here are some of the things I hear most often about this recipe.
Why are my brownies cakey instead of fudgy?
Oh, the eternal brownie dilemma! If your Biscoff Brownies came out tasting more like a chocolate cake, it’s almost always one of two things. First, you might have added too much flour—make sure you spoon the flour into your measuring cup and level it off; never scoop directly from the bag! Second, and this is the big one, you likely mixed the batter way too much once the flour went in. Remember, we stop mixing as soon as those dry streaks disappear. That slight underbake also helps keep that center gooey!
How long do these Biscoff Brownies last?
Because this recipe has plenty of fat from the butter and the oily cookie spread, they stay wonderfully fresh for days! Stored correctly in an airtight container at room temperature, they are fantastic for about four or five days. If you managed to save any that long, they’ll still be good in the fridge for up to a week, though they firm up a bit when chilled.
Can I use crunchy Biscoff spread instead of smooth?
You absolutely can! If you love texture, using crunchy Biscoff spread is a fun little twist. You’ll still want to warm it up briefly to help it drizzle nicely, but those little bits of cookie mixed throughout the spread add an extra layer of crunch against the soft fudge. It’s a totally great variation on the classic Biscoff Brownies experience!
Can I make these brownies vegan?
That’s a tough one because this recipe relies heavily on eggs for structure and that perfect dense lift, plus dairy butter for the flavor. Making a true swap for the eggs and butter without changing the outcome drastically would require a total recipe overhaul, honestly. If you’re looking for a completely plant-based treat, you might be better off searching for a recipe specifically developed to be vegan from the start, though I adore how these cheesecake brownies turn out, too!
Nutritional Estimates for Biscoff Brownies
Look, I won’t lie to you—these irresistible Biscoff Brownies are a total treat, not an everyday snack! They are rich, loaded with chocolate, butter, and that glorious cookie spread, so they aren’t exactly low-cal, but you knew that when you decided to bake them, right? Part of enjoying baking is knowing what you are getting into!
I ran the numbers based on the recipe below into my tracker just so you have a rough idea of what you are pulling out of that pan. Remember, these are just estimates, and your results might vary a little bit depending on the specific brand of cocoa powder or the exact amount of butter you used. Did you add extra Biscoff drizzle? Well, that’s going to swing the sugar upwards a bit!
Here is what the general breakdown looks like per square (assuming you got 16 perfect squares, which is a very optimistic goal!):
- Calories: Approximately 300 per brownie. Definitely a rich choice!
- Total Fat: Around 18 grams, which gives us that amazing melt-in-your-mouth mouthfeel.
- Carbohydrates: We are looking at about 33 grams of carbs, most of which comes from that delicious sugar content.
- Protein: Around 4 grams per serving.
Enjoy them guilt-free because homemade is always better, and these are worth every single glorious, fudgy bite!
Print
Biscoff Brownies
- Total Time: 50 min
- Yield: 16 brownies 1x
- Diet: Vegetarian
Description
Rich, fudgy brownies topped with melted Biscoff spread and cookie pieces.
Ingredients
- 1 cup unsalted butter
- 1 cup granulated sugar
- 1 cup packed brown sugar
- 4 large eggs
- 1 teaspoon vanilla extract
- 3/4 cup unsweetened cocoa powder
- 1/2 cup all-purpose flour
- 1/2 teaspoon salt
- 1/2 cup Biscoff cookie butter (plus extra for topping)
- 1 cup Biscoff cookies, crushed
Instructions
- Preheat your oven to 350°F (175°C). Line a 9×9 inch baking pan with parchment paper, leaving an overhang.
- Melt the butter in a saucepan over low heat. Remove from heat.
- Whisk the granulated sugar and brown sugar into the melted butter until combined.
- Beat in the eggs one at a time, then stir in the vanilla extract.
- In a separate bowl, whisk together the cocoa powder, flour, and salt.
- Gradually add the dry ingredients to the wet ingredients, mixing until just combined. Do not overmix.
- Pour half of the batter into the prepared pan.
- Warm 1/2 cup of Biscoff spread slightly so it is pourable. Drizzle half of the warmed spread over the batter. Sprinkle with half of the crushed cookies.
- Pour the remaining batter over the top. Drizzle with the remaining Biscoff spread and sprinkle with the remaining crushed cookies.
- Bake for 30 to 35 minutes, or until a toothpick inserted near the edge comes out with moist crumbs attached.
- Let the brownies cool completely in the pan before lifting out using the parchment overhang and cutting into squares.
Notes
- For extra fudginess, slightly underbake the brownies.
- You can warm the Biscoff spread in the microwave for 15-20 seconds to make drizzling easier.
- Prep Time: 15 min
- Cook Time: 35 min
- Category: Dessert
- Method: Baking
- Cuisine: American
Nutrition
- Serving Size: 1 brownie
- Calories: 300
- Sugar: 30
- Sodium: 150
- Fat: 18
- Saturated Fat: 10
- Unsaturated Fat: 8
- Trans Fat: 0
- Carbohydrates: 33
- Fiber: 2
- Protein: 4
- Cholesterol: 80
Keywords: Biscoff, brownies, chocolate, fudge, cookie butter, dessert, baked goods