
When the weather is just too hot for the oven to even think about turning on, that’s when I reach for the easiest, coziest dessert in my entire recipe binder. Seriously, I’m talking about something that requires zero actual baking time—just a little assembling and a lot of chilling. This classic **Banana Icebox Cake** is my absolute go-to for instant sweet satisfaction. I remember making this for the first time when I was about ten, trying to impress my older cousins during a summer cookout. It looked so impressive, but it was secretly just whipped cream and cookies! Trust me, the results you get from just a few simple ingredients sitting in the fridge are pure magic.
Why This Banana Icebox Cake Recipe Works So Well
I love this recipe because it proves you don’t need fancy equipment or hours of fuss to make something that tastes absolutely indulgent. It’s my backup plan when company shows up unexpectedly, or frankly, when I just need chocolate and banana without dirtying half my kitchen. It really comes together in minutes, and that’s the beauty of it.
This approach gets rave reviews every single time. If you’re looking for something similar for other occasions, you might want to check out my no-bake funfetti Oreo icebox cake idea too!
No-Bake Dessert Simplicity
The best part? You don’t even preheat the oven. That’s right, this is the ultimate summer classic. It’s perfect for when you have young kids helping, or if you just hate cleaning up baking sheets. It’s just mixing, layering, and waiting—no sweat involved!
The Magic of Chilling Time
Don’t try to cheat this step, please! When you layer the cream and bananas with those thin chocolate wafers, the wafers soak up all the moisture from the cream. After about six hours, those crisp cookies melt right into a soft, dark, cake-like layer. That transformation is what makes this dessert a genuine **Banana Icebox Cake** and not just a trifle!
Essential Ingredients for Your Banana Icebox Cake
Okay, let’s talk what you actually need to make this happen. The ingredient list is shockingly short, which is another reason I trust this recipe when I’m in a hurry. It’s all about quality here since there aren’t a ton of things to hide behind! You’ll need one cup of heavy whipping cream—and I mean *cold* cream straight from the back of the fridge, that’s important for whipping later on.
Next up is powdered sugar, about a quarter of a cup, because it dissolves so much nicer into the cream than granulated sugar does. Add in a teaspoon of vanilla extract, and that’s your cream base sorted. Then, the stars of the show: three perfectly ripe bananas. They need to be sweet, but not so mushy they collapse when you slice them.
The absolute must-have is one full package of those crisp, thin chocolate wafer cookies. Don’t get the sandwich kind; you want the classic, thin rounds. If you want another creamy, banana-focused dessert, you should check out my thoughts on the best banana pudding recipe, but for this, the wafers are non-negotiable!
Finally, a little dusting of unsweetened cocoa powder right before serving. Seriously, that’s it! Simple, right?
Expert Tips for the Perfect Banana Icebox Cake Whipped Cream
Okay, let’s address the elephant in the room: the whipped cream. If this part goes wrong, the whole **Banana Icebox Cake** suffers because the cream is holding everything together! My biggest secret, which I learned the hard way after a couple of runny disasters, is temperature control. You absolutely must chill your mixing bowl and your whisk attachment or beaters in the freezer for at least fifteen minutes before you start.
It seems slightly over-the-top, but seriously, that initial cold shock helps the fat molecules in the heavy cream whip up faster and hold their shape better, which is crucial for that dense, stable structure we need to support the bananas and wafers. If you want a deeper dive into all things stabilized cream, check out this great primer on DIY whipped cream!
Achieving Stiff Peaks for Your Banana Icebox Cake
You’re looking for visual cues here, not just a time limit. When you lift the whisk, the peaks should stand straight up without folding or drooping over at all. That’s your stiff peak, and that means you’re ready to stop mixing! If you see the mixture start to look grainy or slightly yellow around the edges, you’ve gone too far and you’re turning your cream into butter, which is not what we want here. Stop immediately if you see that happening! The sugar helps stabilize it a bit, but the cold bowl is your first line of defense against buttery failure.
Step-by-Step Assembly of the Banana Icebox Cake
Now for the fun part—we get to build this gorgeous, chilled masterpiece! Grab your loaf pan or whatever small rectangular dish you decided to use. Remember, since this is a no-bake dessert, presentation is key because that chilling time does all the heavy lifting! Start by being a little generous with the whipped cream on the very bottom of the dish. You want a solid foundation layer, maybe about half an inch thick. This prevents our chocolate wafers from sticking right to the glass, trust me on this one.
Next, lay down your first complete layer of chocolate wafer cookies. Try to cover the entire cream base. If you notice any tiny gaps in the corners—which happens especially if your pan isn’t perfectly square—it’s okay to slightly overlap two cookies just to make sure you get that soft, cakey texture throughout! Once the cookies are placed, scatter your sliced bananas evenly over the top. Don’t overdo the bananas on this first layer; think thin and even coverage.
Then we repeat the pattern! Ice cream on bananas, then cookies, then bananas again, then cover that all up with another thick layer of whipped cream. You are essentially building a parfait, but one that freezes itself into a solid cake structure. Keep working through the layers until you run out of ingredients, always ending on a big fluffy cloud of whipped cream right on top for that beautiful finished look. When I did this last week, I ended up with four distinct cookie layers. It looked huge, but it shrunk down perfectly overnight!

If you want a different take on quick banana desserts, you might like this easy 15-minute no-bake banana treat, but this layering method really delivers on that classic **Banana Icebox Cake** promise.
Crucial Chilling Instructions for the Banana Icebox Cake
Listen up, because this is where most people mess up this amazing no-bake dessert. You cannot rush the icebox part! I know we just spent twenty minutes layering everything perfectly, and now you want to dig in, but you have to resist that urge. The minimum time this **Banana Icebox Cake** needs in the fridge is a solid six hours. Six hours of soaking time is when those crisp chocolate wafers start their transformation. They turn from crunchy little soldiers into something soft and velvety, blending right into the cream.
If you can manage it—and I always recommend this if you’re planning ahead—let it chill overnight. Overnight is when the flavors really marry, and the texture achieves peak perfection. It goes from good to absolutely melt-in-your-mouth spectacular. If you are dealing with very hot weather and need to keep your desserts cool, this recipe is your answer, but you still need that chill time. You can even look at some ways to keep no-bake pies cool if you are worried about humidity affecting your layers!
Serving and Finishing Touches for Your Banana Icebox Cake
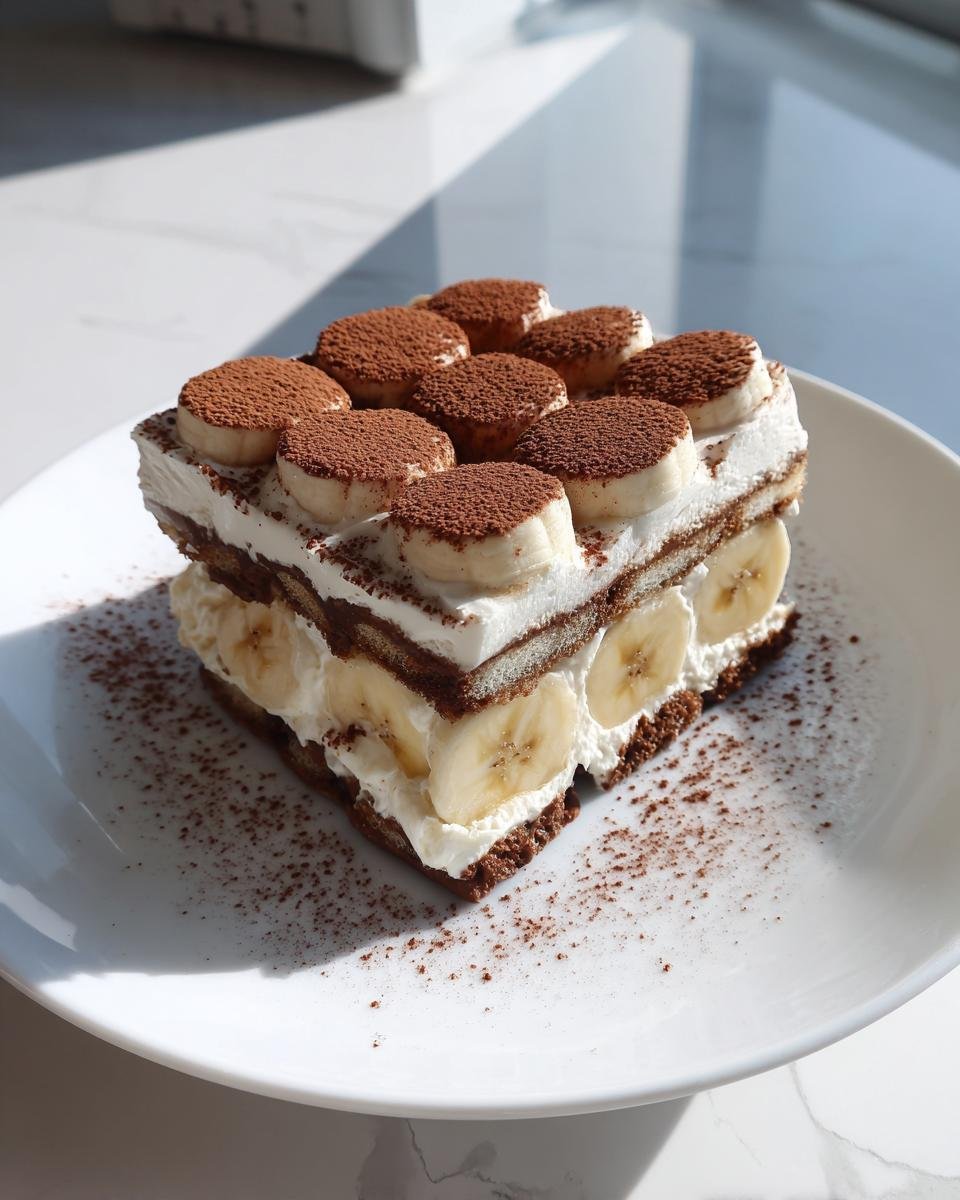
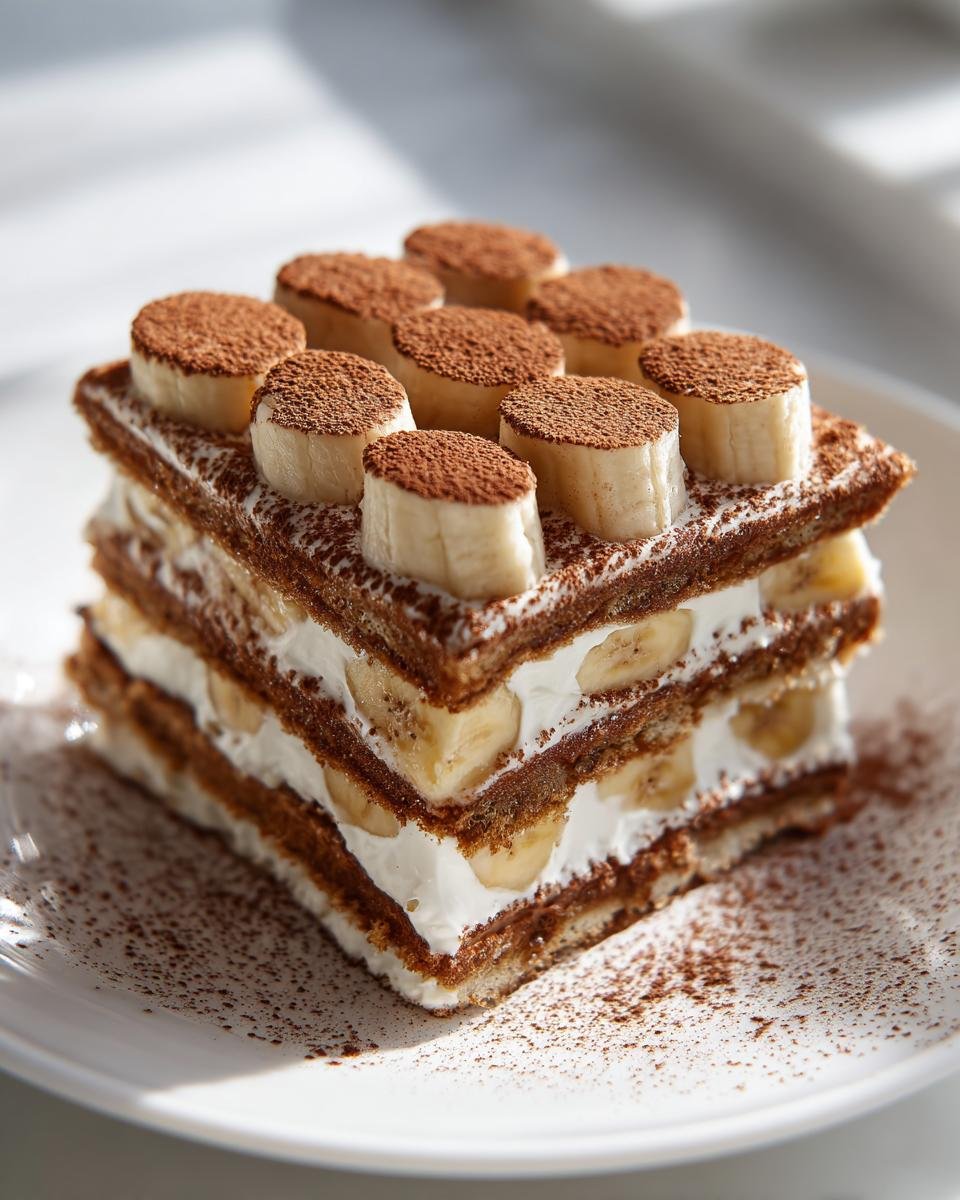
Because this whole dessert relies on chilling, the grand finale presentation once it comes out of the fridge is super exciting! When you finally unwrap that plastic wrap, you’ll see everything has settled down perfectly into a beautiful, tall sliceable block. Right before you bring it to the table, you need that final little flourish.
Take your unsweetened cocoa powder—just a tiny sifter full—and lightly dust the entire top surface. It gives the cake that incredibly rich, bakery-style finish that makes people think you spent hours tending to it. Don’t overdo the dust, though; a light veil is all it needs to contrast beautifully with the white cream underneath.
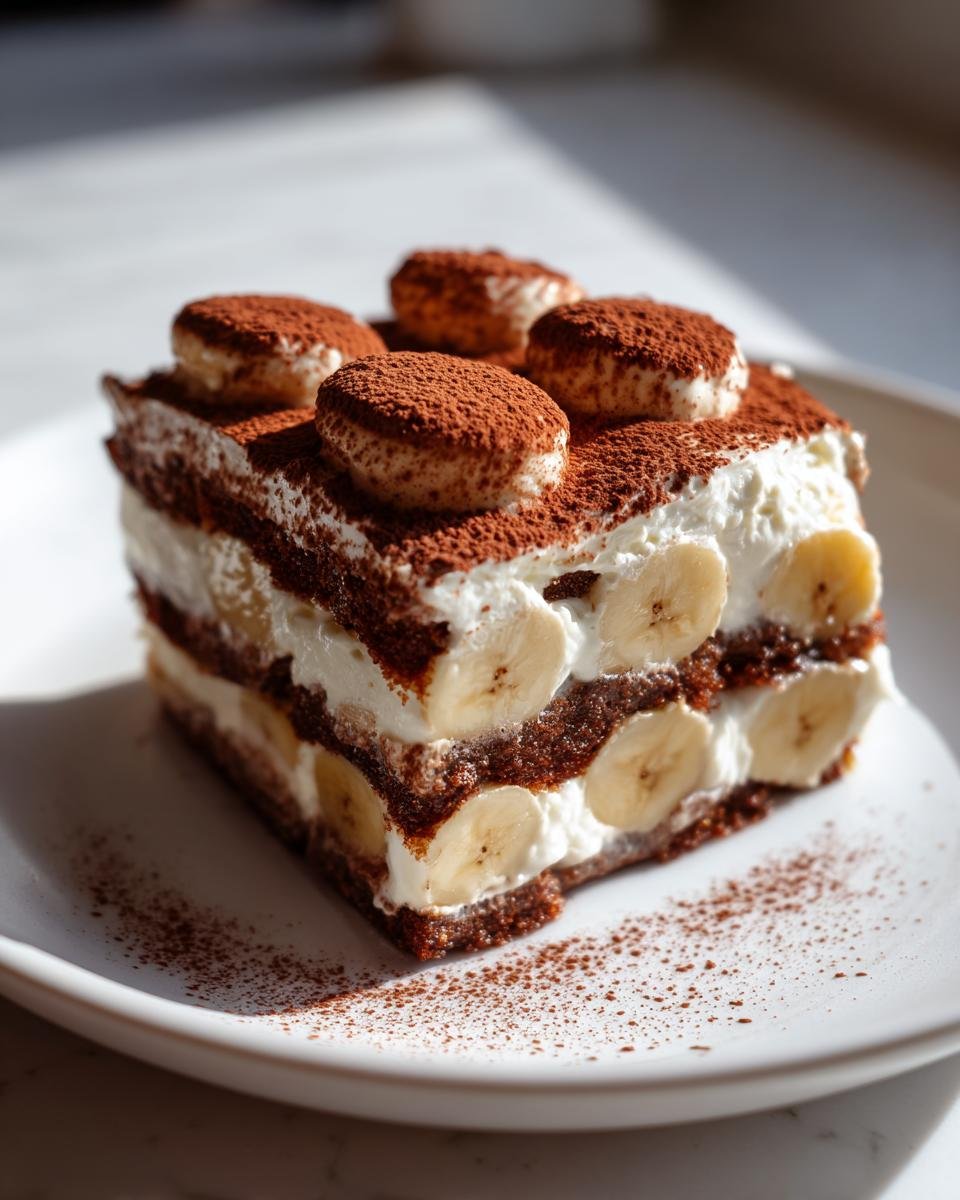
Now for the tricky part: slicing. Since this **Banana Icebox Cake** achieved that gorgeous, soft texture, you can’t just hack at it with a regular knife or you’ll push the layers out the sides. I always take a long, thin, sharp knife and dip it into hot water, wiping it completely dry before making the first cut. That heat helps the blade slide right through the chilled cream and softened wafers without smashing the layers down. Wipe the knife clean between every single slice or two, and you’ll get perfect, clean portions every single time. Enjoy watching your guests tackle that first decadent bite!
Ingredient Notes and Substitutions for Banana Icebox Cake
Even though this **Banana Icebox Cake** is super simple, paying attention to a few ingredient details makes the difference between good and mind-blowingly good. Let’s go back to those bananas—you really want them firm-ripe. If they are too green, they won’t be sweet enough to balance the cream, and if they are too soft, they’ll turn to mush halfway through chilling. We need that perfect balance so they hold their shape!
Now, if you’ve run out of the chocolate wafers, don’t panic! You can absolutely use graham crackers instead. Just know that the resulting **chocolate wafer cake** will taste a little different; it becomes sweeter and less intensely chocolatey, which some folks actually prefer. For those wafers, I always look for the thinner, more brittle style; the thicker ones sometimes take way too long to soften up properly, and we don’t have time for that!
If you are keen to explore other fudgy no-bake options after mastering this one, maybe give my zucchini chocolate brownies a look when you are ready to turn the oven back on!
Frequently Asked Questions About Making Banana Icebox Cake
I get so many questions about this dessert because people are always trying to speed it up, but trust me, the waiting is part of the joy! Here are the things readers ask me most often when they are planning to make their first **Banana Icebox Cake**.
Can I use different cookies in this no bake dessert?
Yes, you certainly can experiment, but keep in mind that the chocolate wafers are specifically chosen for a reason! They are thin and have a specific fat content that helps them soften perfectly over time, resulting in that cake-like texture we are obsessed with. If you use something thicker, like standard vanilla wafers or shortbread, they might end up just being soft cookies instead of cake. If you use graham crackers, like I mentioned before, it works in a pinch, but the overall final flavor of this **no bake dessert** will definitely shift toward a banana crust vibe rather than that deep, dark chocolate contrast.
How far in advance can I prepare the Banana Icebox Cake?
This is actually one of the greatest advantages of making this dessert! You need a *minimum* of six hours for the wafers to soften up enough, but for the absolute best result, I always tell folks to aim for overnight preparation. If you make it the day before, the bananas have time to really integrate their flavor into the cream layers, and the cookies are unbelievably tender. It keeps perfectly well in the fridge for up to three days. I wouldn’t push it past that, though, just because bananas start to brown slightly, even when covered in cream.
If you like the idea of quick chocolate treats, you should definitely check out my tutorial on making an easy 15-minute no-bake chocolate marshmallow pie for those times when you need something *right now*!
Can I use regular sugar instead of powdered sugar in the cream?
You *can*, but I strongly advise against it if you want the best whipped cream for your **Banana Icebox Cake**! Granulated sugar doesn’t dissolve as easily as powdered sugar when you’re whipping cold cream. If you use regular sugar, you risk having slightly gritty cream, or worse, you might over-whip the cream trying to get the sugar dissolved, which leads to that buttery texture we are trying to avoid. Powdered sugar has cornstarch in it, which also helps stabilize the peaks, giving you a smoother, more reliable result with less effort.
Do I need to use a loaf pan? What if I want a taller cake?
A loaf pan is just my personal preference because it makes for a neat, easy-to-serve rectangle and keeps the layers nice and thick. However, you can absolutely use any small, deep rectangular dish you have! If you want a taller **chocolate wafer cake**, you just need a narrower dish. The key is ensuring your dish is sturdy enough to handle the weight once it sets up, and you must still use the layering pattern—cream, cookies, banana, repeat! Just be prepared that a taller cake might take an extra hour or two in the fridge to fully set up to the center.
Storage Guidelines for Leftover Banana Icebox Cake
Since we went through the effort of chilling this amazing **Banana Icebox Cake**, we definitely want to make sure any leftovers last! The best way to store this no-bake beauty is tightly covered with plastic wrap directly in the pan you assembled it in. You want to make sure that wrap is touching the surface of the cream or pressed right up against the sides if you can manage it, which prevents any drying out or weird fridge smells from sneaking in.
Honestly, this cake tastes best within the first 24 hours, but it holds up really well in the refrigerator for up to three full days. Any longer than that, and those lovely bananas start getting mushy and brown, even protected by the cream. If you are curious about how to properly preserve other foods better, you might want to check out this useful guide on how to properly store rice and grains—it’s all about keeping things airtight!
Print
Banana Icebox Cake
- Total Time: 6 hr 20 min
- Yield: 6 servings 1x
- Diet: Vegetarian
Description
A simple, no-bake dessert featuring layers of whipped cream and banana slices with chocolate wafers.
Ingredients
- 1 cup heavy whipping cream
- 1/4 cup powdered sugar
- 1 teaspoon vanilla extract
- 3 ripe bananas, sliced
- 1 package (9 ounces) chocolate wafer cookies
- 2 tablespoons unsweetened cocoa powder (for dusting)
Instructions
- In a medium bowl, whip the heavy cream, powdered sugar, and vanilla extract until stiff peaks form.
- Select a loaf pan or a small rectangular dish for assembly.
- Spread a thin layer of whipped cream on the bottom of the dish.
- Arrange a single layer of chocolate wafer cookies over the cream.
- Place a layer of sliced bananas over the cookies.
- Spread another layer of whipped cream over the bananas.
- Repeat the layers—cookies, bananas, cream—until all ingredients are used, ending with a layer of whipped cream on top.
- Cover the dish tightly with plastic wrap.
- Refrigerate for at least 6 hours, or preferably overnight, to allow the cookies to soften.
- Before serving, dust the top lightly with cocoa powder.
- Slice and serve cold.
Notes
- Use firm, ripe bananas for the best texture.
- If you do not have chocolate wafers, graham crackers can be substituted, though the flavor profile will change.
- You can add a thin layer of chocolate syrup between layers for extra flavor.
- Prep Time: 20 min
- Cook Time: 0 min
- Category: Dessert
- Method: No-Bake/Chilling
- Cuisine: American
Nutrition
- Serving Size: 1 slice
- Calories: 280
- Sugar: 25
- Sodium: 110
- Fat: 16
- Saturated Fat: 10
- Unsaturated Fat: 6
- Trans Fat: 0
- Carbohydrates: 32
- Fiber: 2
- Protein: 4
- Cholesterol: 55
Keywords: banana icebox cake, no bake dessert, chocolate wafer cake, easy dessert, chilled cake