
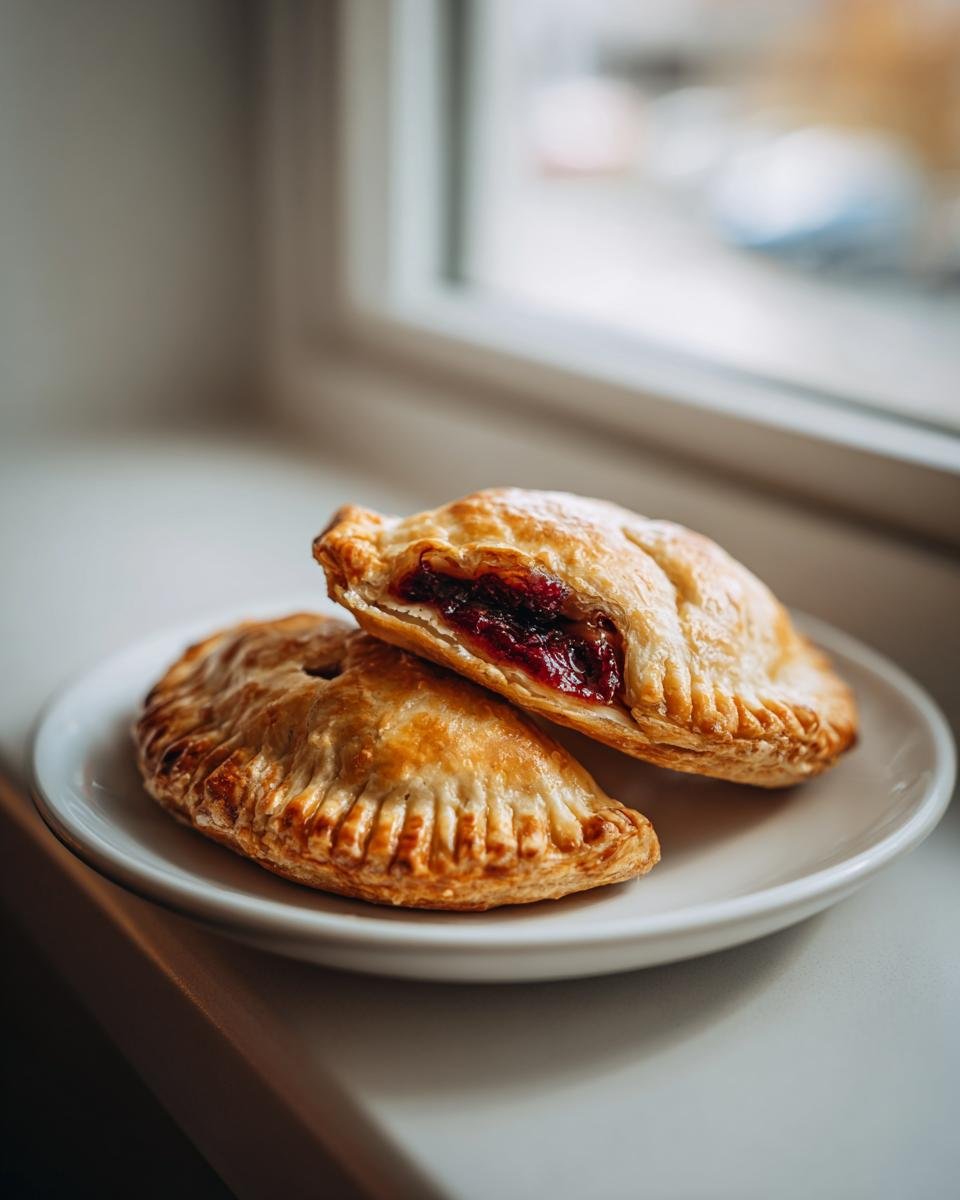
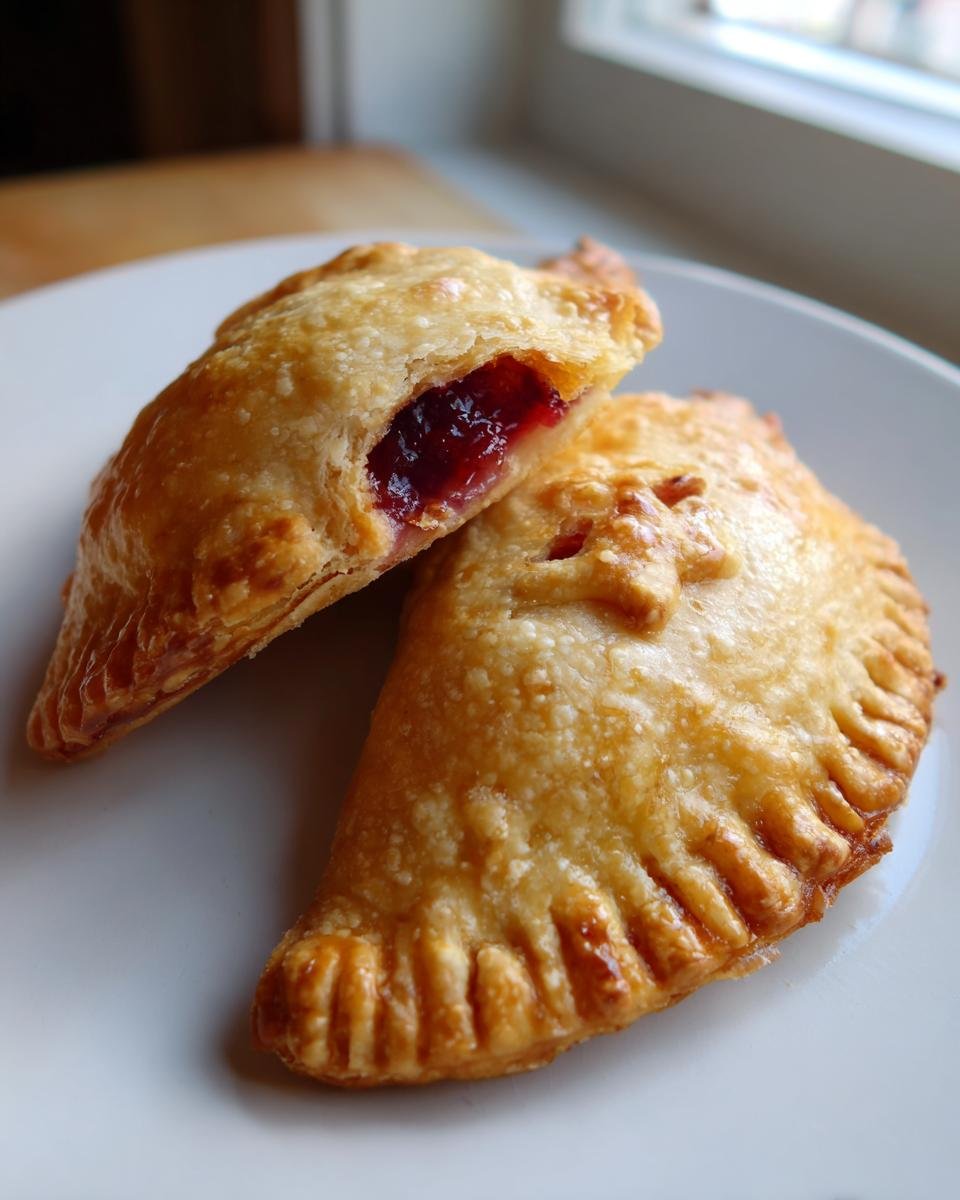
The holidays are just around the corner, and you know what that means—a full-on siege on my kitchen counter by festive baking projects! But honestly, who has time to fuss with cutting perfect slices out of a giant, often messy, traditional pie? Not me! That’s why I’m completely obsessed with these **Cranberry Hand Pies**. They give you all that gorgeous, tart-sweet cranberry flavor locked inside the flakiest pastry shell you can imagine, but you can eat them standing up, walking around, or tucked on the couch. I’ve been messing around with pastry since I was knee-high to a rolling pin, and perfecting the little individual crust that doesn’t weep or tear? That’s my specialty. Trust me, once you try these perfectly portioned fruit bites, you’ll never look back at the large pie dish again!
Why You Will Love These Cranberry Hand Pies
Now that you know these are worth the small effort, let me tell you why this recipe sings. Forget about serving spoons, uneven slices, or cutting through a crust that’s too hard. These hand pies solve all those problems while tasting like pure holiday magic! If you’ve ever wanted a perfect pastry that travels well, this is it.
- They bake up beautifully flaky, and because they’re individually sealed, there’s almost no mess! You can even whip up some cranberry honey butter for dipping if you’re feeling ambitious.
- The filling is just the right combination—sharp, bright cranberry mixed with just enough sugar that it wakes up every single taste bud.
- Prep is faster than a full pie because the dough is simpler and you don’t have to worry about lattice work or fancy edges!
Perfect Portability for Any Occasion
Seriously, these things are the ultimate grab-and-go treat. I pack them in my kids’ lunch boxes during the winter months, they are fantastic additions to cookie plates because they feel a little more special, and they are perfect for sharing potluck style without worrying about keeping a whole pie perfectly level in the car.

The Ideal Sweet and Tart Flavor Balance
Cranberries, bless their hearts, are naturally quite tart, right? That’s why I love them! But sugar is crucial for balancing that zing. When they cook down with the sugar and hit the bright pop of fresh lemon juice, you get this fantastic contrast against the rich, buttery pastry. It’s vibrant, it’s festive, and it hits that perfect sweet-tart note every single time.
Essential Ingredients for Perfect Cranberry Hand Pies
Okay, let’s talk about what goes into these little gems because, believe me, the quality of your ingredients really shines through in such a simple pastry. We’re not hiding anything here—just good, honest stuff that works together beautifully. If you follow these measurements, you won’t end up with soggy bottoms or leaky filling. I always keep my extras, especially any leftover cooked cranberry mix, handy for things like a glaze for salmon! Check out how I use mine in this sauce recipe.
For the Flaky Pastry Dough
The key to amazing hand pies is the crust, and the secret to a flaky crust? Everything must be icy cold. Don’t even think about using melted butter!
- 2 cups all-purpose flour (just the standard stuff works great here), plus a little extra for dusting.
- 1 teaspoon salt—don’t skip this, it brings out the butter flavor!
- 1 cup (that’s two full sticks) unsalted butter, kept in the fridge until the absolute last second, then quickly cubed.
- About 1/2 cup ice water—and I mean water with actual ice cubes floating in it when you measure it out.
For the Tart Cranberry Filling
This is where the holiday flavor bursts through. The sweet really balances the tartness of those beautiful red berries.
- 2 cups fresh or frozen cranberries. If you use frozen, don’t bother thawing them; just toss them in the pot!
- 1/2 cup granulated sugar. This is what keeps them from being overwhelmingly sour.
- 1/4 cup water to help get the cooking process started.
- 1 tablespoon lemon juice—this brightens everything up!
For the Finishing Touches
These little details are what make them look professional and give them that gorgeous, shiny crust.
- 1 large egg, well beaten with a splash of water—this is your egg wash.
- 1 tablespoon coarse sugar for sprinkling on top; it adds a lovely crunch.
Mastering the Pastry for Your Cranberry Hand Pies
Look, I know some people are intimidated by pastry, but honestly, making the dough for these cranberry hand pies is pure zen once you get the rhythm down. It’s all about temperature control here, my friend. If your butter is soft, you’ll get a cookie, not a flake! This is where you need to be decisive and quick. If you’re looking for another easy pastry adventure, you absolutely have to check out my recipe for apple turnovers; the technique is almost identical.
Cutting in the Butter Correctly
You need to use a pastry blender or your fingertips—and your fingers should be cold! You’re cutting the butter into the flour mixture until it looks like coarse meal, but here’s the critical part: you want some chunks of butter still visible. We’re talking pea-sized pieces! When those cold pieces hit the hot oven, they create steam, which is what lifts the dough into those beautiful, airy flakes. If you mix until it’s all one smooth flour dust, you just murdered the potential flakiness.
Chilling the Cranberry Hand Pies Dough
Once you finally add that ice water—and only add enough until the dough just starts clinging together, resist adding more!—you immediately need to stop mixing. Seriously, stop! Divide that shaggy ball into two disks, wrap them up tight in plastic wrap, and let them chill for at least one full hour in the fridge. This hour isn’t optional; it’s mandatory! Chilling lets the gluten relax, which means the dough won’t fight you when you roll it out, and it keeps that precious butter solid so it can make those layers!
Preparing the Sweet and Tart Cranberry Filling for Cranberry Hand Pies
Now that our pastry dough is happily chilling out in the fridge, we can tackle the star of the show: that bright, beautiful cranberry mix! Honestly, this cooking step is super fast, which is great because we need to rush it into the fridge to chill before we start stuffing our little pies.
You’re just going to combine the cranberries, your granulated sugar, and that 1/4 cup of water in a small saucepan. Set it over medium heat. It takes about ten minutes of occasional stirring for the magic to happen. You’ll know it’s ready when you start hearing those loud little pops, which means the cranberries are bursting open. That’s when the mixture naturally starts to thicken up a bit. Don’t overcook it! We want some whole or partially burst berries for texture.
Once it’s cooked down just right, take that pan *off* the heat immediately. This is when you stir in that tablespoon of lemon juice. It just really wakes up the flavor and brightens the whole filling. Now comes the most important advice I can give you for these lovely **Cranberry Hand Pies**: you absolutely cannot rush this cooling process.
If you put warm filling onto cold pastry dough, two things happen: one, the butter in the dough melts immediately, leading to a sad, tough crust instead of a flaky one. And two? You get seepage! Soggy bottoms are the enemy of a good hand pie. So, dump that filling out onto a plate or shallow bowl to cool down fast. If you’re pressed for time, pop it into the freezer for about 15 minutes, but be careful not to let it freeze solid!
Quick tip from my kitchen to yours: taste the filling once it’s cool. If your cranberries were particularly tart this season, feel free to stir in an extra teaspoon of sugar until it tastes perfect to *you*. These are your pies, after all!
Assembling Your Beautiful Cranberry Hand Pies
Alright, this is the fun part where all the careful chilling and cooking pays off! Before we even touch the dough, get your oven preheated to 400 degrees F (200 degrees C). You want it screaming hot right when these pies are ready to go in, ensuring that immediate blast of heat helps make those pastry layers pop up nice and high. Make sure you get two baking sheets lined with parchment paper too; that’s non-negotiable for easy cleanup and preventing sticking!
Take one of those lovely disks of pastry dough out of the fridge. Lightly flour your counter—don’t go crazy with the flour, or your dough will get tough—and get rolling! You want that dough about 1/8-inch thick. It’s thinner than you might think, but that’s what keeps these hand pies light and flaky rather than dense and bready. Next, grab a 4-inch round cutter. If you don’t have one, a small saucer or the rim of a glass usually works perfectly in a pinch!
Rolling and Cutting the Pastry Circles
Roll, roll, roll until it’s generally uniform, aim for that 1/8-inch thickness. Then, use your 4-inch cutter to press down firmly and extract as many circles as you can without overlapping the dough too much. You should get about eight circles from each disk, giving you eight beautiful hand pies total, depending on how close you cut them! Set those precious circles aside on your prepared baking sheets.
Sealing and Venting the Cranberry Hand Pies
Now we fill! Take your completely cooled cranberry filling—remember, it has to be cool!—and put just about a tablespoon right in the center of half the circles. Don’t overfill, or they *will* leak, and nobody likes a leaky pie adventure. When you’re filling, leave a decent border around the edge, maybe a good half-inch clear.
To seal these little beauties, dip your finger or a small pastry brush in a tiny bit of water and brush it all around that empty crust edge. This acts as our natural, non-toxic glue! Take another dough circle and gently lay it over the filling. Then, take a fork and firmly press down all the way around the edge where the two dough layers meet. Make sure you press hard enough that they are completely sealed. If you need anything to compare it to, think about how you seal up my recipe for whoopie pies—you need that tight seal!
Finally, the venting! Grab a sharp knife, or just use the tip of a clean fork, and cut a small little slit right in the top center of each pie. This is absolutely crucial. That steam needs somewhere to escape while baking, or the pressure buildup will burst your pastry open awkwardly. We want the steam out, but we want the filling *in*!
Baking Instructions for Golden Brown Cranberry Hand Pies
We have sealed them up tight, we’ve vented them perfectly, and now it’s time to see these beauties turn golden! Remember, we preheated that oven to 400 degrees F (200 degrees C), so have those pans ready to slide right in. Nobody wants a hot crust sitting around waiting for a lukewarm oven!
Before they hit the heat, we need to give them their lovely finish. Grab that small bowl with your beaten egg mixture—that’s the egg wash. Use a pastry brush to paint the egg wash right over the entire top surface of each **Cranberry Hand Pie**. When the egg wash hits the hot oven air, it cooks up into that gorgeous, glossy sheen that makes bakery goods look irresistible. It also helps that coarse sugar stick!
Next, grab that tablespoon of coarse sugar. Sprinkle it lightly and evenly over the egg-washed tops. This sugar doesn’t dissolve; it stays sparkly and crunchy, giving you that wonderful textural contrast when you bite into the soft pastry and jammy filling. It’s a small step, but totally worth the effort for presentation!
Now, gently slide those trays into the hot oven. We are aiming for 20 to 25 minutes baking time. Keep an eye on them after the 20-minute mark. You are looking for a really rich, deep golden brown color on top, and you’ll want to peek underneath if you can—the bottoms should look slightly toasted and firm, not pale. If you notice they are browning too quickly but don’t seem done, you can always fashion a quick shield out of foil and lay it loosely over the top to prevent the crust from burning while the inside finishes cooking. If you like the shine and finish on these, you will adore how they turn out when brushing the tops of my apple turnovers!
When they are ready, pull them out! They will be sizzling hot. Let them rest right there on the baking sheets for about five minutes. This allows them to set up a little before you try moving them. Then, carefully transfer them over to a wire rack to cool down further. They actually taste best once they are warm, not piping hot, so give them that little time to breathe!
Tips for Success with Cranberry Hand Pies
Okay, you’ve made the dough, you’ve simmered the filling, and you’re ready to assemble these gorgeous **Cranberry Hand Pies**. Even with a great recipe, pastry can sometimes be a little stubborn, right? Don’t stress! I’ve picked up a few tricks over the years that I swear by. These little nuggets of wisdom are the difference between a good hand pie and a truly fantastic, flaky masterpiece that doesn’t fall apart when you pick it up!
Keeping Ingredients Cold is Key
I know I keep harping on this, but I have to say it one more time because it’s the absolute cornerstone of flaky pastry: Keep everything cold! If you’re working and notice your dough is getting a little warm—maybe your kitchen is toasty—just stop. Don’t push it! Wrap the dough disc back up and put it in the fridge for an extra 15 minutes. That super cold butter that hasn’t melted yet equals those beautiful, separated layers. If your ice water is getting lukewarm, swap it out for fresh, colder water. It sounds fussy, but trust me, the resulting crisp, shattering crust is worth the extra two minutes!
Preventing Leaks During Baking
We’ve all done it: we get excited during assembly, overfill the little pocket, and end up with molten cranberry lava oozing out onto the baking sheet. It smells amazing, but it leaves you with a crust that’s fused to the pan. The fix is simple:
- Underfill slightly: Never put more than one tablespoon of that cooled filling in the center. When you brush the edges with water, you need plenty of clear dough space around the perimeter to get a solid seal.
- Crimp firmly: When you close the pie, use that fork to press down really hard around the entire edge. You should see the tines leave deep impressions. You want to smash those layers together so they weld shut against the heat.
- Vent, vent, vent: That little slit on top is your safety release valve. Make sure it’s big enough for steam to escape easily. If the steam gets trapped, it won’t just bake the filling; it will literally blast your crust apart from the inside!
Follow these rules, and you’ll have perfectly intact, golden-topped **Cranberry Hand Pies** every single time. Happy baking!

Storing and Reheating Your Cranberry Hand Pies
The best part about these **Cranberry Hand Pies** is that they are just as delicious on day two, or even day three, as they are fresh out of the oven! Which means you can totally make a huge batch during the holidays and just pull them out as needed. I speak from experience; these never last long in my house, but if you do manage to have leftovers, storage is super easy.
You want to store them in an airtight container at room temperature. And yes, I mean room temperature! Since the filling is cooked down quite a bit and the pastry doesn’t have a dairy-heavy frosting, they keep perfectly well on the counter for up to three days. Put wax paper or parchment squares between the layers if you stack them high, just so that beautiful crust doesn’t stick to itself overnight.
Now, if you want that lovely, flaky texture back—and you definitely do—you have to be careful about reheating. Do not, I repeat, *do not* just blast them in the microwave. You’ll end up with soft, rubbery pastry, and we worked too hard on those layers for that tragedy!
The best way to revive them is in a toaster oven or a regular oven set to about 325 degrees F (160 degrees C). Pop the hand pie in for about 5 to 8 minutes. This low and slow heat gently warms the filling back up without drying out the cranberry goodness, and more importantly, it crisps up that pastry shell again. It makes them taste almost instantly fresh-baked. If you’re in a huge rush and only need one, sometimes I’ll wrap it loosely in a paper towel and microwave it for just 10 seconds—but only if I plan on eating it immediately and don’t mind sacrificing that ultimate crispness!
Common Questions About Cranberry Hand Pies
I swear, baking is 90% intuition and 10% knowing how to troubleshoot! Since these **Cranberry Hand Pies** are pretty straightforward, most questions I get revolve around that pastry component. Trust me, I’ve made every mistake in the book assembling these sweet little treats, so hopefully, these answers save you some time and a little bit of flour dust!
Can I use store-bought pie dough for these Cranberry Hand Pies?
Oh, honey, of course, you can! We all have those days where we might be short on time or just don’t have the patience to cube the butter for an hour. Using high-quality, refrigerated store-bought pie dough is totally fine! It cuts your prep time down significantly. If you do use it, make sure you still handle it gently and keep it cold right up until rolling. If you’re interested in using up any leftover cooked cranberry bits, you can turn it into a nice spicy glaze for salmon using this recipe I love: Leftover Cranberry Sauce Recipes. But just know, that homemade pastry dough we made using the cold butter method will always give you that extra *shatter* and flakiness that’s just hard to beat!
What is the best way to seal the edges of the hand pies?
The best way, hands down, is the fork crimp! You seal these little guys in two stages, remember? First, you brush the edges of the bottom circle with water—that’s your glue. Then you place the top circle on and gently press down all over the perimeter with the tines of a fork. Press firmly, but don’t just jab at it. You want to make sure you see those deep fork marks all the way around. A good, firm press ensures no steam escapes from the sides, forcing all the happy, hot cranberry filling to exit only through those little vents you cut on top.
Can I freeze the assembled but unbaked Cranberry Hand Pies?
Yes! This is one of my favorite tricks for the holidays when I need to prep things ahead. Assemble the pies exactly as the recipe says—fill, seal, vent, and egg wash them. Then, place them on a parchment-lined baking sheet (like a cookie sheet) and pop that whole sheet into the freezer until the pies are rock hard. Once they are solid, you can transfer them into a large, heavy-duty freezer bag, pushing out as much air as possible. They’ll keep for about two months this way!
When you’re ready to bake them, you don’t even need to thaw! Just take them straight from the freezer and place them on your prepared baking sheet. You will need to add about 5 to 10 minutes to the standard baking time, so check them closely around the 30-minute mark. They should look golden brown and delicious when they are finished!
Print
Cranberry Hand Pies
- Total Time: 1 hour 55 min
- Yield: 8 servings 1x
- Diet: Vegetarian
Description
Simple, portable hand pies filled with a sweet and tart cranberry mixture.
Ingredients
- 2 cups all-purpose flour
- 1 teaspoon salt
- 1 cup (2 sticks) cold unsalted butter, cut into cubes
- 1/2 cup ice water
- 2 cups fresh or frozen cranberries
- 1/2 cup granulated sugar
- 1/4 cup water
- 1 tablespoon lemon juice
- 1 large egg, beaten (for egg wash)
- 1 tablespoon coarse sugar (for topping)
Instructions
- Make the pastry: In a large bowl, whisk together the flour and salt. Cut in the cold butter using a pastry blender or your fingers until the mixture resembles coarse crumbs with some pea-sized pieces of butter remaining. Gradually add the ice water, mixing until the dough just comes together. Divide the dough in half, form each half into a disk, wrap in plastic, and chill for at least 1 hour.
- Make the filling: In a small saucepan, combine the cranberries, granulated sugar, and 1/4 cup water. Cook over medium heat, stirring occasionally, until the cranberries burst and the mixture thickens slightly, about 10 minutes. Remove from heat and stir in the lemon juice. Let the filling cool completely.
- Assemble the pies: Preheat your oven to 400 degrees F (200 degrees C). Line two baking sheets with parchment paper. On a lightly floured surface, roll out one disk of dough to about 1/8-inch thickness. Use a 4-inch round cutter to cut out circles.
- Place about 1 tablespoon of cooled filling onto the center of half the dough circles. Brush the edges with water, then top with the remaining dough circles. Crimp the edges with a fork to seal. Cut a small slit in the top of each pie to allow steam to escape.
- Brush the tops of the hand pies with the beaten egg wash and sprinkle with coarse sugar.
- Bake for 20 to 25 minutes, or until golden brown. Cool on the baking sheets for a few minutes before transferring to a wire rack to cool further.
Notes
- If using frozen cranberries, do not thaw them before cooking the filling.
- You can substitute apple for some of the cranberries if you prefer a milder flavor.
- Store cooled hand pies in an airtight container at room temperature for up to 3 days.
- Prep Time: 30 min
- Cook Time: 25 min
- Category: Dessert
- Method: Baking
- Cuisine: American
Nutrition
- Serving Size: 1 pie
- Calories: 350
- Sugar: 20
- Sodium: 200
- Fat: 18
- Saturated Fat: 11
- Unsaturated Fat: 7
- Trans Fat: 0
- Carbohydrates: 45
- Fiber: 2
- Protein: 5
- Cholesterol: 55
Keywords: cranberry, hand pies, pastry, dessert, baked goods, fruit pie