
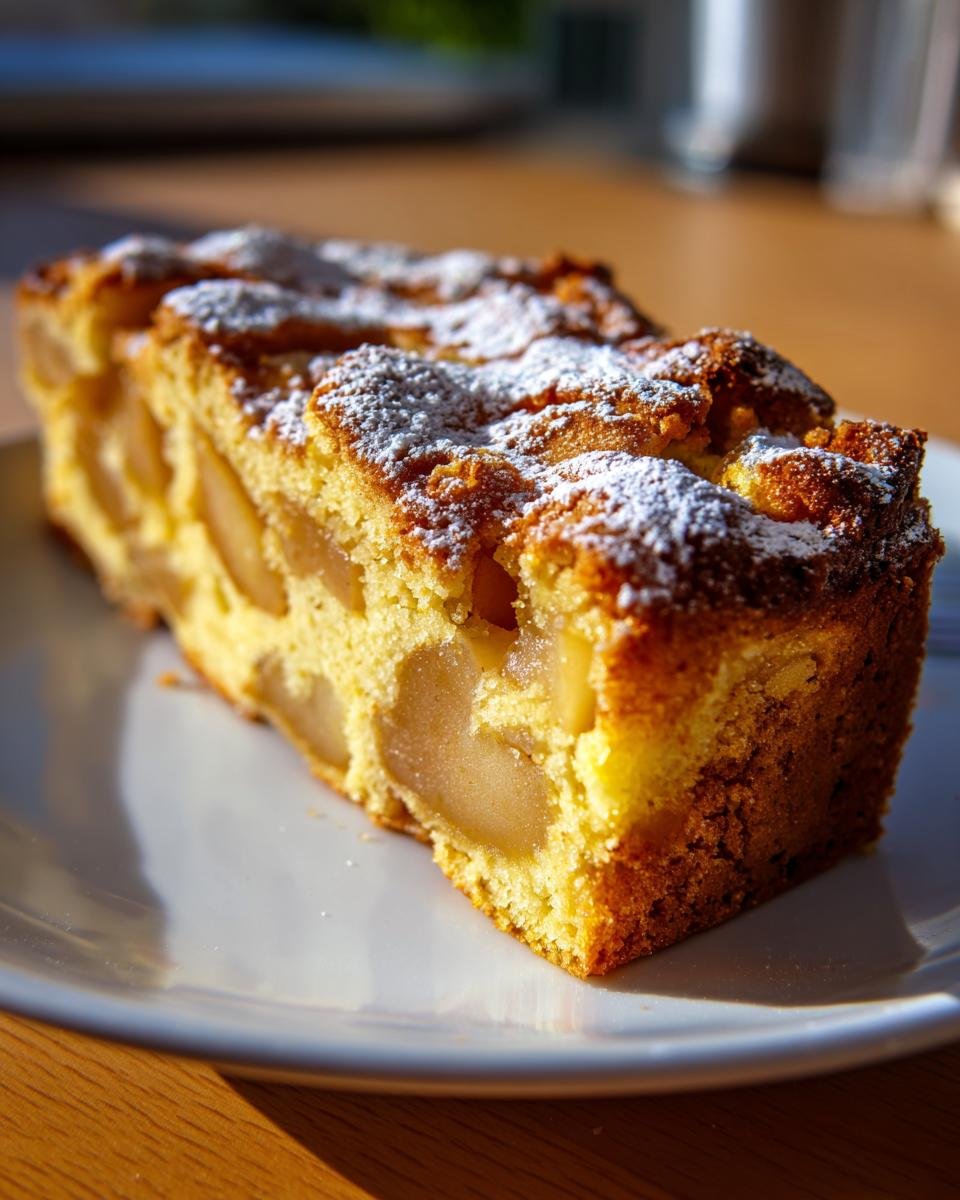
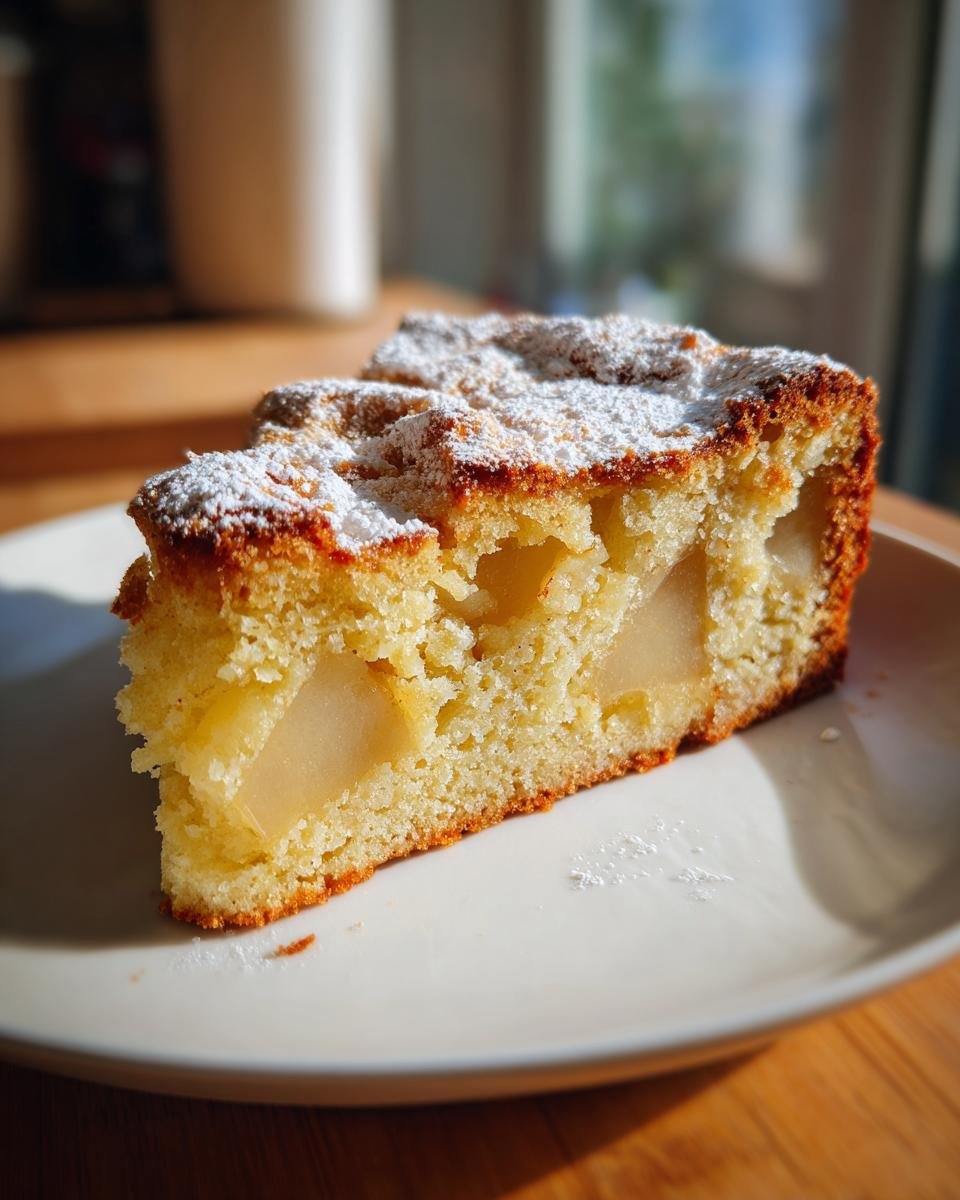
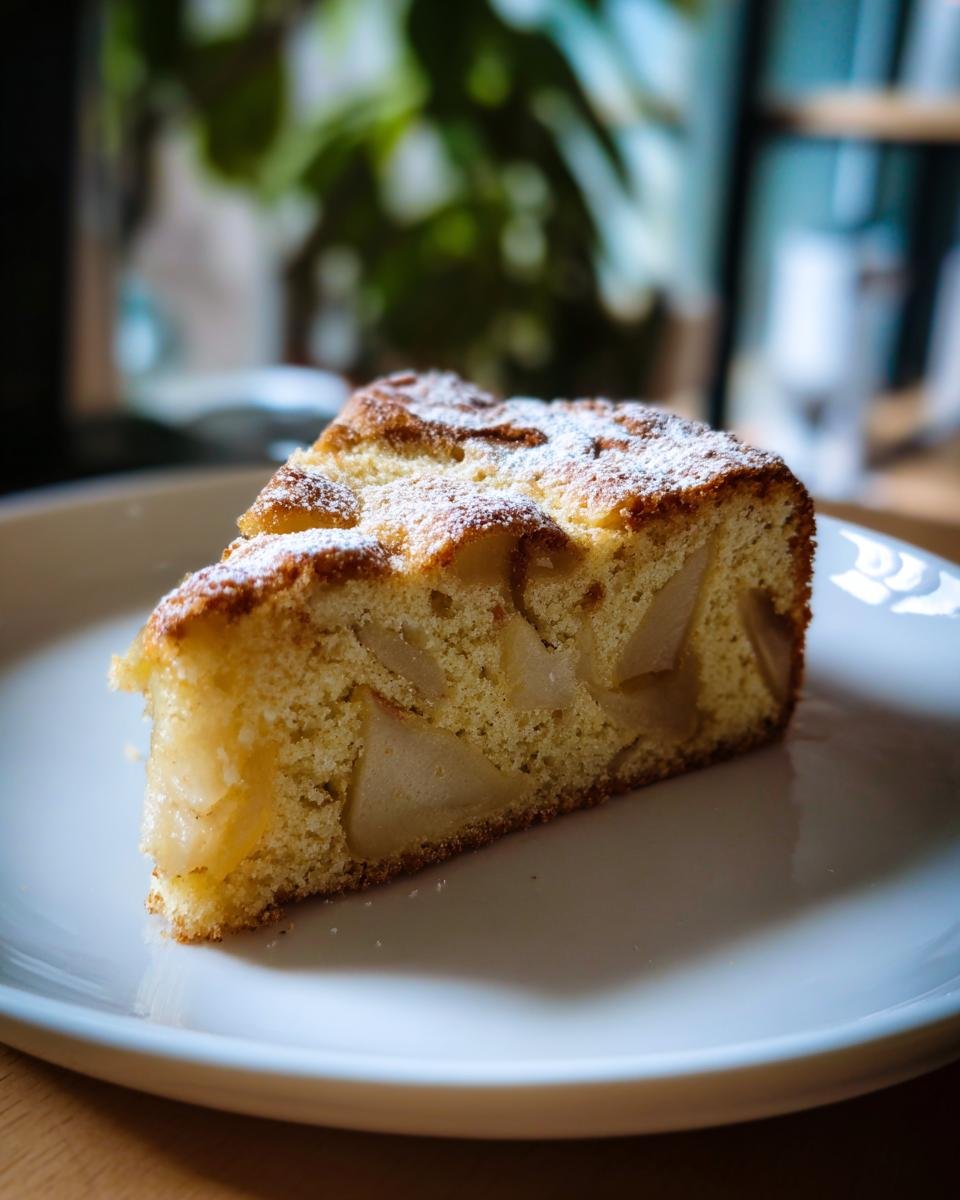
Oh, there’s just nothing like the smell of a cake baking, is there? It instantly turns a regular Tuesday into something special. I’ve tried all sorts of fancy layered things, but honestly, my heart belongs to the quiet, reliable comfort of a perfectly simple fruit cake. And that’s exactly what we have here: the absolute best **Pear Cake** you will ever need.
This recipe is famous in my house, especially when the leaves start turning that gorgeous gold and red. It’s straightforward—no weird techniques, no 15 different bowls—but it delivers the most unbelievably moist crumb. Seriously, this **Pear Cake** is so tender it practically melts away. If you are looking for an easy dessert that tastes like you slaved over it all day, grab your mixing bowls; we’re starting right now!

Why This Simple Pear Cake Recipe Works So Well (EEAT)
You might think a cake this easy couldn’t possibly be impressive, but trust me, this is where simple ingredients shine! The reason this Pear Cake is so reliable comes down to the ratio of wet ingredients to the flour. We’re using just enough fat and liquid without drowning the dry stuff, which means zero risk of a gummy texture. It’s all engineered for that perfect crumb.
I’ve tested this time and time again, and the balance of the baking soda and acid from the pears gives it a lovely lift. It’s sturdy enough that you don’t worry about it falling apart, yet tender enough that it feels luxurious. It really is one of my go-to recipes when I need guaranteed results every single time. You can check out how I handle texture secrets in other recipes, like my famous carrot cake here, but for the Pear Cake, the simplicity *is* the magic.
Gathering Ingredients for Your Perfect Pear Cake
Okay, let’s talk about what you need lying around the kitchen cupboard. Because this is a simple Pear Cake, we aren’t diving into fancy extracts or imported spices. Everything here is stuff you probably have on hand, but attention to detail on the pears is key!
First up, your dry team: we need two cups of all-purpose flour, one teaspoon of baking soda, just half a teaspoon of salt to keep things honest, and one teaspoon of ground cinnamon. That cinnamon just sings with baked fruit, doesn’t it? Mix those up in a small bowl and set them aside for later.
Then the wet ingredients need a little love. You’ll want half a cup of unsalted butter, and make sure it’s softened—softened means you can easily dent it without smashing it; not melted, okay? Cream that with one cup of granulated sugar. Beat in two large eggs, one by one, and don’t forget that teaspoon of vanilla extract. You’ll also need half a cup of milk to keep things flowing smoothly. I always have my pasta sauce recipe handy when I’m baking because it reminds me how good simple ingredients can be; you can check that out if you need a quick dinner idea later here.
The star, of course, is the fruit! You need two medium ripe pears. And this is important: peel those babies, core them out, and then dice them up small. We want them tender when baked, not chunky. That’s the whole secret to having fruit distributed nicely in every slice of your Pear Cake.
Expert Tips for Preparing the Best Pear Cake Batter
Listen, the difference between a good cake and an absolutely show-stopping cake is all in the prep work. For this simple Pear Cake, we need patience during the creaming stage. Make sure that butter and sugar get fluffy—I mean, really pale and light. That’s where you’re whipping air into the cake, and that air keeps the final product from feeling like a hockey puck!
Also, when you select your pears, don’t grab the absolute softest ones from the fruit bowl. We want pears that are firm but ripe. If they are too mushy before they even go into the oven, they turn to total mush during baking, and nobody wants watery pockets in their cake. A firm texture will hold up beautifully against the richness of the butter and sugar.
I rely on these little techniques all the time, even when I’m trying out something new, like my moist banana cake recipe—you can see how crucial technique is there, too in that post.
Achieving the Right Batter Consistency for this Pear Cake
This is where folks often go wrong, so pay attention! When you start adding the dry mixture and the milk, you absolutely must alternate. We start and finish with the flour mixture. If you dump all the milk in first, you shock the creamed butter and undo all that lovely air you just created.
And the biggest rule? Do not, under any circumstances, overmix once the flour is in there. I mean it! You are gently folding until you just don’t see streaks of dry flour anymore. Mixing too much wakes up the gluten in the flour, and that’s what turns your tender Pear Cake into something tough and chewy. We want a tender crumb, so mix minimally and gently fold those diced pears in last. They can handle a little encouragement, but the batter cannot handle aggressive stirring!
Step-by-Step Instructions to Bake Your Pear Cake
Alright, the batter is mixed and looking gorgeous—all those little pear pieces nestled in there. Now for the fun part: the baking! First things first, make sure your oven is actually hot. We need that consistent heat right from the start, so preheat it to 350 degrees F (175 degrees C) before you even think about mixing the wet and dry stuff. Patience here pays off!
Next, we prep the pan. I use a standard 9-inch round pan for this. You have to grease it really well, and then just lightly flour it. I always give the pan a little tap upside down over the sink to knock out any extra flour—we want the cake to stick just enough to climb up the sides nicely, but not so much that it rips when you try to get it out later!
Once you fold those pears in gently, pour that entire batter right into your prepared pan. Smooth the top a little with your spatula if you want a flatter top, but honestly, I just let it fall where it may. Remember when I talked about folding? That gentleness matters right up until the moment it hits the oven, similar to how I treat the fudgy layers when making my Texas Sheet Cake here.
Pop it in the center rack and let it work its magic for about 40 to 45 minutes. Now, how do you know when it’s done? Forget guessing! After 40 minutes, grab a thin wooden pick—a toothpick works great—and stick it right into the very center of the cake. If it comes out clean, or maybe with just a couple of moist crumbs clinging to it, it’s done! If you see wet batter, give it another five minutes and check again. We are aiming for baked through but still super moist.
Don’t rush the cooling! Let the Pear Cake sit right there in that hot pan for about 10 minutes. This little rest helps it firm up just enough so it doesn’t collapse when you turn it out. After 10 minutes, carefully flip it onto a wire rack to cool completely. If you try to remove it too soon, you might end up with a crumbly mess, and we worked too hard for that!
Cooling and Serving Suggestions for Your Pear Cake
Patience, patience—we’re almost done! You let that beautiful Pear Cake cool in the pan for those crucial 10 minutes, right? That little bit of time helps the delicate structure set up before it goes onto the wire rack to finish cooling. Don’t leave it in the pan too long, though, or the bottom might get a little steamy and soft.
Once it’s totally cool, I stick with what the classics suggest: a simple dusting of powdered sugar. It lets that lovely cinnamon aroma and the texture of the cake truly shine. But if you’re feeling a bit fancy, this Pear Cake is just begging for a dollop of homemade whipped cream. I have a fantastic quick recipe for chocolate whipped cream if you want to mix things up a bit here, though vanilla cream also works wonderfully.
Alternatively, you could whip up a super thin glaze using powdered sugar and just a splash of milk—maybe even a tiny bit of pear juice if you saved any! It should just barely coat the top. But honestly, this simple Pear Cake is so moist on its own; sometimes less is truly more.
Storing Leftovers of This Delicious Pear Cake
Since this Pear Cake is so wonderfully moist, storing it is pretty simple, but we need to protect that tenderness! Once it’s totally cool, pop any leftovers into an airtight container. You can keep it right on the counter at room temperature for two or maybe three days. If your kitchen is super hot, the fridge is okay, but it might dry it out a tiny bit faster—so keep it on the counter if you can!
If you do stash it in the fridge, just let a slice sit on the counter for about 20 minutes before you eat it. That little bit of warming up brings back the soft texture beautifully. Trust me, this cake rarely lasts more than two days at my house!
Frequently Asked Questions About Making Pear Cake
I always get so many questions when people try this recipe for the first time! It’s usually because it’s so much simpler than they expected. Here are the ones I hear most often about making this perfect Pear Cake.
Can I substitute the pears in this Pear Cake?
Oh, absolutely! If pears are out of season or you just don’t have any on hand, you can swap them out for other firm fruits. Firm apples, diced small just like you would the pears, work fantastic. They bake up beautifully and pair perfectly with that cinnamon flavor. You could also try using firm plums or even firm peaches if it’s the right time of year. Just make sure whatever you use is diced small so it gets tender, just like we did with the pears!
What type of pears work best for this simple Pear Cake?
This is super important for texture! You really need pears that hold their shape. I always recommend using something like Bosc or Anjou. They are firm when you buy them but ripen up nicely without turning to soup in the oven. Bartlett pears are great for eating raw, but they often get too soft for baking unless you catch them at the *exact* right moment. For reliability in your simple Pear Cake, stick to the firmer varieties and make sure they are ripe, not rock hard!
Why did my simple Pear Cake sink in the middle?
Ugh, sinking batter is the worst! Usually, this happens for one of two reasons, and it usually relates to the oven temperature being off. If you open the oven door too early—say, before 30 minutes into baking—the quick change in heat can cause the center to collapse. The other big culprit is often over-mixing the batter once the flour goes in, which can weaken the final structure. Remember, gently fold in those pears! If you want to read about other common baking fails, I covered some of the logic behind my brownie recipes over here, which might help diagnose your oven quirks!
Can I use canned pears instead of fresh in this Pear Cake recipe?
You definitely *can*, but I wouldn’t really recommend it for this specific recipe. Canned pears are already very soft and usually packed in syrup. If they are too wet, they can really compromise the structure of this light batter and might make the center gummy, which is the opposite of what we want! If you have no other choice, drain them really, really well, pat them dry with a paper towel, and maybe toss them lightly in a spoonful of the flour mixture before folding them in. Fresh is always best here, though!
Estimated Nutritional Snapshot for Your Pear Cake
I know some of you folks like to keep track of what you’re eating, and while this is a homemade comfort cake, I wanted to give you a general idea of what’s in a slice of this fabulous Pear Cake. Please know these numbers are just an estimate, okay? We are dealing with fresh fruit and a good amount of butter, after all!
Based on the recipe making 8 generous servings, here’s what you can generally expect per slice, according to my basic calculations:
- Calories: Around 280
- Fat: Guessing about 12 grams total
- Carbohydrates: Roughly 40 grams, mostly from the sugar and the pears themselves
- Protein: A light 4 grams
Now, please take those numbers with a giant grain of salt! If you substitute milk for buttermilk, or if your pears were huge, these numbers will jump around. This isn’t professional diet tracking; it’s just a helpful little guide so you know what you’re putting into your body when you enjoy this simple cake. I love that this recipe keeps the sugar moderate compared to some store-bought versions, though!
Share Your Simple Pear Cake Experience
Whew! We made it. Now that you’ve baked this fantastic, ridiculously easy Pear Cake, I would absolutely love to hear how it went for you. Did you top it with just powdered sugar like I often do, or did you go ahead and try a little glaze?
Baking is never truly finished until you share the results, right? So please, take a second and head down to the comments below. Drop a star rating so others know how much you loved this simple recipe, and tell me about your experience!
Did you try a different spice instead of cinnamon? Did you have a favorite pear variety you want to recommend to the next baker? Spill the beans! Your feedback helps the whole community, and honestly, seeing everyone’s successful bakes just makes my day. If you have any other baking questions or just want to say hello, you can always reach out through my contact page too. Happy baking!
Print
Simple Pear Cake
- Total Time: 65 min
- Yield: 8 servings 1x
- Diet: Vegetarian
Description
A straightforward recipe for a moist cake featuring fresh pears.
Ingredients
- 2 cups all-purpose flour
- 1 teaspoon baking soda
- 1/2 teaspoon salt
- 1 teaspoon ground cinnamon
- 1/2 cup unsalted butter, softened
- 1 cup granulated sugar
- 2 large eggs
- 1 teaspoon vanilla extract
- 1/2 cup milk
- 2 medium ripe pears, peeled, cored, and diced
Instructions
- Preheat your oven to 350 degrees F (175 degrees C). Grease and flour a 9-inch round cake pan.
- In a medium bowl, whisk together the flour, baking soda, salt, and cinnamon. Set aside.
- In a large bowl, cream together the softened butter and sugar until light and fluffy.
- Beat in the eggs one at a time, mixing well after each addition. Stir in the vanilla extract.
- Gradually add the dry ingredients to the wet ingredients, alternating with the milk, beginning and ending with the dry ingredients. Mix until just combined. Do not overmix.
- Gently fold in the diced pears.
- Pour the batter into the prepared cake pan.
- Bake for 40 to 45 minutes, or until a wooden pick inserted into the center comes out clean.
- Let the cake cool in the pan for 10 minutes before inverting it onto a wire rack to cool completely.
Notes
- You can dust the top with powdered sugar before serving for a simple finish.
- Use firm but ripe pears for the best texture in the cake.
- Prep Time: 20 min
- Cook Time: 45 min
- Category: Dessert
- Method: Baking
- Cuisine: American
Nutrition
- Serving Size: 1 slice
- Calories: 280
- Sugar: 25
- Sodium: 180
- Fat: 12
- Saturated Fat: 7
- Unsaturated Fat: 5
- Trans Fat: 0
- Carbohydrates: 40
- Fiber: 2
- Protein: 4
- Cholesterol: 60
Keywords: pear cake, simple cake, fruit cake, cinnamon cake, easy dessert