
Listen, Halloween dinners don’t have to be fussy or take forever, especially when you have little goblins running around demanding spooky treats! I’ve spent years trying to balance ease with maximum ‘wow’ factor for my family when the holiday rolls around. You know how I feel about spending hours over a stove when there’s trick-or-treating to plan.
That’s why I absolutely adore these Halloween Cheeseburger Skulls. They take basic hamburger ingredients—stuff you likely already have—and turn them into something genuinely memorable on the plate in just about 25 minutes total. Seriously, forget fancy molds! The trick, and it’s an easy one, is just using a pairing knife to carve out some simple eye sockets and a grin right into the raw patty. It’s fast, it’s slightly messy (which means it’s fun!), and every single kid I’ve served these to has absolutely gone nuts for them. It’s my go-to easy spooky dinner!

Why You Will Make These Halloween Cheeseburger Skulls
I know you’re busy—we all are, especially when Halloween decor is taking over the living room! That’s the beauty of these spooky little guys. They’re designed for speed and maximum impact without needing any specialty tools.
If you’re still on the fence, here’s the quick rundown on why these are making it onto my menu again this year:
- Talk about fast! The prep time is only 15 minutes, seriously. You mix, shape, and carve before the pan even gets hot.
- The fun factor for the kids is huge. They love watching me carve the faces, and they get a real kick out of eating something that looks like it should be kept in a crypt.
- No need to run out and buy a fancy skull mold! You just need a small knife or even a heavy-duty skewer, which I bet is already rattling around in your junk drawer.
This recipe proves that the best holiday food is often the simplest. You get a great dinner on the table before you run out of time to watch scary movies!
Essential Ingredients for Your Halloween Cheeseburger Skulls
Okay, let’s talk about what exactly you need to pull off these spooky masterpieces. The list is wonderfully short, which is always a win in my book, but a couple of these ingredients really have to be right so your skull patties don’t turn into meat dust on the skillet. Remember, we’re aiming for juicy, sturdy skulls!
For the meat base, you absolutely want 1 pound of ground beef. Here’s my little secret: go for 80/20 if at all possible. That little bit of fat is what keeps these patties juicy while you cook them and helps them hold that carved shape. For the cheese, we’re going with 4 slices of cheddar cheese. Sharp cheddar gives you a nice tang, but honestly, mild works just fine if that’s what your kids prefer!
The rest of the components are for building the actual burger framework and making the scary face. Don’t mix up your flavor cheeses with your face condiments! The ketchup and mustard are purely for decoration; they are what bring the skull to life once it’s cooked.
- 1 pound ground beef (80/20 recommended for juiciness)
- 1/2 teaspoon salt
- 1/4 teaspoon black pepper
- 4 slices cheddar cheese (sharp or mild as preferred)
- 4 hamburger buns
- 1 tablespoon vegetable oil (for frying)
- 2 tablespoons ketchup (for drawing those creepy eyes and mouths!)
- 2 tablespoons mustard (for accents and teeth lines)
Ingredient Notes and Substitution Tips
Don’t panic if you don’t have cheddar! American cheese melts beautifully and holds everything together, or Monterey Jack works in a pinch. If your ground beef is way leaner, like 93/7, I suggest mixing in about a teaspoon of softened butter right into the meat mix. That extra fat will save you from a dry skull when the heat hits it!
Step-by-Step Instructions for Perfect Halloween Cheeseburger Skulls
This is where the magic happens, and honestly, it’s more fun than actual cooking! We’re going from basic meat mixture to spooky centerpiece in just a few easy steps. I always put on some fun music before I start this part because it turns into a little carving session. Don’t rush the shaping, but definitely don’t stress about perfection—remember, no two human skulls look exactly alike, so your burgers shouldn’t either!
Preparing and Shaping the Skull Patties
First things first, grab your bowl. Gently mix the ground beef with the salt and pepper. And I mean *gently*! If you overmix burgers, you end up with tough, dense pucks, and we want friendly ghosts, not angry hockey pucks. Once it’s just combined, divide the meat into four equal portions. Roll each portion into a ball and then flatten it into a patty shape. Here’s a crucial tip many people miss: make these patties a little bit wider than your hamburger buns will be. Seriously, make them about an inch wider all around. They shrink a ton when they hit the heat!
Now for the fun part—shaping the skull! Take a small, sharp knife, or even a sturdy wooden skewer if you’re worried about cutting the meat too much, and start carving. I like to gently poke two small indentations near the top for the eye sockets first. Don’t go too deep, just enough to mark the spot. Then, carve a simple, slightly curved line underneath for the mouth. If you mess up, just smoosh the meat back together and try again. Nobody will ever know! If you are totally against freehand carving, you can use a small skull-shaped mold if you happen to have one dedicated to holiday shenanigans.
Cooking the Halloween Cheeseburger Skulls to Perfection
Once your four gruesome faces are ready, heat about a tablespoon of vegetable oil in your skillet over medium heat. We aren’t looking for sizzling-hot oil here; medium heat keeps the shape stable while the inside cooks evenly. Place those carved beauties carefully into the pan. Try not to smash them down with the spatula right away—we need to maintain that beautiful skull contour!
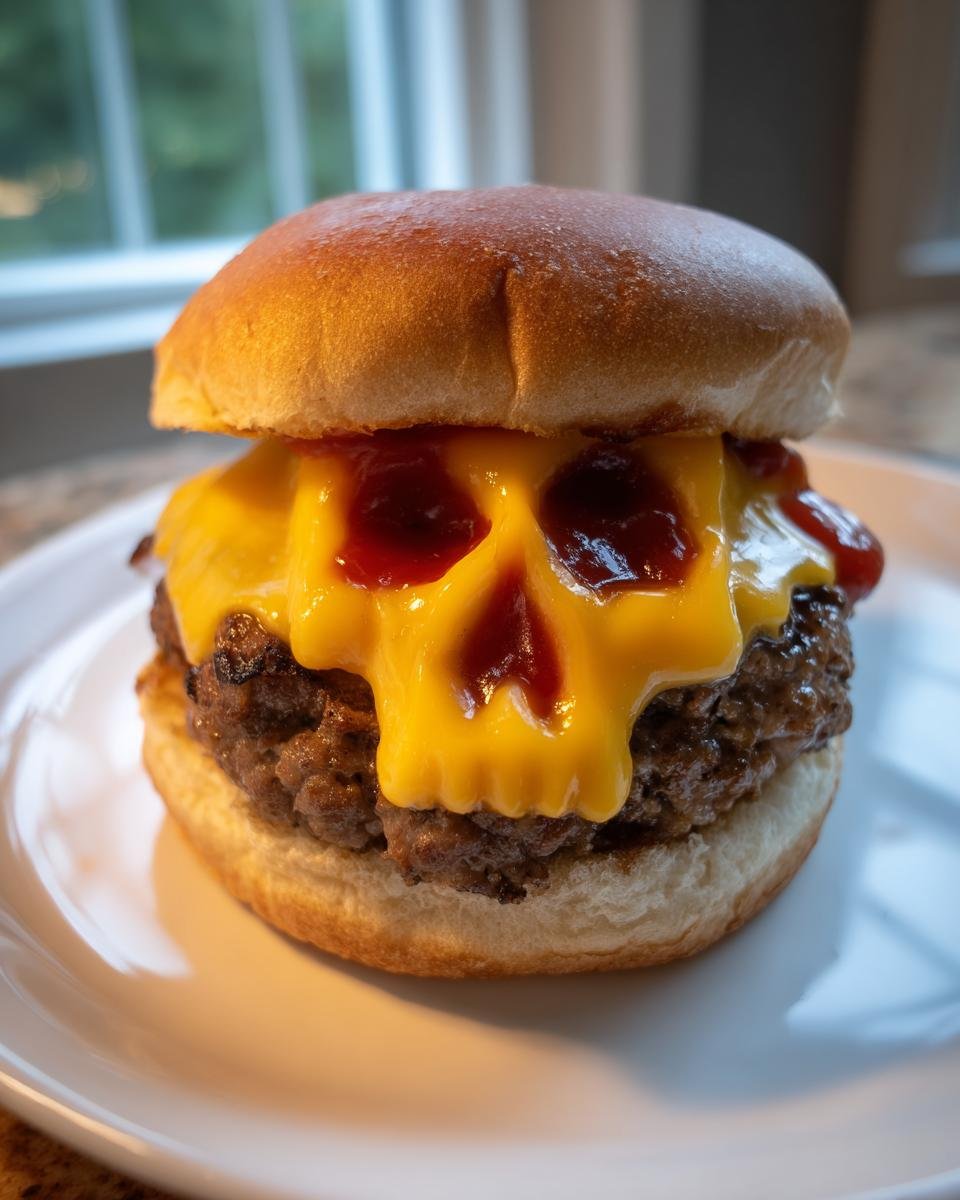
Cook them for about 3 to 4 minutes on the first side. Flip them over gently. Now, here’s the time to add a slice of cheddar cheese right onto the carved face. Let it melt for the final minute or two until the cheese is gooey and dripping down slightly—it almost looks like melted bone! If you decide to go the grilling route for that smoky flavor I rave about, make sure your grill grates are clean, and watch the cooking time closely as grills tend to cook faster than a skillet.
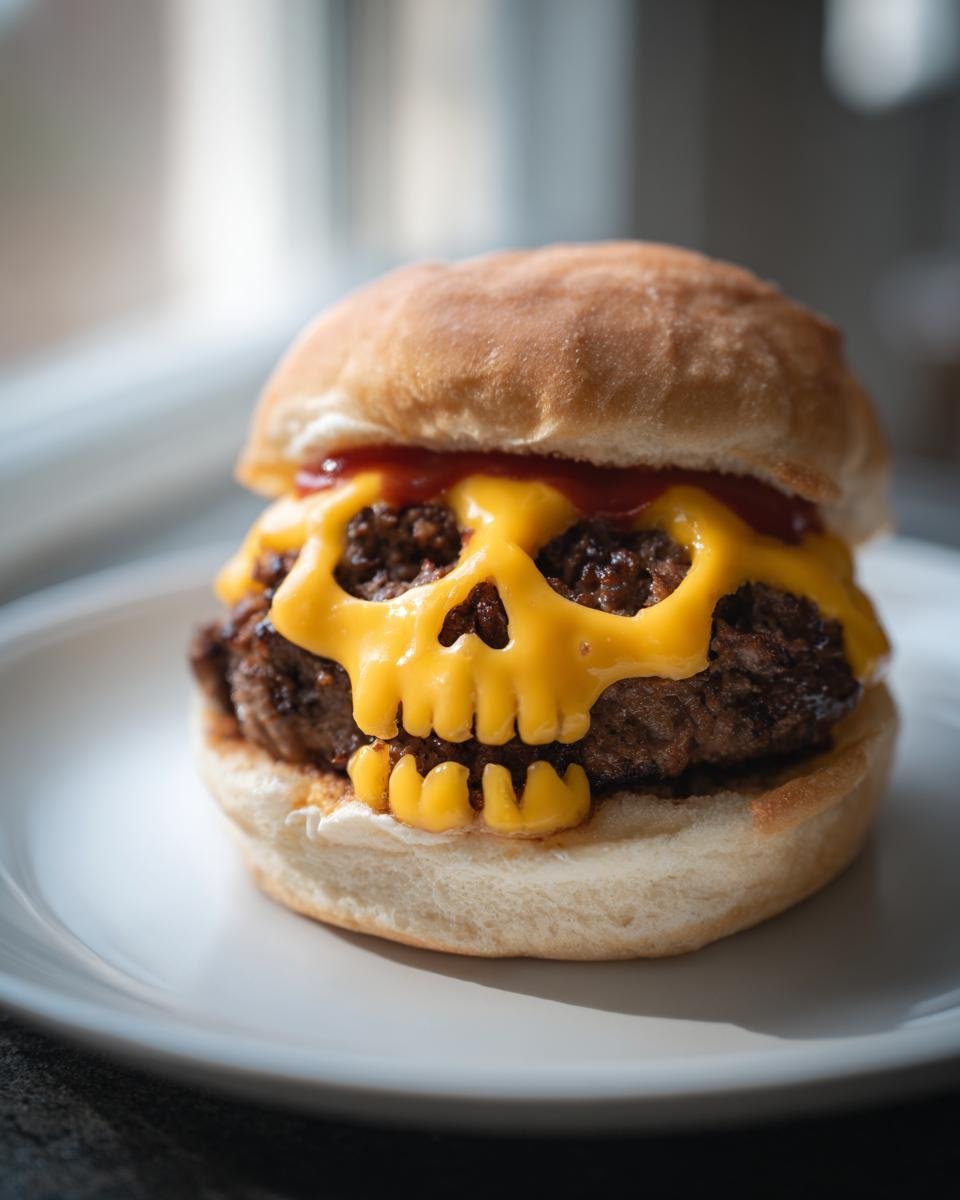
When they are cooked through to your liking—usually another 3 to 4 minutes—take them off the heat. Lightly toast those buns while the patties rest for just a second. Then comes the best part: assemble the burger and use your ketchup and mustard to paint in those little details. Tiny dots of ketchup in the eye sockets really make them pop open, and a few mustard lines make for terrific, slightly goofy teeth!
Expert Tips for Making Amazing Halloween Cheeseburger Skulls
Okay, so you’ve got your meat mixed and your faces carved, but I have a couple of little tricks I use that really elevate the final spooky presentation. These aren’t in the main list because they are the kind of things you only learn after burning a few burgers!
My absolute favorite tip, especially if you’re using very soft, high-fat meat, is to pop those raw, carved patties into the fridge for about 10 minutes before they hit the pan. Chilling them just briefly helps the meat firm up, which means those little eye sockets and mouths you carved won’t collapse when they start cooking. Trust me, that really helps the skull shape stay proud!
Also, when you’re doing the final face painting with the ketchup and mustard, try dipping a clean toothpick into the condiment instead of squeezing directly onto the burger. You get way more control, and you can make those tiny, pinpoint eyes that look much creepier than a big blob of red sauce.
Serving Suggestions for Your Spooky Halloween Cheeseburger Skulls
We’ve got the main event ready, but what’s a spooky skull burger without some equally fun (and easy!) side companions? I try to keep the sides theme-appropriate, but honestly, if you’re short on time, nobody will complain about plain old chips!
For me, the best pairings are things that look a little ghostly or use those nice, deep orange and black colors of the season without requiring me to turn the oven on high for an hour. Check out my guide on easy Halloween side dishes for tons more ideas, but here are my two favorites that go perfectly with these cheeseburgers.
First up, you have to try making ‘ghostly’ mashed potatoes. It sounds weird, but trust me on this. When you are mashing your potatoes, don’t over-mix them until they are perfectly smooth. Leave them a little lumpy. Then, when you scoop them onto the plates, use a large spoon to create a slightly tall cone shape rising up—it looks just like a little blob ghost sitting next to the burger. A tiny drizzle of melted butter on top of the ‘head’ is the perfect finishing touch.
If you need something green to cut through all that richness, keep it simple. I just toss together some mixed greens, maybe some crumbled blue cheese, and toss it with store-bought raspberry vinaigrette. The dark purple/red from the dressing looks a bit spooky against the green lettuce, and the sweetness really balances out the savory beef. Plus, it takes about three minutes to pull together, which means more time for pumpkin carving!
Storage and Reheating Instructions for Leftover Halloween Cheeseburger Skulls
So, what happens if—and I highly doubt this—you actually have any of these amazing Halloween Cheeseburger Skulls left over? Because everyone knows leftovers taste even better the next day, but we have to store them right to keep that skull texture intact! We want leftovers, not sad, floppy patties.
The most important rule here is separation. Those soft hamburger buns will turn soggy practically overnight if they’re sitting next to that juicy, cheesy patty. Always take everything apart!
For the patties (with or without the cheese still on them, since the cheese melts so nicely even when cold), wrap each one tightly in plastic wrap or pop them into an airtight container. They’ll keep happily in the fridge for about three or four days. If you think you won’t eat them within that time, these ground beef friends freeze beautifully, too! Just wrap them well and pop them in a freezer bag.
When it comes time to eat them again, forget the microwave if you can—that’s the fastest way to make a burger chewy and sad. The oven or an air fryer is your best friend for bringing these back to life!
- For the patty: Lay the leftover skull patty on a baking sheet lined with foil. Heat the oven to 350°F (about 175°C). Bake for about 8 to 10 minutes. This gently reheats the meat all the way through and crisps up the edges just a bit. If you still have that cheese layer, it will melt beautifully again.
- For the bun: While the patty is heating, quickly toast the bun halves on a separate baking sheet, or pop them in the toaster for just a minute until they are warm and just starting to brown. Never reheat the bun alongside the meat—it gets steaming hot and ruins the texture.
Once everything is warm, reassemble those spooky skulls! A fresh dab of ketchup or mustard goes a long way to making it feel like you just cooked it fresh. Enjoy those leftovers!
Frequently Asked Questions About Halloween Cheeseburger Skulls
I know you probably have a few lingering questions floating around, especially about managing the carving so your creation looks genuinely terrifying and not just mushy. These little details make all the difference between a good Halloween meal and an epic one!
Can I make these ahead?
Yes, you absolutely can prep these ahead of time, which I recommend if you’re busy on Halloween evening! You can mix the meat and carve the faces up to a day in advance. Just make sure to wrap the raw patties tightly in plastic wrap (using the chilling trick I mentioned earlier helps them hold shape) and keep them refrigerated. Don’t try to cook them ahead, though; these Halloween Cheeseburger Skulls taste way better fresh off the skillet. If you’re prepping ahead, you might also want to keep the ketchup and mustard condiments separate until serving time so they don’t dry out sitting on the raw meat.
What meat ratio works best for the beef?
As I mentioned earlier, I really push for 80/20 ground beef. That 20% fat content is your friend here because the fat melts during cooking, adding flavor and moisture, and most importantly, it helps support those thin carved areas so your skull doesn’t crumble when you flip it. If you’re checking raw ground beef safety standards, remember that you should cook beef to an internal temperature of 160°F, but the fat content really manages the texture in this particular recipe!
How do I stop the cheese from sliding off the skull shape?
That melted cheddar sliding down the ‘forehead’ is part of the look, but if you want it to stick nicely right over the eye sockets, wait until the patty is almost done—maybe 30 seconds before you plan to flip it—to place the cheese on top. Immediately after flipping, cover the skillet with a lid for about 30 seconds. The trapped steam helps the cheese instantly adhere to the contours of the hot meat. It gives you that perfect, slightly grotesque, melted look that we’re aiming for with these spooky burgers! For more general food handling guidelines, you can always check standard food safety standards.
Estimated Nutritional Data for One Halloween Cheeseburger Skull
I’m not a nutritionist, not even close! You know I’m much better suited for messy kitchens than precise counting rooms. But I know you busy parents often want a ballpark idea of what everyone is eating, especially when we’re cramming in treats for a holiday meal.
So, here is the rough breakdown for what one of these wonderfully spooky Halloween Cheeseburger Skulls offers per serving, based on the ingredients we used—that’s just the patty, the cheese, and the bun, nothing else!
Keep in mind that these numbers are estimates, okay? If you swap out the half-pound of beef for turkey or use low-fat buns, those numbers are going to scoot around a bit. This is just my starting point if you stick to the recipe exactly as written!
- Calories: Around 450 (Not bad for such a fun meal!)
- Total Fat: About 25 grams (That 80/20 beef really shows up here, it keeps things juicy!)
- Protein: A solid 28 grams—keeps the kids full until the candy rush hits.
- Carbohydrates: Roughly 30 grams, mostly coming from that hamburger bun.
We’re aiming for fun family dinners here, not perfection, so use this info as guidance! The main takeaway is that you’re getting a decent amount of protein in a really fun package.

Share Your Spooky Creations
I always tell people that the best part of any shared recipe isn’t the cooking itself—it’s seeing how everyone else puts their own spin on it! Honestly, when you finish carving those eerie faces and the cheese is melting down perfectly, you need to show them off!
When you finally sit down to enjoy your batch of these Halloween Cheeseburger Skulls, please take a moment to snap a picture! We all need a little inspiration for next year, and I’d absolutely love to see your spooky plating skills.
Head over to my social media—you can tag me directly so I can see your amazing work. Seeing your kitchen creations truly makes writing these recipes worthwhile! And if you found this quick dinner idea helpful, don’t forget to swing back here and leave a quick star rating right below the recipe card. Your feedback helps other busy parents find the best, easiest Halloween recipes out there!
Print
Halloween Cheeseburger Skulls
- Total Time: 25 min
- Yield: 4 servings 1x
- Diet: Low Fat
Description
Make spooky skull-shaped cheeseburgers for Halloween.
Ingredients
- 1 pound ground beef
- 1/2 teaspoon salt
- 1/4 teaspoon black pepper
- 4 slices cheddar cheese
- 4 hamburger buns
- 1 tablespoon vegetable oil
- 2 tablespoons ketchup (for eyes/mouth)
- 2 tablespoons mustard (for accents)
Instructions
- Mix ground beef, salt, and pepper in a bowl.
- Shape the meat mixture into four patties slightly larger than the buns.
- Use a small, sharp knife or a skewer to carefully carve simple eye sockets and a mouth shape into each patty to resemble a skull.
- Heat vegetable oil in a skillet over medium heat.
- Cook patties for 3-4 minutes per side for medium doneness, or until cooked through.
- Place one slice of cheddar cheese on each patty during the last minute of cooking to melt.
- Lightly toast the hamburger buns if desired.
- Assemble the burgers: place the cheese-topped skull patty on the bottom bun.
- Use ketchup and mustard to draw small dots for eyes and lines for teeth or accents on the carved areas of the skull.
- Place the top bun on the burger.
Notes
- You can use a skull-shaped mold if you prefer not to carve by hand.
- Cook the burgers on a grill for a smoky flavor.
- Prep Time: 15 min
- Cook Time: 10 min
- Category: Dinner
- Method: Pan Frying
- Cuisine: American
Nutrition
- Serving Size: 1 burger
- Calories: 450
- Sugar: 5
- Sodium: 550
- Fat: 25
- Saturated Fat: 10
- Unsaturated Fat: 15
- Trans Fat: 1
- Carbohydrates: 30
- Fiber: 2
- Protein: 28
- Cholesterol: 80
Keywords: Halloween, cheeseburger, skull, beef, burger, spooky, ground beef