
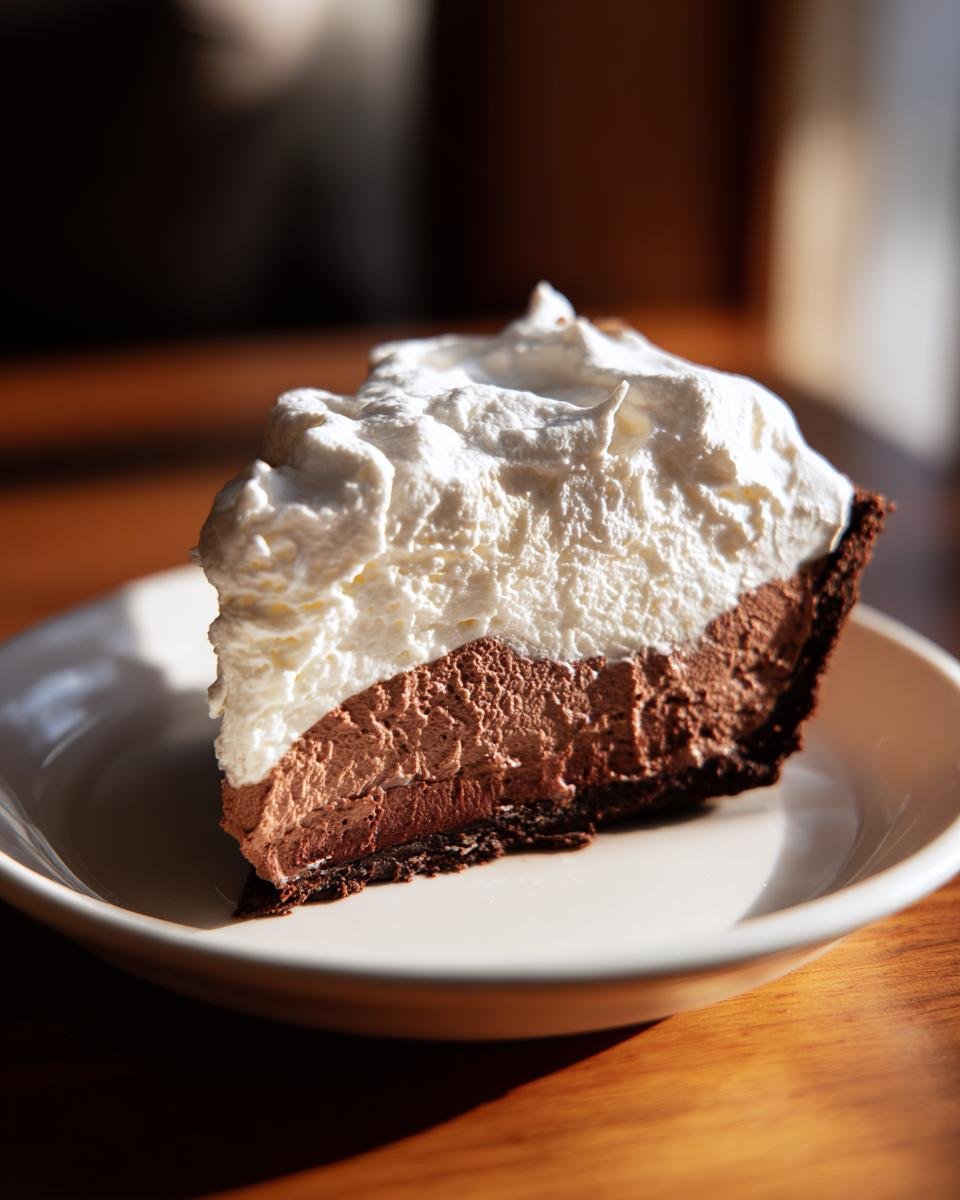
Doesn’t anything just beat the satisfaction of pulling a truly decadent homemade dessert out of the fridge? I’m talking about something deeply, intensely satisfying. That’s what we’re making today! Forget those complicated baked pies; this recipe for **Chocolate Cream Pie** is shockingly simple and requires almost no active time in front of the stove. Seriously, 20 minutes of whisking is all it takes! I spent years fussing with flavor ratios, trying to get that perfect, melt-in-your-mouth dark chocolate taste without any grainy texture. Well, I finally landed on this winner. It’s rich, it’s creamy, and it uses an old-school technique that ensures ultimate smoothness every single time.
Why This Chocolate Cream Pie Recipe Stands Out
I know we all have fifty recipes competing for our attention, so I want to tell you exactly why this **Chocolate Cream Pie** needs to be next on your menu. This isn’t just another dessert; it’s pure, fuss-free indulgence. You won’t believe how easy it is!
- It tastes like you spent half a day in the kitchen when you actually didn’t!
- The contrast between that flaky crust and the cool, dark filling is just everything.
Quick Preparation for a Perfect Chocolate Cream Pie
Honestly, the hands-on part is a dream. We’re talking maybe 20 minutes of prep, followed by 15 minutes of actual cooking on the stovetop. After that, it’s all you! The magic happens while it chills. You set it and forget it for a few hours, and Bam! Perfect **Chocolate Cream Pie** ready for serving.

Rich, Velvety Filling Texture
This is where we prove we’re serious home bakers, even if we made the crust ahead of time. My secret for that ridiculously luxurious texture is the combination of cornstarch for structure and the careful tempering of the egg yolks. If you temper correctly, your filling never gets that weird scrambled egg texture—just pure, smooth velvet that melts perfectly on your tongue.
Essential Ingredients for Your Chocolate Cream Pie
Okay, don’t panic when you see the list—it breaks down so easily! Everything here is designed to create that ultra-rich, deep chocolate flavor. You’ll notice we need the crust already baked, but everything else comes together quickly on the stove. Remember, quality matters, especially with your cocoa powder, since that’s where all the punch comes from in this **Chocolate Cream Pie**.
For the Rich Chocolate Cream Pie Filling
- 1 pre-made 9-inch pie crust, already baked and waiting patiently
- 1 cup granulated sugar—don’t skim on this, it blends beautifully!
- 1/4 cup unsweetened cocoa powder—I use the dark kind for depth
- 1/4 cup cornstarch—this is our secret thickening weapon
- 1/4 teaspoon salt
- 3 large egg yolks, whisked lightly (we temper these later, so be gentle!)
- 2 cups milk—I prefer whole milk for the best richness
- 2 tablespoons unsalted butter, cut into a few pieces
- 1 teaspoon vanilla extract
For the Whipped Cream Topping
This topping is light, fluffy, and so easy, but you must make sure your cream is freezing cold!
- 1 cup heavy whipping cream (must be super cold)
- 1 tablespoon powdered sugar, sifted is best
- 1/2 teaspoon vanilla extract (a nice little extra kick for the topping)
Step-by-Step Instructions to Make Chocolate Cream Pie
Alright, let’s get this **Chocolate Cream Pie** filling on the stove! Remember, this part needs your attention—give it about 35 minutes total, and don’t walk away when it starts bubbling. Patience here guarantees that incredible texture later on.
Preparing the Chocolate Cream Pie Base Mixture
First things first, grab medium saucepan. You want to combine all your dry treasures: the sugar, that rich cocoa powder, the cornstarch, and the salt. Whisk them until they look like perfectly uniform brown sand. Now, take your milk and add it in slowly, whisking constantly until you have zero lumps left. Place that over medium heat. Keep stirring! Once it comes up to a boil, let it roll for a solid minute while you keep that constant stirring motion going. Then, pull it right off the heat!
Tempering Egg Yolks for the Chocolate Cream Pie Filling
Don’t let those egg yolks get shocked! You need to temper them so they don’t scramble. Take just about half a cup of that hot chocolate liquid we just made and splash it *slowly* into your whisked yolks while you whisk the yolks like crazy. This brings their temperature up gently. Once that’s nicely blended, pour that whole tempered yolk mixture right back into the saucepan with the rest of the chocolate stuff. Pop it back over medium-low heat. Stir, stir, stir until it starts looking thick again and just begins to bubble—and I mean *just* begins! You absolutely cannot let this boil again, or you’ll ruin the tempering!
Finishing and Chilling the Chocolate Cream Pie
Off the heat it goes for the final touches. Stir in your butter until every last bit melts down, followed by the teaspoon of vanilla. Now, pour this gorgeous, hot filling right into your pre-baked crust. This next part is non-negotiable for a creamy top: grab a sheet of plastic wrap and press it directly onto the surface of the filling. If you don’t do this, you get a heavy ‘skin’ on top, and nobody wants that! Stick that whole pie in the fridge for at least three hours until it’s totally firm.
Making and Applying the Whipped Topping
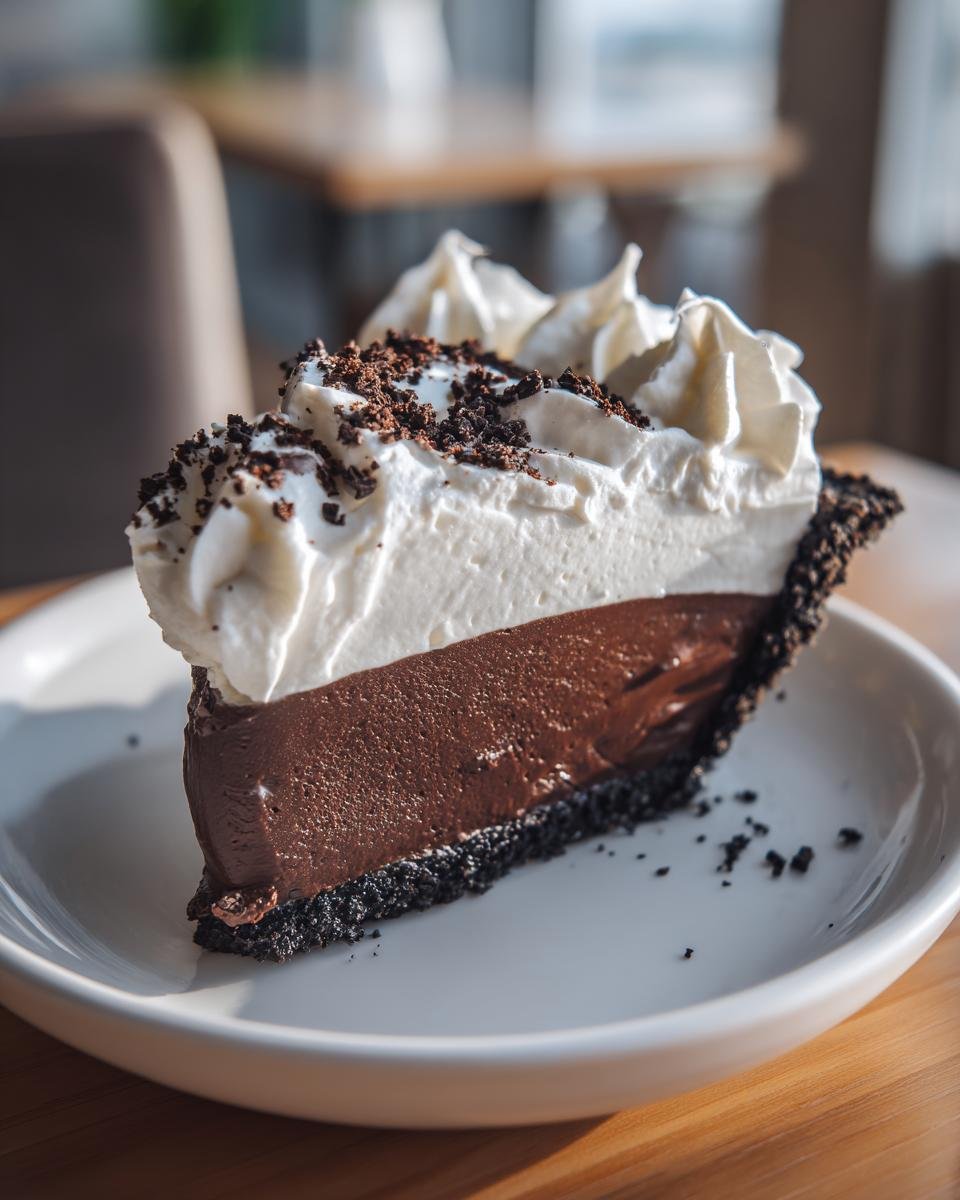
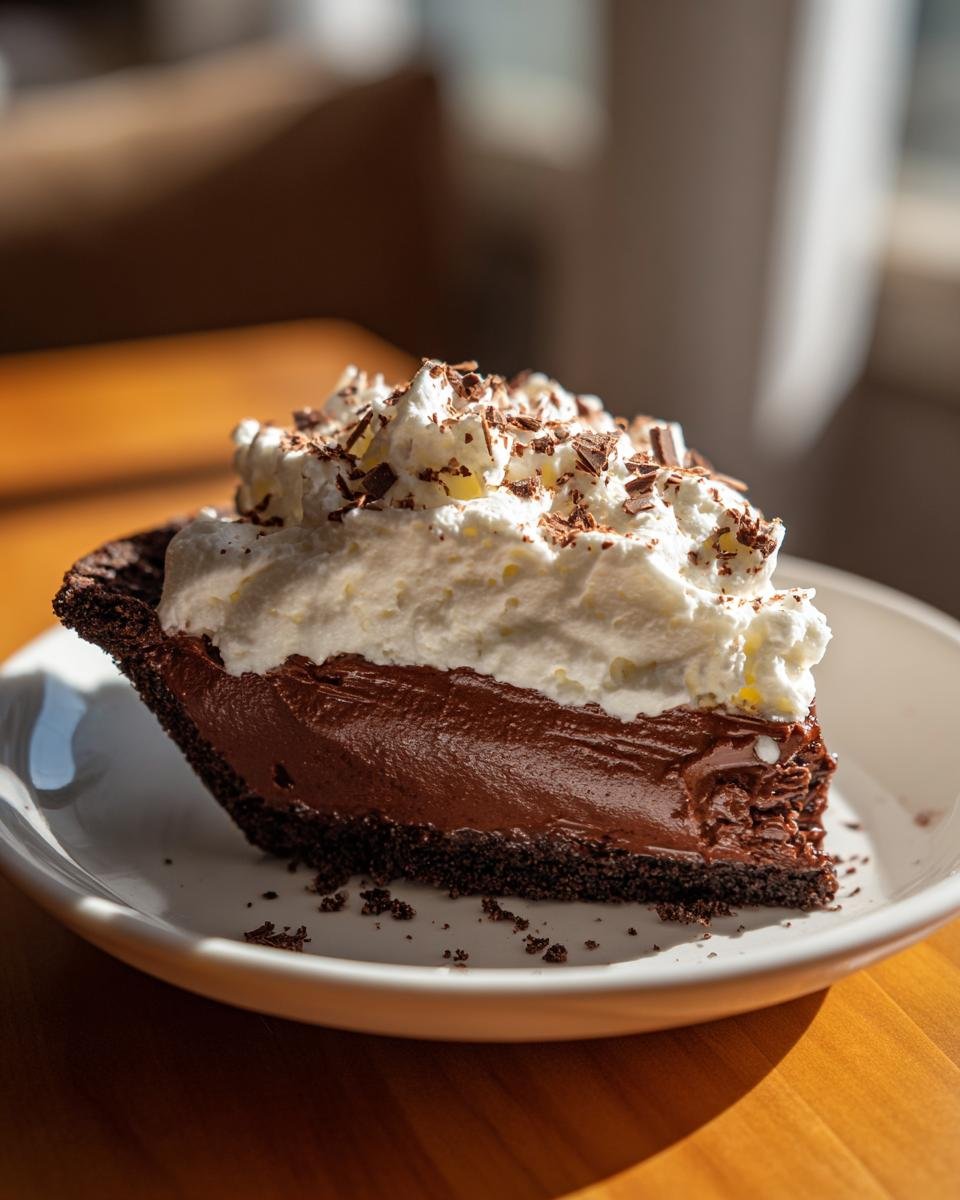
While it chills, you can prep the cloud on top. For the best success whipping cream and getting those stiff peaks, chill your mixing bowl and whisk attachment in the freezer for about 15 minutes beforehand—it truly makes a difference! Throw in your heavy cream, powdered sugar, and the last bit of vanilla, and whip until they hold their shape perfectly. If you want a slightly fancier, firmer topping, check out my recipe for quick chocolate whipped cream—though honestly, the simple vanilla version is just as divine on this pie!
Expert Tips for the Best Chocolate Cream Pie
Even though this is a straightforward **Chocolate Cream Pie** recipe, there are a few little secrets I’ve learned over the years that turn a good pie into an *epic* pie. If you follow these little pointers, you’re basically guaranteeing success. We aren’t just following steps here; we are mastering the cream pie game!
Preventing a Skin on Your Chocolate Cream Pie Filling
I mentioned this before, but it’s worth repeating because it feels like magic. When that hot filling goes into the crust, you need to stop it from drying out on top while it cools in the fridge. So, take a piece of plastic wrap and drape it right over the filling so it’s actually touching the surface. I mean it—it has to make contact! This traps the steam right where it belongs and keeps the top layer perfectly smooth and glossy until you’re ready to garnish it. If you don’t, you get a weird, slightly rubbery skin that totally ruins that beautiful, smooth texture we worked so hard for.
Achieving Stiff Peaks for the Chocolate Cream Pie Topping
Getting that topping right is key because it provides the lift and lightness to balance the rich filling. Remember how I said chill your bowl ahead of time? That’s step one. Cold fat whips faster! When you whip the cream, you’ll start seeing soft mounds forming—that means you’re halfway there. Keep going until the peaks stand straight up when you lift the whisk out. If the very tip just curls over a little bit, that’s called a medium peak, and it’s great for spreading. But for that dramatic look, you want stiff peaks that don’t move an inch. If you accidentally go too far and make butter, don’t worry! Just fold in a tiny splash of cold milk to loosen it up slightly.
Ingredient Notes and Substitutions for Chocolate Cream Pie
Okay, let’s talk about making swaps because sometimes we just don’t have every single thing the recipe calls for on hand. That’s fine! We can still pull off an unbelievable **Chocolate Cream Pie**. This recipe is super flexible, but there are a couple of spots where I really encourage you to stick close to the script, like with the eggs—they are crucial for setting the filling correctly.
Pie Crust Options
The recipe calls for a pre-made crust that’s already baked, and honestly, that’s my favorite time-saver when I’m in a rush! But if you are feeling ambitious and want to make your own, go for it. Just make sure you blind bake it fully so it’s firm enough to hold up against that creamy, moist filling. A flaky, buttery homemade crust just pushes this pie right over the top, but no shame if you use the store-bought one!
Cocoa Powder Quality
Listen, the filling is really just sugar, milk, eggs, and cocoa, which means the cocoa has to carry all the heavy lifting for that rich chocolate flavor. If you use a cheap, dusty old canister, your **Chocolate Cream Pie** will taste just fine, but if you splurge on a good quality unsweetened cocoa powder—maybe something Dutch-processed if you have it—the difference in the final taste is honestly staggering. It makes the chocolate taste deeper, darker, and way more professional!
Serving Suggestions for Your Homemade Chocolate Cream Pie
Now that you’ve got this stunning **Chocolate Cream Pie** chilled and ready to go, we need to talk about how to serve it up like a dessert champion! Because the pie itself is so intensely rich and creamy, I always lean toward something bright or crunchy on the side. A few simple fresh raspberries or a sprinkle of shaved dark chocolate is always gorgeous sitting right on top of that cloud of whipped cream.
If you have kids (or just a major sweet tooth like me), a little side drizzle of caramel sauce works wonders. Or, if you are truly going all out, skip the milkshake and grab a glass of cold milk, or maybe check out my recipe for a super decadent chocolate milkshake to go alongside your slice. Honestly, though, this pie is perfect all by itself!
Storage and Reheating Instructions for Chocolate Cream Pie
This **Chocolate Cream Pie** is simply not a leftover-friendly pie if you leave the topping on for too long; the moisture from the filling can make the whipped cream soggy fast. It absolutely must stay refrigerated—no counter time allowed for cream pies! Once it’s fully chilled and set, I cover the entire pie loosely with whatever plastic wrap I have handy (don’t let it touch the cream if you can help it!).
It stays fantastic in the fridge for about three days maximum. If you’re only having one or two slices, cut only what you need and cover the exposed filling tightly with plastic wrap before putting it back in the cold. Trust me, reheating this is a total no-go—it’s meant to be served icy cold!
Frequently Asked Questions About Chocolate Cream Pie
It drives me crazy when I follow a recipe for a decadent **Chocolate Cream Pie** and something goes slightly wrong, so let’s clear up any last-minute worries right here! These are the questions I always get when friends try this recipe out at home for the first time. Don’t let a little kitchen hiccup stop you from enjoying this sweet pie!
How long does the filling need to set before serving?
I know waiting is the hardest part, especially when the smell of chocolate is everywhere! We need that filling to be completely firm, so the absolute minimum setting time in the fridge is three hours. If you can manage to hold off until the next day—overnight is truly ideal!—you’ll get the absolute firmest, clean slices imaginable. That extra time really lets the cornstarch work its magic and keeps the pie from weeping.
Can I make this Chocolate Cream Pie filling ahead of time?
Yes, you totally can! This is great if you are hosting a big dinner. You can cook the filling completely, pour it into your baked crust, and press the plastic wrap right on top, just like I showed you. Keep it chilled for up to 24 hours. The only thing you shouldn’t do ahead of time is put the glorious whipped cream on top. Wait until about an hour before you plan to serve so that topping stays light and fabulous!
What happens if my filling doesn’t thicken?
Oh no, a runny filling! Don’t toss it yet! This usually means your first boil wasn’t long enough to activate all that cornstarch, or maybe you didn’t quite hit that bubbling point. If you notice it’s not setting up after 30 minutes of chilling, carefully set the whole pie back on the stove over low heat. Whisk it gently but vigorously (remember, don’t boil it hard again!). Often, just a minute or two of reheating and stirring will get that beautiful thickness back, I promise!
Share Your Homemade Chocolate Cream Pie Experience
Now that you’ve gotten your hands dirty (or, let’s be honest, just whisked furiously over a saucepan!), I absolutely need to hear how your **Chocolate Cream Pie** turned out! There is nothing I love more than seeing your gorgeous, creamy masterpieces sitting on your tables.
Did you stick to tradition, or did you decide to throw some toasted coconut on top like I secretly considered doing? Tell me everything! Did the tempering step go smoothly for you? Drop a comment below and let me know how many stars you’re giving this recipe. It helps me know what’s working for you all!
And please, if you took a picture—and I know you did because this pie is stunning—tag me on social media! I love flicking through photos of that perfect, smooth chocolate filling contrasted against that fluffy white topping. Happy baking, or in this case, happy chilling!
Print
Simple Chocolate Cream Pie
- Total Time: 3 hours 35 min
- Yield: 8 servings 1x
- Diet: Vegetarian
Description
A straightforward recipe for a rich chocolate cream pie with a flaky crust.
Ingredients
- 1 pre-made 9-inch pie crust, baked
- 1 cup granulated sugar
- 1/4 cup unsweetened cocoa powder
- 1/4 cup cornstarch
- 1/4 teaspoon salt
- 3 large egg yolks
- 2 cups milk
- 2 tablespoons unsalted butter
- 1 teaspoon vanilla extract
- 1 cup heavy whipping cream
- 1 tablespoon powdered sugar
- 1/2 teaspoon vanilla extract (for topping)
Instructions
- In a medium saucepan, whisk together the granulated sugar, cocoa powder, cornstarch, and salt.
- Gradually whisk in the milk until smooth.
- Cook over medium heat, stirring constantly, until the mixture thickens and comes to a boil. Boil for one minute, stirring constantly. Remove from heat.
- In a small bowl, whisk the egg yolks. Slowly temper the yolks by whisking about 1/2 cup of the hot chocolate mixture into the yolks.
- Pour the tempered yolk mixture back into the saucepan with the remaining chocolate mixture. Cook over medium-low heat, stirring constantly, until the mixture thickens again and just begins to bubble. Do not boil.
- Remove from heat. Stir in the butter and 1 teaspoon of vanilla extract until the butter melts and is fully incorporated.
- Pour the hot filling into the baked pie crust. Press plastic wrap directly onto the surface of the filling to prevent a skin from forming. Chill for at least 3 hours, or until completely cold and set.
- For the topping, beat the heavy whipping cream, powdered sugar, and 1/2 teaspoon vanilla extract until stiff peaks form.
- Spread or pipe the whipped cream over the chilled pie before serving.
Notes
- You can make your own pie crust if preferred.
- Chill the bowl and whisk attachment before making the whipped cream for best results.
- Prep Time: 20 min
- Cook Time: 15 min
- Category: Dessert
- Method: Stovetop and Chilling
- Cuisine: American
Nutrition
- Serving Size: 1 slice
- Calories: 380
- Sugar: 35
- Sodium: 150
- Fat: 18
- Saturated Fat: 10
- Unsaturated Fat: 8
- Trans Fat: 0.5
- Carbohydrates: 50
- Fiber: 2
- Protein: 6
- Cholesterol: 95
Keywords: chocolate cream pie, homemade pie, cocoa dessert, no-bake filling, sweet pie