
You know those days when you desperately need dessert, but the thought of turning on the oven feels like climbing a mountain? Trust me, I live for fast, simple sweets, but sometimes even a basic cookie recipe feels like too much work. That’s why I’m obsessed with the Oreo Icebox Cake. Seriously, this thing changes the game! It’s creamy, it’s deeply satisfyingly crunchy-then-soft, and it requires zero baking whatsoever. I’ve made this Oreo Icebox Cake for everything from last-minute potlucks to a Tuesday night when the sugar craving hit hard.
The magic here is that the cookies transform into this incredible, nearly cake-like layer after chilling. It’s pure indulgence with just four main ingredients, and honestly, once you see how easy it is, you’ll wonder why you haven’t made twelve batches already. It’s foolproof, and my kids think I’m suddenly a baking genius every single time I pull it out of the fridge!
Why This Oreo Icebox Cake Recipe is Your New Go-To Dessert
Listen, when I say easy, I mean zero preheating, zero special equipment needed—maybe just a sturdy whisk! This Oreo Icebox Cake proves that simple assembly beats fancy baking any day of the week. It’s reliable, which I love, because you know exactly what you’re going to get.
- It’s totally no-bake! Seriously, no oven time required, which is a lifesaver in the summer.
- You only need four core ingredients. If you have Oreos and heavy cream, you’re basically halfway there.
- The texture payoff is huge—it feels much fancier than the effort you put in. If you’re looking for another easy win, check out my thoughts on No-Bake Funfetti Oreo Icebox Cake!
Quick Facts About Our Oreo Icebox Cake
Let’s get down to brass tacks about timing. Prep time is lightning fast, clocking in at just 15 glorious minutes. Since this is no-bake, the cook time is truly 0 minutes! Just make sure to pencil in that mandatory chilling time because the total time is about 6 hours and 15 minutes since that time in the fridge is non-negotiable.
It yields about 8 perfect servings, which is usually enough… if you don’t get to it first, that is!
Essential Ingredients for the Perfect Oreo Icebox Cake
Okay, this is where the magic begins! Because we aren’t baking, your ingredients better be top-notch, even if they’re simple. You absolutely will need Oreos, obviously, but the quality of your cream is what makes or breaks the texture of this Oreo Icebox Cake. I learned this the hard way!
Make sure you grab those ingredients and prepare them right before you start layering. Everything needs to be ready to go so assembly is fast!
- One full package of Oreo cookies—I’m talking the whole 14.3-ounce package. Don’t crush them yet, we need them whole for layering!
- Two cups of heavy whipping cream. And I mean cold, straight from the back of the fridge cold. It needs that chill to whip up properly.
- Half a cup of powdered sugar. Make sure it’s powdered, granulated sugar just won’t dissolve right into the cream.
- One teaspoon of good vanilla extract. Don’t skimp here; it really brightens up the flavor profile of the filling.
That’s it! See? Four main things, and you’re ready to build layers that taste like heaven.
Step-by-Step Instructions for Making Your Oreo Icebox Cake
Alright, time to put the mixer to work! This is the fun part where we turn cream into fluffy clouds and stack them up like little cookies towers. Since everything needs to come together quickly once the cream is whipped, have your 8×8 inch pan right next to your mixing station. Don’t worry about making the layers look perfect right now; we’ll smooth it all out later.
If you’re looking for another way to use those Oreos in a no-fuss way, you have to see how I make my Oreo Delight—it’s a slightly different vibe, but just as easy!
Whipping the Cream for Your Oreo Icebox Cake
Get your cold heavy cream, powdered sugar, and vanilla extract all into your mixing bowl. Start whipping it slowly until everything starts to come together. Then turn that mixer up to medium-high speed! You have to watch this closely. We are looking for stiff peaks, which means when you lift the whisk out, the cream stands straight up and doesn’t flop over at all. If it looks like soft soap, keep going! Stiff peaks mean your cookie layers won’t collapse under the weight.
Assembling the Layers of the Oreo Icebox Cake
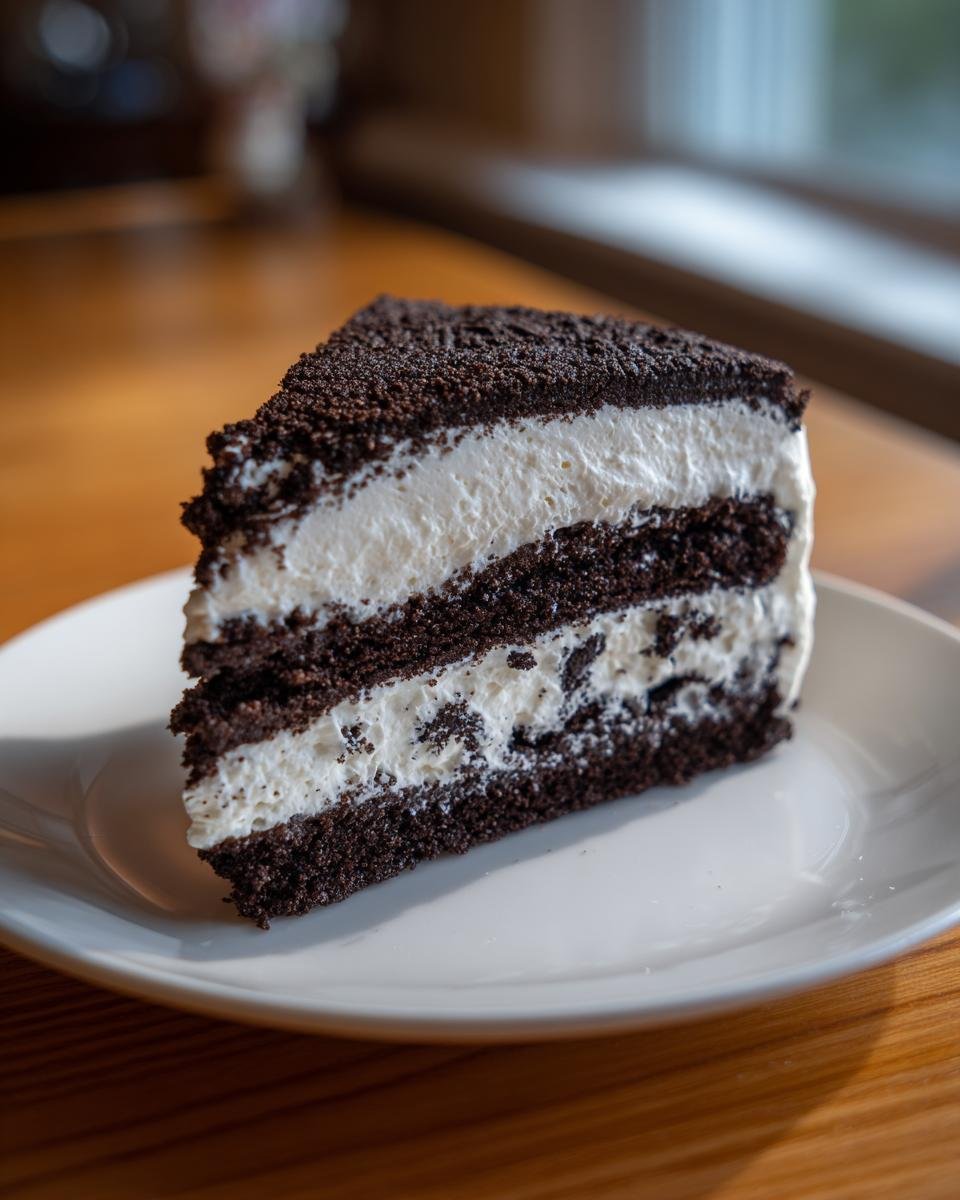
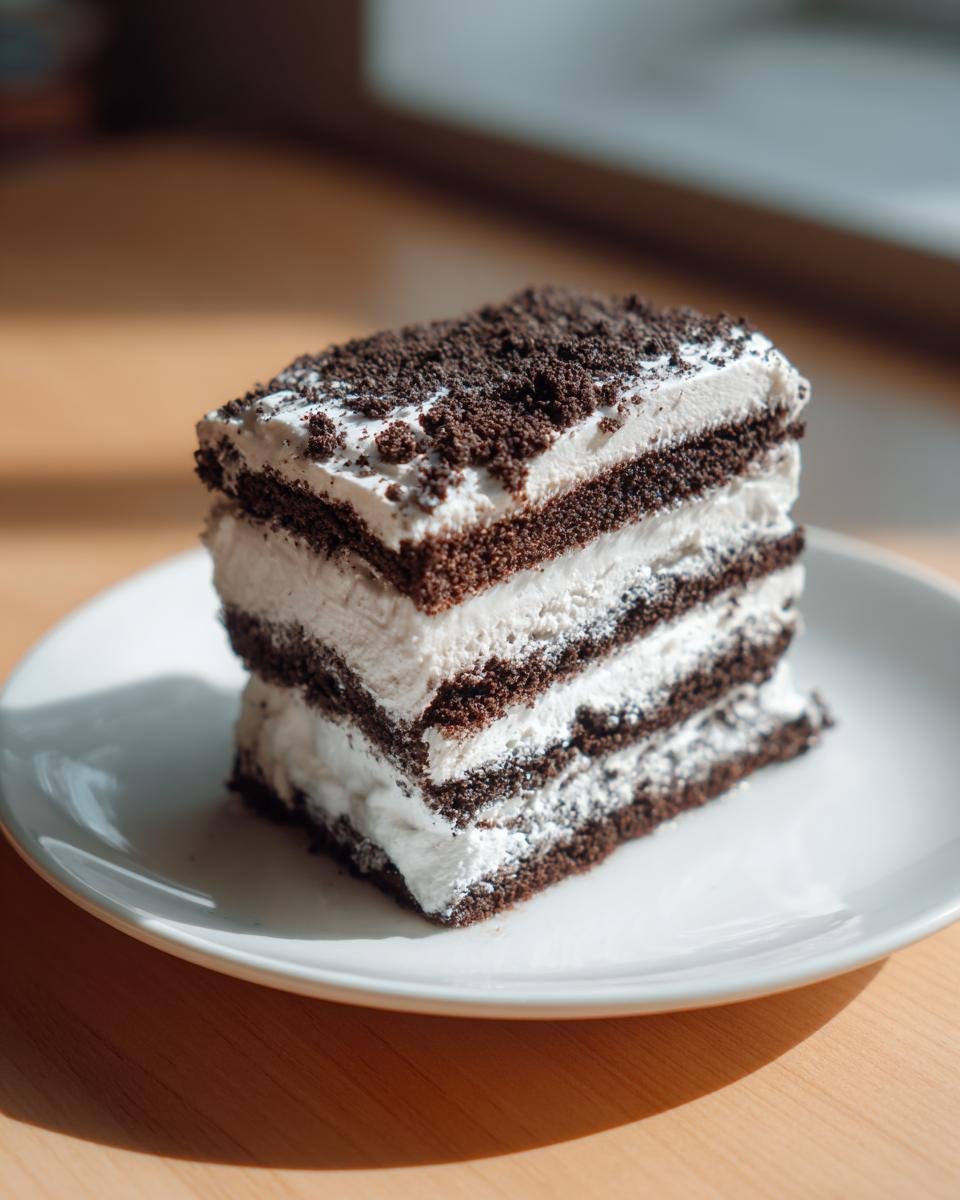
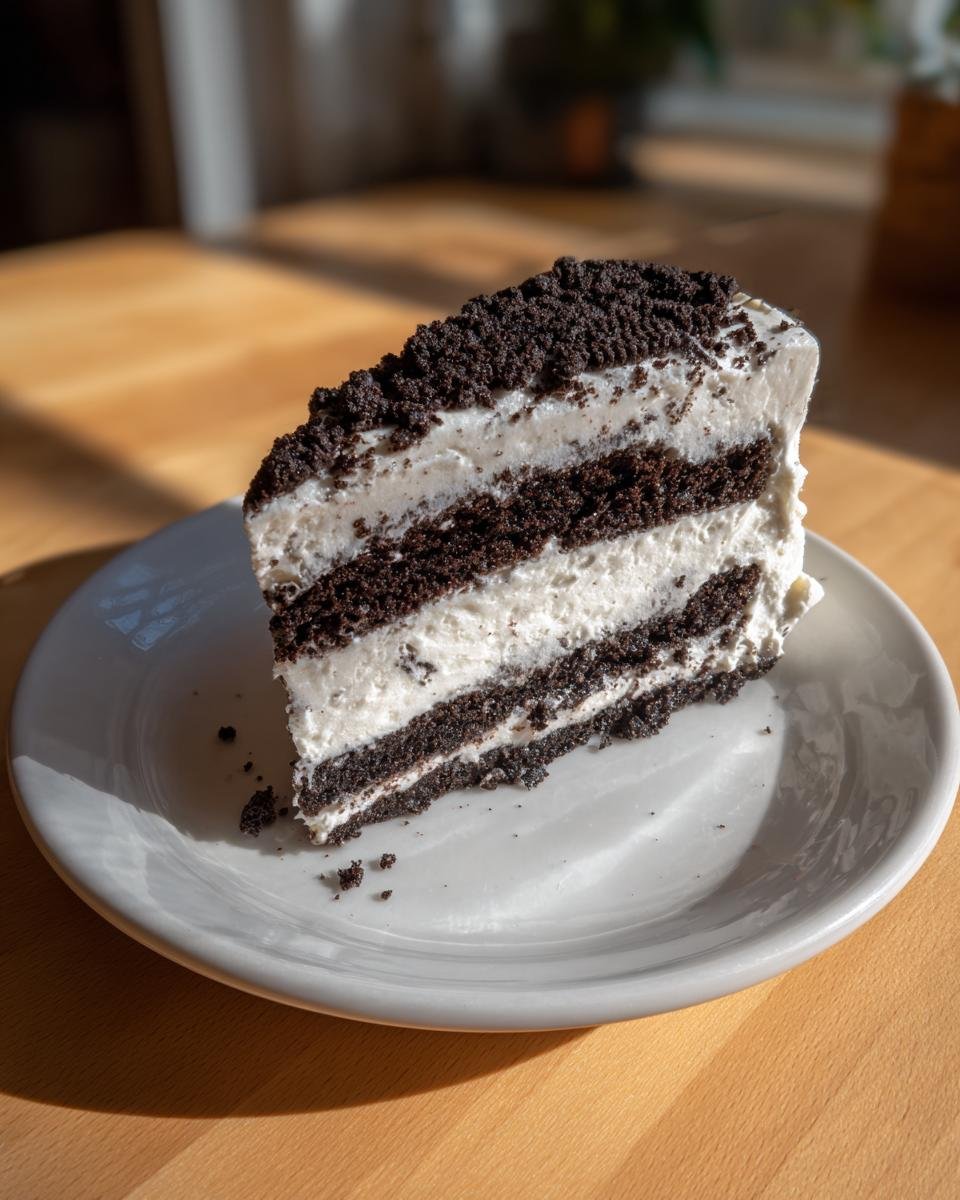
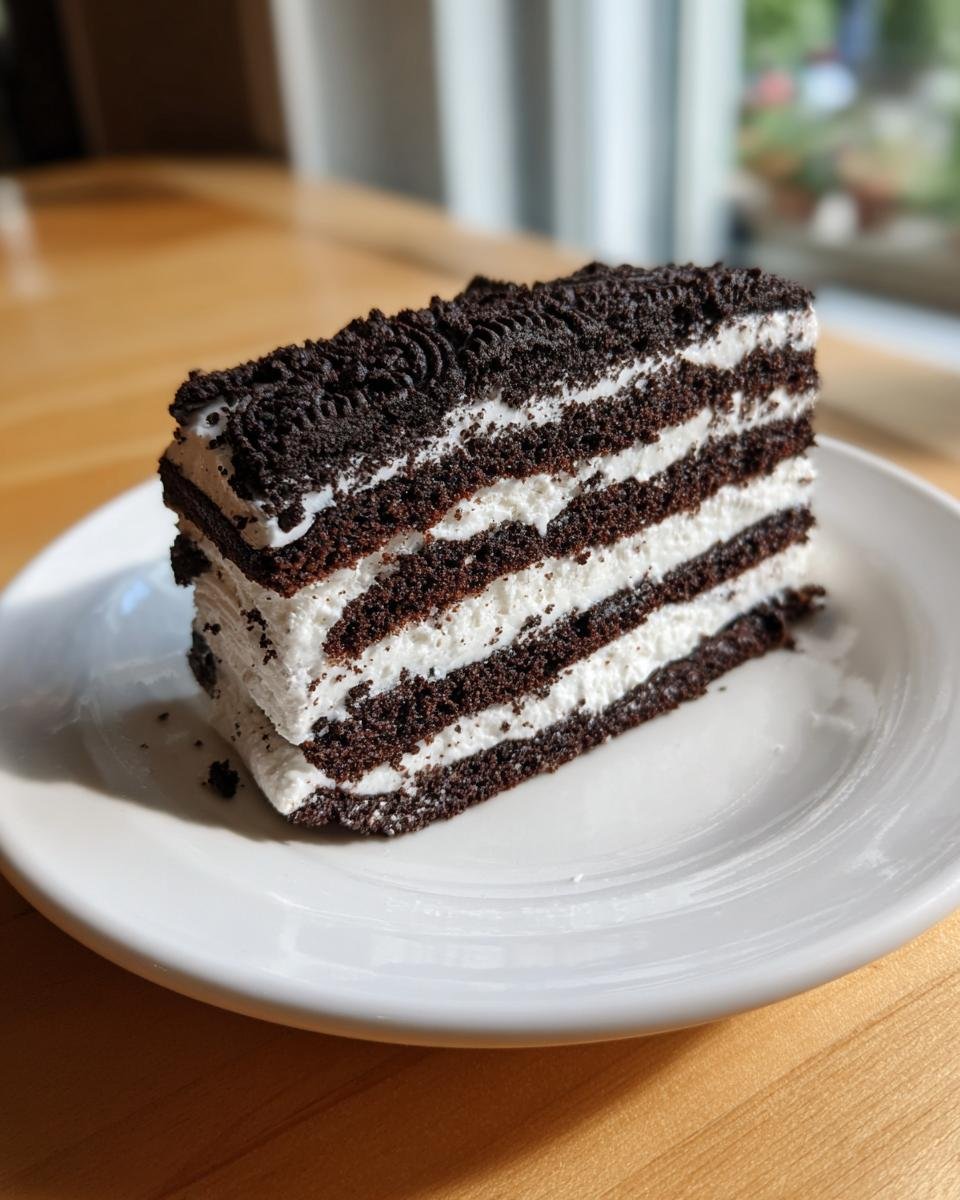
Now, put down the mixer and grab those Oreos. Put a single layer of cookies right on the bottom of your 8×8 pan. Don’t overlap them too much; make a nice base layer. Then, take about one-third of that gorgeous whipped cream and spread it over those cookies evenly. Layer by layer, we go: more cookies, then more cream! Repeat that cookie-and-cream pattern two more times until you run out of both ingredients. Make sure that final top layer of cream is smoothed out nicely.

The Crucial Chilling Time for the Oreo Icebox Cake
This is the hardest part because it smells so good already, but you cannot skip this step. Cover that whole pan tightly with plastic wrap. Pop it into the fridge for a minimum of six hours. I’m telling you, overnight is ideal. This chilling process is what lets the moisture from the whipped cream seep into the Oreos. If you cut it early, you just have crunchy cookies and loose cream—we want that signature, soft, cake-like texture for our perfect Oreo Icebox Cake!
Expert Tips for the Best Oreo Icebox Cake
I’ve made this Oreo Icebox Cake so many times that I’ve picked up a few tricks to make sure it comes out flawless every single time. If you want to bump this recipe up just a tiny bit, try these simple moves. They don’t add any time, but they really improve the texture and presentation!
First thing—if your cream isn’t whipping well, you’re probably using a room-temperature bowl. Trust me, put your mixing bowl and your whisk attachments in the freezer for about 15 minutes before you start. That cold helps the fat in the cream solidify faster, giving you those massive, stiff peaks quicker.
For a richer, almost cheesecake-like filling, I sometimes take half of that heavy whipping cream and replace it with softened cream cheese. You must make sure the cream cheese is super soft before you try to whip it in, otherwise, you get lumps instead of fluff. Also, don’t forget the garnish! I always save a few extra Oreos and crush them thinly right before serving to sprinkle over that top layer. It looks amazing!
If you love quick, creamy treats like this, you might also love my review on No-Bake Cookie Delights—they’re just as simple!
Variations on the Classic Oreo Icebox Cake
The basic Oreo Icebox Cake is perfection, I won’t lie, but sometimes you just want to mess with a good thing, right? I love that you can take this simple structure and completely change the flavor profile without adding any baking steps. It’s really a blank canvas of cookies and cream!
One of my earliest attempts to jazz this up involved the coffee aisle. If you toss about a teaspoon of finely ground espresso powder into your heavy cream when you’re whipping it—wow! It turns the whole thing into a sophisticated mocha dream. It cuts through the sweetness of the Oreos just perfectly. You get this subtle caffeine kick that makes it feel like a grown-up dessert. I wrote about another chocolate obsession you might enjoy, my Divine Chocolate Cheesecake, if you’re going that direction!
Another fun switch-up is changing the cookie base. You absolutely must try this with Golden Oreos. It changes the whole aesthetic of your Oreo Icebox Cake. Instead of the sharp black-and-white contrast, you get this beautiful warm, buttery-looking layer, and the filling tastes a bit like vanilla custard. It’s fantastic and much lighter visually.
If you’re a die-hard chocolate fan, try using chocolate sandwich cookies instead of the original. I find that using the chocolate version makes the final dessert taste a bit richer, almost like a classic fudge icebox cake, especially if you swap out half that vanilla extract for a little bit of unsweetened cocoa powder right into the whipped cream. It’s a deeper, more decadent Oreo Icebox Cake, guaranteed to please any chocoholic!
Serving Suggestions for Your Oreo Icebox Cake
Okay, so your glorious Oreo Icebox Cake has chugged along in the fridge, the cookies are perfectly soft, and it’s time to serve this masterpiece! Presentation matters, even when the dessert is mostly just stacking things up. Since the cream is so rich, I always try to pair it with something that offers a little bit of tartness to balance everything out. Fresh raspberries or sliced strawberries are absolutely my favorite companions for this dessert.
A little fruit on the side cuts through that sweetness perfectly. You can also just use a light dusting of unsweetened cocoa powder right before you serve it—it adds that professional, bakery-case look without adding any more effort. And for the true chocoholics out there (you know who you are!), a super thin drizzle of good quality chocolate syrup right over the top slice really sets things off. Check out my thoughts on the perfect chocolate pairing over at my Ultimate Chocolate Milkshake Delight post for inspiration!
Now, for the tricky part: slicing! Since this Oreo Icebox Cake is soft from the chilling, you want a really sharp knife. Here’s the trick: dip your sharp knife into a glass of hot water, wipe it completely dry with a clean towel, and then make your cut. Wipe and repeat this process for every single slice! This keeps the cream clean and prevents the layers from getting messy and smearing when you pull the serving out. A clean knife means a beautiful slice every single time!
Storage and Make-Ahead Guide for the Oreo Icebox Cake
One of the best things about this Oreo Icebox Cake is that it’s actually fantastic for making ahead of time! You can’t exactly bake it two weeks early, can ya?
This dessert is actually designed to hang out in the cold for a bit! That chilling time isn’t just helpful; it’s mandatory because that’s what softens the cookies. So, if you’re planning a party, you can absolutely assemble the whole thing the day before you need it. In fact, I think the texture gets even better after a solid 12 hours in the fridge!
When it comes to leftovers—and you might have some, though I rarely do—you just want to keep it covered tightly with plastic wrap right in the refrigerator. The cream doesn’t love exposure to air, and it tries to soak up fridge smells like a sponge! I find that the Oreo Icebox Cake is absolutely at its peak for about two full days.
Now, here’s the important part: We don’t mess around with freezing this one. I tried it once, thinking I could save half for later, and the whipped cream went completely wonky once it thawed. It gets watery and separated, and you lose all that beautiful, fluffy structure we worked so hard to achieve. So, if you have extra, just plan to eat it within 48 to 72 hours, or else you might have to bake cookies for dessert!
Frequently Asked Questions About Oreo Icebox Cake
I get asked about this Oreo Icebox Cake all the time! It’s so simple that people worry they must be missing something, or they want to know if they can swap out ingredients without ruining the whole thing. Don’t worry, this recipe is super forgiving, but there are a few sticky points that always trip people up.
If you’re thinking of twisting the recipe, bookmark this section! And if you’re always looking for fast, easy recipes, check out my guide on the No-Bake Funfetti Oreo Icebox Cake—it uses the same principle!
Can I use Cool Whip instead of heavy whipping cream in this Oreo Icebox Cake?
Oh, the eternal question! Yes, you can use Cool Whip if you are really short on time or just prefer it. Cool Whip is already stabilized, so it whips up instantly, and you skip that scary part where you wait for stiff peaks to form. But here’s the catch: the texture won’t be the same. Heavy whipping cream, when whipped nicely, creates a lighter, richer, and more airy structure that feels decadent. Cool Whip tends to be denser and sweeter. It works in a pinch, but for that truly melt-in-your-mouth, authentic taste, stick to the real cream!
What happens if I don’t chill the Oreo Icebox Cake long enough?
This is the most important thing you need to know about this recipe! If you cut into your Oreo Icebox Cake after just two or three hours, you’re going to be disappointed. Remember, the chilling time isn’t just about making it cold; it’s about creating cake magic! The moisture from the cream slowly soaks into those crisp cookies, turning them tender and cake-like. If you don’t chill it long enough, you’ll end up with crunchy, soggy cookies layered with loose cream—it’s not the same experience at all. Give it those minimum six hours, seriously!
What is the best way to get clean slices of the Oreo Icebox Cake?
I mentioned this briefly before, but it bears repeating because cutting this dessert cleanly is the key to making it look like you worked way harder than you did. Soggy cookies and soft cream mean that knife drags everything down. So here’s the secret: use a large, sharp knife, and make sure you heat that knife first. Dip the knife completely into a tall glass of very hot water for about ten seconds. Wipe it totally dry so you don’t add water to your layers, and make your cut. Wipe it clean, reheat it, and wipe it dry again before the next slice! It keeps your layers looking sharp and distinct.
Nutritional Estimates for Your Oreo Icebox Cake Serving
Now, I know what you’re thinking—a dessert this good has to come with a hidden calorie bomb, right? Well, maybe a little! But I wanted to give you a good ballpark idea of what you’re dealing with when you sit down with a nice big slice of this wonderful Oreo Icebox Cake. Remember, since we aren’t baking or adding any weird stabilizers, these numbers are just estimates based on standard ingredient brands.
If you use premium organic Oreos or a fancier brand of heavy cream, those numbers might shift a bit, so take this as a guideline! I always tell my family, it’s dessert; we’re enjoying it!
- Serving Size: 1 slice (This recipe generally makes 8 big servings!)
- Calories: Around 350
- Total Fat: About 22g (with 14g of that being the richer Saturated Fat)
- Carbohydrates: Roughly 35g
- Sugar Content: Hold onto your hat—about 30g of that carb count is sugar, which is expected in a cookies-and-cream dream team like this one!
- Protein: A small bump of about 4g
- Cholesterol: Hovering around 70mg
It’s certainly a treat, but given that it’s got zero cook time and uses simple dairy and cookies, I think that’s a pretty fair trade-off for something so delicious. Enjoy every bite!
Print
Oreo Icebox Cake
- Total Time: 6 hr 15 min
- Yield: 8 servings 1x
- Diet: Vegetarian
Description
A simple, no-bake dessert made with layers of whipped cream and Oreo cookies.
Ingredients
- 1 package (14.3 ounces) Oreo cookies
- 2 cups heavy whipping cream
- 1/2 cup powdered sugar
- 1 teaspoon vanilla extract
Instructions
- Whip the heavy cream, powdered sugar, and vanilla extract in a large bowl until stiff peaks form.
- Arrange a single layer of Oreo cookies on the bottom of an 8×8 inch pan.
- Spread about one-third of the whipped cream mixture evenly over the cookies.
- Repeat the layering process twice more: cookies, then cream.
- Top with the remaining whipped cream.
- Cover the pan and refrigerate for at least 6 hours, or preferably overnight, to allow the cookies to soften.
- Slice and serve cold.
Notes
- You can crush a few extra Oreos to sprinkle on top before serving for decoration.
- For a richer flavor, substitute half of the heavy cream with cream cheese softened to room temperature before whipping.
- Prep Time: 15 min
- Cook Time: 0 min
- Category: Dessert
- Method: No Bake
- Cuisine: American
Nutrition
- Serving Size: 1 slice
- Calories: 350
- Sugar: 30
- Sodium: 250
- Fat: 22
- Saturated Fat: 14
- Unsaturated Fat: 8
- Trans Fat: 0
- Carbohydrates: 35
- Fiber: 1
- Protein: 4
- Cholesterol: 70
Keywords: Oreo, icebox cake, no bake, easy dessert, cookies and cream