
Oh, I love those nights when you just need something warm, cheesy, and deeply satisfying tucking you in like a favorite old blanket. Forget fussy layers and complicated sauces! If you ask me what the ultimate weeknight Italian comfort food is, it’s got to be baked pasta, and specifically, this Manicotti Recipe. Seriously, this is the easiest, most reliable recipe I’ve ever developed for proper cheese manicotti.
My family practically demands this dish when anyone feels under the weather or when we’re celebrating a small win. It reminds me of sitting around my Aunt Clara’s kitchen table—she used to fill those shells like she was preparing for battle! The beauty of this particular recipe is that it uses standard ingredients but treats them right, ensuring every shell is perfectly stuffed and swimming in bubbly sauce. Trust me, you need this simple, wonderful recipe in your rotation!
Why This Manicotti Recipe Stands Out
When I test a recipe over and over, I look for those magic spots where the work pays off instantly. This baked cheese manicotti isn’t fancy; it’s just unbelievably good and quick to put together. Honestly, who has time for super fussy weeknight dinners? That’s why this recipe is the MVP in my kitchen. It just works!
Here’s why I keep coming back to this specific approach for a perfect cheese manicotti:
- It’s minimal prep! Most of the time is just mixing cheese and waiting for the oven, which is my kind of cooking.
- The filling is pure classic Italian flavor—no weird additions, just creamy, tangy ricotta and mozzarella bliss.
- Assembly is surprisingly easy, even when stuffing shells. I promise, even if you aren’t a natural twirler, you can handle stuffing these!
- It tastes even better the next day, which is a win for my busy work lunches. You can also check out some of my other great pasta ideas right here!
It’s foolproof comfort food, and that’s exactly what we all need sometimes.

Gathering Ingredients for Your Manicotti Recipe
Listen, the quality of your ingredients really dictates how spectacular this simple cheese manicotti turns out. We aren’t masking anything here; it’s all about the ricotta, the bright parsley, and that yummy sauce. If you want the best results from this Manicotti Recipe, don’t skimp; use the good stuff! It makes a huge difference in that final cheesy pull.
I always grab my homemade sauce when I can—oh, if you need a totally phenomenal tomato base, check out how I make my absolute best homemade marinara. But if you’re using store-bought, pick a brand you already love!
Cheese Filling Components for the Manicotti Recipe
This is where the real creamy magic happens. Measure everything carefully, especially the mozzarella, because we divide it up for stuffing and topping!
- 15 ounces ricotta cheese (I prefer whole milk—don’t go low-fat here, it gets grainy!)
- 1 cup shredded mozzarella cheese, divided (half for the filling, half for the beautiful bubbly top!)
- 1/2 cup grated Parmesan cheese
- 1 large egg (this helps bind the filling so it doesn’t run out when baking!)
Pasta and Sauce for the Manicotti Recipe
These are the heart of the dish, holding all that wonderful cheese goodness.
- 12 manicotti shells (Make sure you look closely at the shape you buy—the large tubes are what you need!)
- 24 ounces marinara sauce
- 1/4 cup chopped fresh parsley (fresh is a must for that bright flavor, not dried, trust me on this one!)
- 1/2 teaspoon salt
- 1/4 teaspoon black pepper
Essential Equipment for Making Manicotti Recipe
Okay, before you even think about putting water on the stove, let’s talk about what you need sitting on the counter. Being prepared is half the battle when you’re working with delicate pasta shells! If you don’t have these tools ready, you end up making a huge mess or, worse, breaking your shells while trying to find a saucepan.
For this simple baked pasta magic, you really only need a few core items:
- A medium saucepan for boiling those manicotti shells until they are perfectly al dente—don’t overcook them!
- A sturdy medium mixing bowl for whipping up that rich ricotta filling.
- A 9×13 inch baking dish. This is the classic size that fits 12 perfectly stuffed shells in a nice, snug layer.
- A small spoon or, better yet, a piping bag (seriously, that plastic bag trick is a lifesaver!) for stuffing.
- A rubber spatula to gently spread that base layer of sauce without scraping up your good non-stick pan.
That’s truly it! We’re keeping things simple today so you can get this comfort food on the table fast.
Step-by-Step Instructions for the Perfect Manicotti Recipe
This is where we put it all together, but stick close to the plan, okay? Rushing the cooking of the pasta or overmixing the cheese filling is how you end up with a runny mess instead of perfect cheese manicotti tubes. We want that nice, slight resistance when you bite into the pasta—that’s al dente! If you accidentally cook them a minute too long, don’t panic; the freezing or making-ahead tips can sometimes help solidify slightly mushy pasta.
Also, a quick word of advice: because manicotti shells are fragile tubes, they can tear easily. To stop them from breaking when you try to stuff them, cook them just shy of done and always rinse them immediately in cold water after draining. That stops the cooking process fast! Now, let’s get cooking. You can check out a recipe for another amazing baked dinner inspiration right here!
Preparing the Shells and Oven
First things first, you need the oven ready to welcome our baked pasta! Preheat your oven to a nice, steady 375 degrees F (190 degrees C). While that warms up, get a big pot of salty water going and cook those 12 manicotti shells. Remember the rule: cook them according to package directions until they are just *al dente*. They need to hold up to stuffing and baking, so undercook them by about a minute!
Once they are done, drain them immediately and run them under some cool water. Honestly, this stops them from turning into complete mush. Lay them out on a clean cutting board or baking sheet while you handle the filling. You want them dry enough not to soak the already wet cheese filling.
Mixing the Ricotta Cheese Filling for Manicotti Recipe
Grab that medium bowl we talked about! This filling needs to be creamy, savory, and hold its shape once it’s in the shells and baked. Toss in the ricotta, half of that shredded mozzarella (save the other half for the top!), all the Parmesan, the whole egg, that fresh parsley, plus your salt and pepper.
Now, mix it up, but here’s the key: only mix until everything is just combined and smooth. If you whip it too hard or too long, you can actually break down the ricotta structure too much, and it gets watery when baked. We want creamy, not soupy! Stir gently until you can’t see any dry streaks of Parmesan or white clumps of ricotta.
Assembling and Baking Your Manicotti Recipe
Time to assemble this beauty in your 9×13 dish! Start by spreading about 1 cup of your marinara sauce right across the bottom of the pan. This prevents the bottom layer of pasta from sticking or scorching—it’s the glue holding everything together.
Now comes the delicate part: stuffing those shells. Like I mentioned, using a zip-top bag with the corner snipped off is the easiest way to pipe that filling right into each tube. Once all 12 shells are happily filled, arrange them snugly in a single layer over that base layer of sauce. Don’t overlap them too much, or the cheese won’t melt evenly!
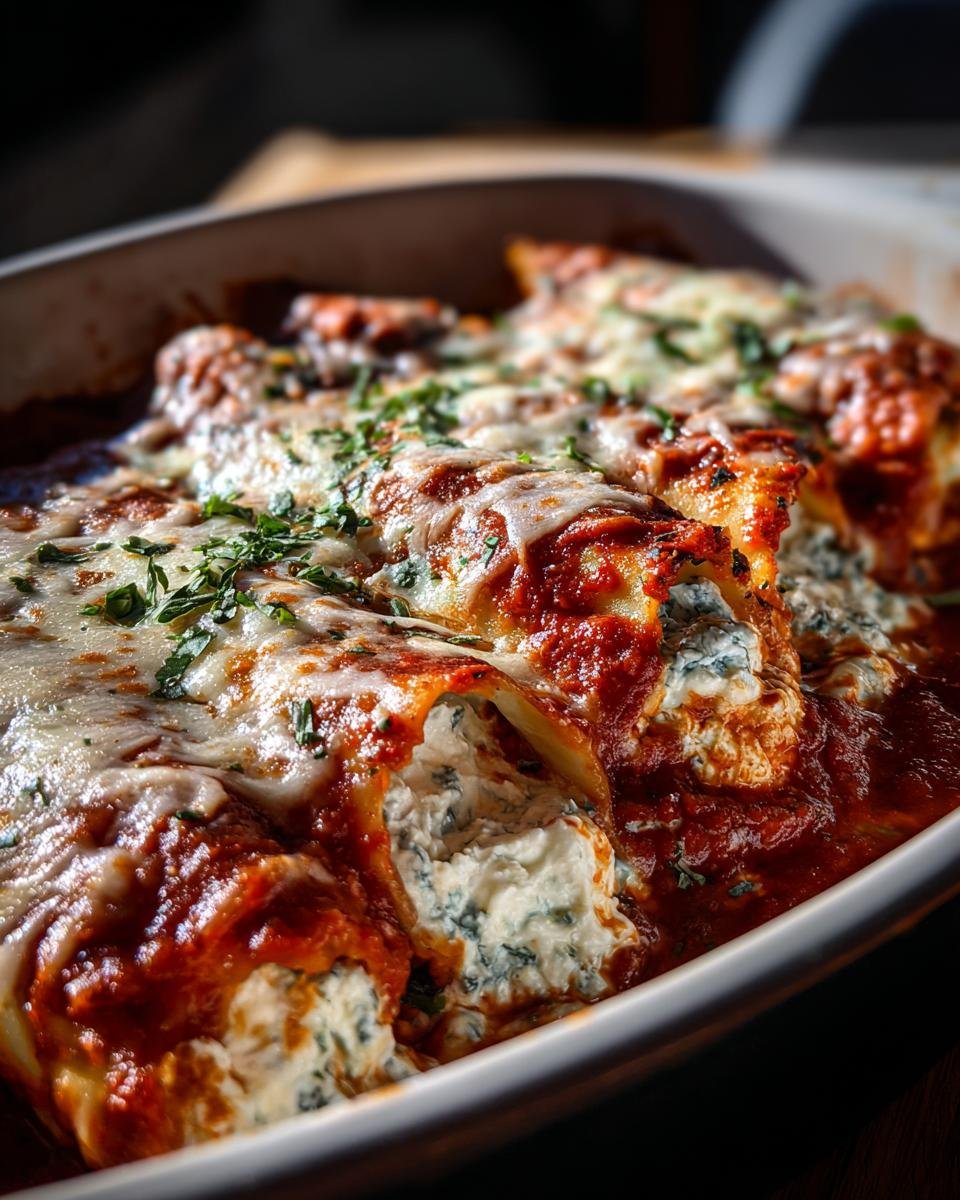
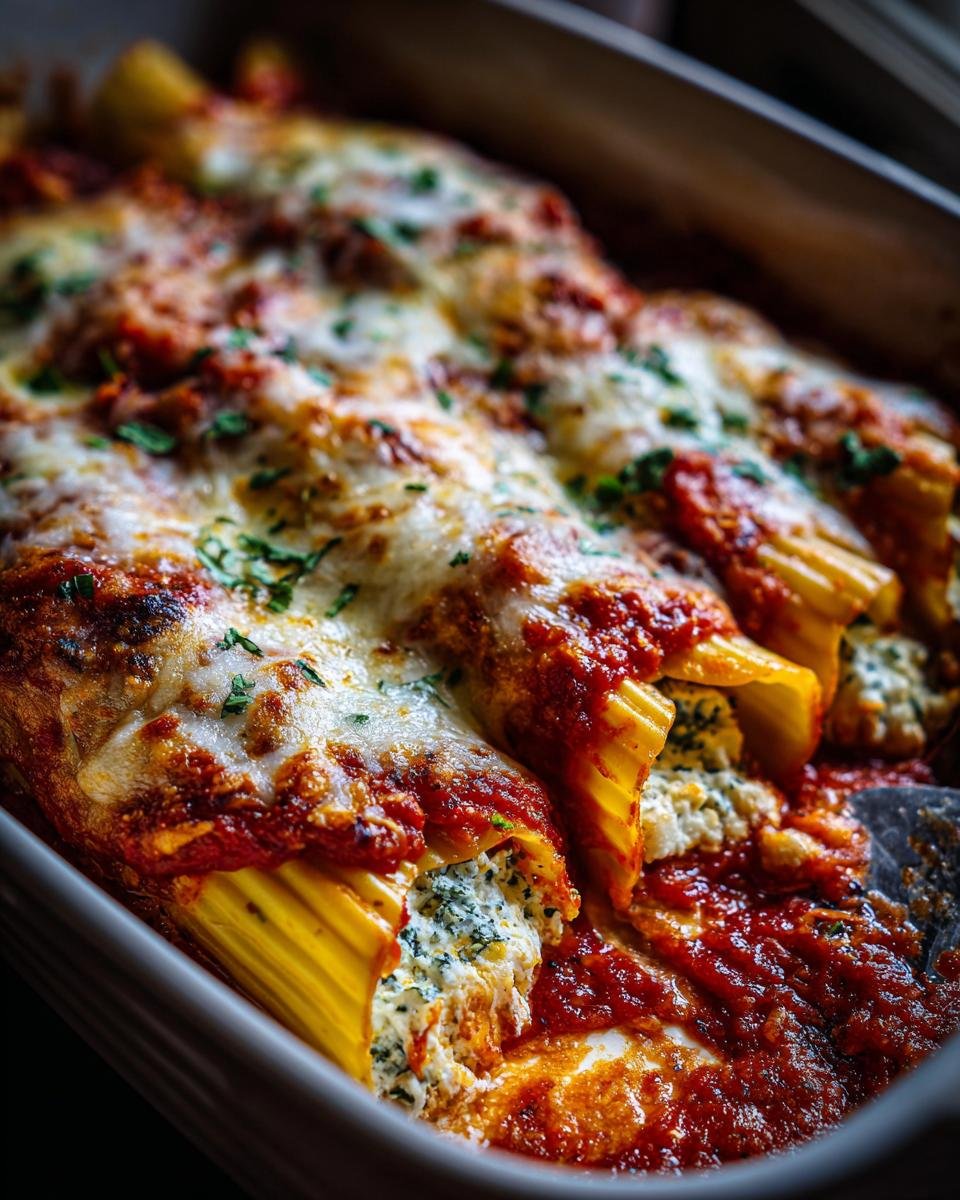
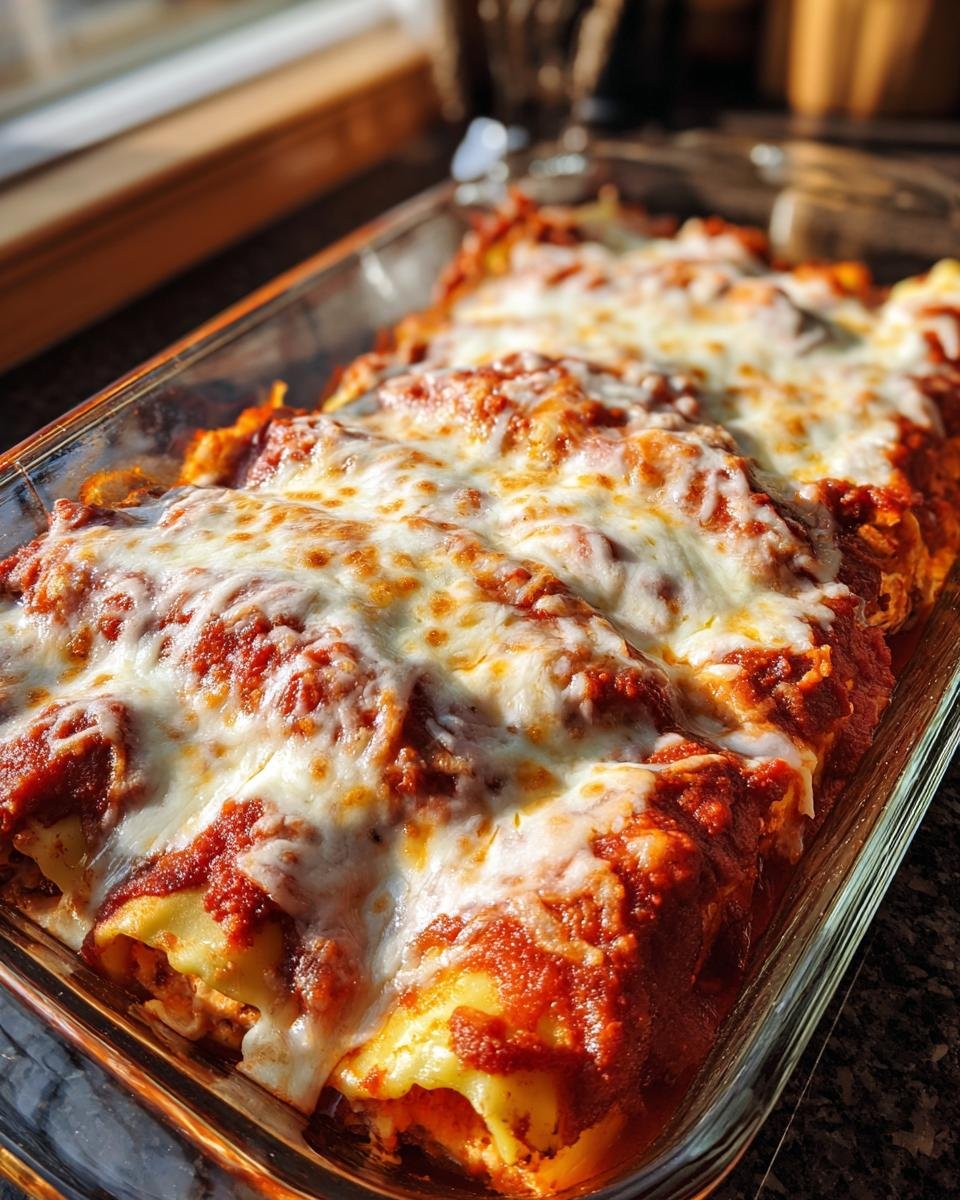
Spread the rest of that yummy marinara sauce right over the tops of the stuffed shells. Then, take the final 1/2 cup of mozzarella and shower it evenly over everything. Pop that dish into the preheated oven.
Bake it for 25 to 30 minutes. You’re looking for great visual cues here: the sauce should be bubbling happily around the edges, and that top layer of cheese needs to be fully melted and just starting to turn lightly golden brown. Take it out and let it sit on the counter for 5 minutes before serving. That little rest helps everything set up so you don’t burn your mouth or have the filling slide out when you serve the first portion!
Tips for Success with This Manicotti Recipe
I’ve made this Manicotti Recipe a million times, both for quick family dinners and for feeding a crowd when company is over. And over those times, I’ve learned a few little tricks that make the whole process less messy and guarantee that perfect cheesy texture every single time. You want to work smarter, not harder, right?
Here are my top pieces of advice for when you tackle this recipe—these are the things I wish someone had told me the very first time I tried to stuff a shell!
The Piping Bag Hack is Non-Negotiable
Seriously, if you only take one tip from me today, let it be this one for filling your shells. Trying to use a tiny spoon to wedge cold, dense ricotta mixture into a slippery, cooked pasta tube is a straight-up nightmare! It’s messy, you waste filling, and you often tear the shell getting it half full.
My secret weapon is using a large, heavy-duty zip-top bag—like the gallon Ziploc kind. Scoop all your ricotta filling into the bag, seal it up tight (squeeze out all the air!), and then grab kitchen shears and snip off just a generous corner of one side. Bam! Instant, perfectly controlled piping bag. You just squeeze gently, and the filling pipes right into the shells. It’s so much cleaner, and you fill them way faster. Trust me, it changes the game for any stuffed pasta dish!
Adding Veggies? Keep Them Dry!
Sometimes I like to sneak in a little extra goodness, and the recipe notes mention swapping half the ricotta for spinach. That’s a perfect addition, but you have to treat the frozen spinach right! If you just toss it in soggy, you’re going to end up with watery, thin stuffing that seeps out under the mozzarella.
If you use frozen chopped spinach, you must thaw it completely first. Then, the most essential part: you have to squeeze every single drop of water out of it! I usually wrap the thawed spinach in several layers of paper towels or a clean kitchen towel and wring it out over the sink until no more liquid comes out. It should feel almost dry. Once it’s dry, you can fold it right into your cheese mix, and it won’t compromise the texture of your filling or your casserole.
Don’t Skip That Five-Minute Rest
I know, I know. Everything smells amazing coming out of the oven—that bubbly sauce, that slightly browned mozzarella—and you want to dive right in! But that 5-minute resting period after you pull the dish out isn’t just a suggestion; it’s vital. When the casserole is baking hot, the sauce and cheese are liquidy and fully separated. If you try to cut into it immediately, you’ll get a soupy mess on your plate.
When you let it sit for those five minutes, the cheeses start to firm up and the starches in the pasta absorb just a little bit of the excess liquid. This lets the baked pasta set up properly so your individual shells stay intact when you scoop them out. It makes serving so much nicer, and it keeps the integrity of the dish intact. If you are looking for amazing side pairings for this dinner, check out my thoughts on great pasta accompaniments!
Manicotti Recipe Storage and Reheating
The best part about making a big pan of cheesy baked pasta? Leftovers! Honestly, this baked cheese manicotti tastes even more flavorful the next day when all those spices have really settled into the cheese mixture. You want to treat your leftovers well so they taste just as amazing the second time around, right?
Storage for this dish is super straightforward, but how you reheat it makes a big difference in the final texture. Nobody wants dry, hard cheese manicotti!
Storing Leftover Manicotti
Once the casserole has cooled down a bit—maybe an hour after you take it out of the oven is perfect—get it wrapped up tight. Cover the baking dish tightly with aluminum foil or transfer the remaining shells into an airtight container. It needs to stay sealed up to keep that wonderful moisture in.
You can safely store these leftovers in the refrigerator for about three to four days. You’ll notice that the sauce might thicken up quite a bit as it chills; that’s totally normal because the cheese settles in. Don’t worry, it loosens right back up when you reheat it!
Reheating for the Next Day
This dish reheats beautifully, but you have to give it a little help to keep it saucy. If you just microwave a single shell plain, it’s going to come out a bit tough and dry, which we absolutely want to avoid!
For the best results, I recommend reheating in the oven because it gets the sauce bubbling evenly and melts the cheese wonderfully. Place your portion in a small oven-safe dish and add just a teaspoon or two of extra marinara sauce or a splash of water right next to the shells before you cover it tightly with foil. Bake at 350 degrees F until it’s heated all the way through. This added liquid turns to steam, keeping everything nice and moist!
If you’re in a huge rush and you have to use the microwave, use short bursts of power—maybe 60 to 90 seconds at a time—and definitely add that extra splash of sauce or water. Remember that microwave reheating always dries things out faster than the oven, so take it slow and check it often until it’s piping hot throughout, but not rubbery!
Frequently Asked Questions About This Manicotti Recipe
I get so many questions about this recipe because everyone wants their cheese manicotti to come out perfect! It’s a wonderful dish, but sometimes the logistics of stuffing tubes can cause a little panic. Don’t worry; I’ve gathered the most common things folks ask me when planning their baked pasta night. Hopefully, this helps you prep like a pro!
Can I make this ahead of time?
Yes, you absolutely can, and I highly recommend it if you’re planning a big weekend meal! You can assemble the entire dish—sauce on the bottom, shells stuffed, remaining sauce and cheese layered on top—and cover it tightly with plastic wrap and foil. Store it in the fridge for up to 24 hours. When you’re ready to bake, just let it sit on the counter for about 30 minutes to take the deep chill off, and then bake it as directed. You might need to add about 5 or 10 minutes to the bake time since it’s going in cold.
What sauce works best for baked manicotti?
Honestly, the best works best! If you have time to make a homemade marinara, go for it—that rich, slow-simmered flavor really shines through when baked. However, to keep things easy, I usually lean on a good quality jarred marinara. Look for one that isn’t too watery, though! Because the recipe calls for sauce on the bottom and the top, if your sauce is extremely thin, the bottom layer might end up too soupy. I find that thicker, robust sauces hold up better to the baking process.
Can I freeze baked manicotti?
You definitely can freeze these, and they freeze wonderfully! The secret is freezing *before* baking. Assemble the whole dish in a disposable aluminum pan (since you probably don’t want to freeze your nice ceramic dish). Cover it super tightly with two layers of plastic wrap, then a layer of foil. Freeze for up to three months. When you want to bake it, thaw in the fridge overnight, then bake as normal, maybe adding a few extra minutes to the cook time. This is great for busy families—your future self will thank you!
What if my ricotta filling seems too runny?
If your whole milk ricotta seems a little looser than you expected, don’t panic! That’s usually okay because the egg and the Parmesan are there to help it firm up once it bakes. But if it’s genuinely sloppy, you can quickly firm it up by stirring in an extra tablespoon or two of the reserved shredded mozzarella, or even a tablespoon of breadcrumbs. Just stir it in gently until it feels a bit thicker when you scoop it. It’s amazing how versatile this ricotta filling can be with just a tiny adjustment!
Serving Suggestions for Your Manicotti Recipe Dinner
So, you’ve made this huge, gorgeous pan of bubbly, cheesy manicotti. Congratulations! Now, you can’t just serve that masterpiece alone, right? Even though it has cheese, pasta, and sauce, this hearty Italian dish deserves some beautiful, simple friends on the plate to round out the meal. I like to follow the rule of keeping the sides fresh and light to balance out all that rich ricotta goodness.
You don’t need a huge spread, just a couple of easy additions to make it feel like a complete family dinner. My philosophy is: something green and something crunchy on the side is always the perfect pairing for baked pasta.
A Crisp, Bright Salad is Essential
You need something to cut through the richness, and for me, that means a really crisp salad. A heavy, creamy salad just doubles down on the heaviness of the manicotti, and we don’t want that! I always reach for a simple green salad tossed with a bright vinaigrette—something heavy on the lemon, maybe a little Dijon in there.
If you want to step it up just a notch without doing any real work, nothing beats a classic Caesar salad. We’re talking crisp romaine, crunchy croutons, and that tangy, garlicky dressing. If you’re feeling ambitious, you can whip up my favorite version; it’s truly the ultimate Caesar dressing recipe and tastes miles better than anything bottled!
Don’t Forget the Bread for Dipping!
This is non-negotiable in my house, and I’m sure Aunt Clara would agree. You have this amazing, thick marinara sauce sitting under those shells, and you absolutely cannot let that sauce go undipped! Scooping up every last bit of that sauce is a requirement, not an option.
Whether you crusty Italian loaf, slice it open, brush it with garlic butter, and toast it up, or go for full-on cheesy garlic breadsticks, you must have bread. I have an excellent recipe for soft and buttery garlic breadsticks that come together almost as fast as the manicotti bakes. Serve those hot right out of the oven alongside your cheesy pasta!
Simple Vegetable Sides
If you feel like you absolutely must add a cooked vegetable, keep it really simple. Steamed green beans tossed with just a little bit of salt and a heavy drizzle of good olive oil are perfect. Or, even better, roast some asparagus spears with salt and pepper until they are slightly blistered and tender-crisp. They just feel a little bit fancy without requiring any actual extra effort. See? We’re keeping the focus on that incredible cheese manicotti!
Estimated Nutritional Snapshot for Manicotti Recipe
I know sometimes it’s helpful to get a general idea of what’s in your meal, especially when you’re serving it to family or trying to stay mindful about portion sizes. This section gives you the ballpark figures for this big, cheesy, satisfying baked pasta dish. Remember, because we’re dealing with different brands of ricotta and mozzarella, these numbers are just a guide—your actual totals might shift a little.
Think of this as a happy estimate for what you get when you serve up the classic portion size of three stuffed shells. It’s hearty, comforting, and packed with protein from all that lovely cheese!
Here is the snapshot based on our recipe testing:
- Serving Size: 3 shells
- Calories: Approximately 450
- Protein: A solid 25 grams!
- Total Fat: Around 20 grams (it’s cheese, after all!)
- Carbohydrates: About 45 grams
- Sugar: Roughly 12 grams (mostly from the marinara sauce)
- Sodium: About 750 mg
A quick note on those numbers: Since this recipe relies heavily on cheese and sauce, the sodium content is a bit higher, which is pretty typical for baked Italian comfort food! If you are watching salt intake, make sure you use a low-sodium marinara sauce, and go light on adding extra salt when you make the cheese filling. It’s an easy swap that keeps you close to this estimate! Enjoy every cheesy bite!
Print
Simple Manicotti Recipe
- Total Time: 50 min
- Yield: 4 servings 1x
- Diet: Vegetarian
Description
A straightforward recipe for baked cheese-filled manicotti shells with tomato sauce.
Ingredients
- 12 manicotti shells
- 15 ounces ricotta cheese
- 1 cup shredded mozzarella cheese, divided
- 1/2 cup grated Parmesan cheese
- 1 large egg
- 1/4 cup chopped fresh parsley
- 1/2 teaspoon salt
- 1/4 teaspoon black pepper
- 24 ounces marinara sauce
Instructions
- Preheat your oven to 375 degrees F (190 degrees C).
- Cook the manicotti shells according to package directions until al dente. Drain and set aside.
- In a medium bowl, combine the ricotta cheese, 1/2 cup of the mozzarella cheese, Parmesan cheese, egg, parsley, salt, and pepper. Mix well.
- Spread about 1 cup of marinara sauce in the bottom of a 9×13 inch baking dish.
- Carefully stuff each cooked manicotti shell with the cheese mixture. You can use a small spoon or a piping bag.
- Arrange the filled shells in a single layer in the prepared baking dish.
- Pour the remaining marinara sauce over the shells.
- Sprinkle the remaining 1/2 cup of mozzarella cheese over the top.
- Bake for 25 to 30 minutes, or until the sauce is bubbly and the cheese is melted and lightly browned.
- Let stand for 5 minutes before serving.
Notes
- You can substitute frozen chopped spinach (thawed and squeezed dry) for half of the ricotta cheese for added vegetable content.
- For easier filling, place the cheese mixture in a large zip-top bag, snip a corner off, and pipe the filling into the shells.
- Prep Time: 20 min
- Cook Time: 30 min
- Category: Dinner
- Method: Baking
- Cuisine: Italian
Nutrition
- Serving Size: 3 shells
- Calories: 450
- Sugar: 12
- Sodium: 750
- Fat: 20
- Saturated Fat: 10
- Unsaturated Fat: 10
- Trans Fat: 0
- Carbohydrates: 45
- Fiber: 3
- Protein: 25
- Cholesterol: 90
Keywords: manicotti, baked pasta, ricotta, mozzarella, Italian dinner, cheese manicotti