
When that summer sun just won’t quit, you need something cold, bright, and instantly transportive. Forget complicated syrups and hours over a hot stove! I figured out how to capture that perfect, fruity, tropical drink vibe and turn it into the easiest frozen treat you’ll ever make. Seriously, this juice combination is everything!
These **Bahama Mama Ice Pops** are my go-to for cooling down the kids after swimming or serving up a fun, colorful dessert when friends drop by unexpectedly. They taste exactly like that vacation drink you crave, only better because you control everything. You can totally skip the rum for the little ones, making them the perfect refreshing, non-alcoholic dessert for everyone. Trust me, these pops disappear fast!

Why You Will Make These Bahama Mama Ice Pops Again and Again
Look, I live for complicated baking projects, but when it’s ninety degrees outside, I need something that works *now*. These pops deliver that vacation feeling instantly. Once you try mixing these juices, you’ll see why they top my summer rotation.
- They are unbelievably simple to whip up—it’s basically just mixing liquids. Prep takes less than ten minutes, tops!
- That classic tropical flavor is spot-on. That tangy pineapple mixed with the deep sweetness of grenadine? Perfection. I have a similar favorite juice mix that I sometimes use when I need a quick flavor boost.
- Zero cooking required! You mix it, you freeze it, you eat it. Say goodbye to turning on the oven in the middle of July.
- They are totally customizable. Kids love the zero-proof version, but I often add a tiny splash of light rum just for me—it’s way nicer than buying the pre-made cocktail versions.
- They freeze up wonderfully firm! Unlike some watery ice pops, these have a great texture that holds up well outside, which is crucial when you have kids melting things everywhere.
- They look spectacular because of the bright colors. Even without layering, the orange and red mix creates such a happy, bright frozen treat.
Essential Ingredients for Perfect Bahama Mama Ice Pops
Honestly, the ingredient list is why these are foolproof. You probably have 90% of this stuff in your fridge right now, which means you can make these pops whenever the craving hits! We are working with four core juices, plus that beautiful secret weapon, grenadine.
You absolutely need good quality juice here—it matters! Don’t skimp on the pineapple or orange juice because that’s where 90% of the flavor comes from. And please, make sure your lime juice is fresh squeezed; it brightens everything up so much more than the bottled stuff.
- 1 cup sweet pineapple juice
- 1 cup sunny orange juice
- 1/2 cup vibrant grenadine syrup (this gives the signature color!)
- 1/4 cup lime juice, specifically fresh squeezed, none of that concentrate here!
- 1/4 cup light rum (Optional, of course. Just omit this if you are making them strictly for the kids or for a daytime snack.)
That’s it! You don’t need any extra sugar because the juices and the grenadine handle that perfectly. It’s tropical simplicity at its finest.
Expert Tips for Making the Best Bahama Mama Ice Pops
A good recipe gets you halfway there, but a few tricks make these pops truly brag-worthy. My biggest realization when I first started making these was how much the juice quality affected the final flavor. If you use that cheap, watery juice concentrate, the flavor just won’t pop the way it should. Spend just a little extra on the canned pineapple and orange juice for a better experience!
Also, don’t forget that little splash of rum if you’re including it. Alcohol actually slows down the freezing process, so make sure you stir that in really well before pouring. For anyone looking for more inspiration on frozen treats, I found this collection of gourmet popsicle recipes really helpful for ideas.
Achieving the Ideal Bahama Mama Ice Pops Texture
Patience is key here—I know, I know, waiting is the hardest part of freezing anything! You must let these liquids chill out completely in the freezer for a minimum of six hours. If you try to rush it and pull them out at four hours, you’ll just end up with a slushy mess in the middle, and nobody wants that when they are looking forward to a firm pop.
When you’re ready to unmold them, don’t fight it! Just run the outside of the mold under lukewarm water for about ten seconds. It softens the plastic just enough so the frozen treat slides right out smoothly. It saves you from breaking the stick off inside the mold, which is a tragedy I’ve experienced more than once!
Step-by-Step Instructions to Create Your Bahama Mama Ice Pops
Getting these tropical beauties made is honestly quicker than deciding which beach chair to sit in. The magic is in the mix, and then just letting the freezer do its hard work. Follow these simple steps, and you’ll have the most refreshing **Bahama Mama Ice Pops** ready for your next sunny afternoon!
Mixing the Tropical Base for Your Bahama Mama Ice Pops
First things first, grab your biggest mixing bowl—you need room to stir without splashing! Combine all your liquids: the pineapple juice, the orange juice, the zingy lime juice, and if you are making the grown-up version, pour in that light rum right now. We mix all the juices first before adding the color element.
Now add in that gorgeous, thick grenadine syrup. This is the most important stirring part! You absolutely must stir this mixture well until that red syrup is evenly distributed throughout the pale yellow juice mix. You don’t want one bite that’s just OJ and another that’s pure sweetness from settled syrup!
Filling Molds and Freezing Your Bahama Mama Ice Pops
Once everything is perfectly blended, it’s time to fill up those molds. I always grab my funnel because pouring thin juice into tiny mold openings can get messy fast! Carefully pour the liquid, but stop filling about half an inch from the very top edge. Remember, liquids expand when they freeze, and we don’t want our **Bahama Mama Ice Pops** bursting through the plastic!
Next, insert your little sticks according to your mold’s directions. Then, transfer the whole thing very carefully to the freezer. Seriously, move slowly here! They need to stay frozen solid, so aim for at least six full hours—overnight is even better if you can manage to wait!
Releasing and Serving the Frozen Bahama Mama Ice Pops
The moment of truth! If you try to yank them out right away, you risk ripping the stick right through the middle. Don’t do that to yourself!
Just run the outside of the mold very briefly under warm tap water—think ten seconds, tops. You just want to loosen the very outer layer. Tilt the mold upside down, and the cold treat should slide right out, ready to enjoy! They are so bright and happy!
Variations on Classic Bahama Mama Ice Pops
While my tried-and-true combination of basic juices is what I stick to most often—it’s simple and delicious—I love experimenting when I have a little extra time. If you’re looking to really amp up the tropical factor or just make something that looks extra fancy from the freezer, I have a couple of fun ideas for your **Bahama Mama Ice Pops**.
First up, let’s talk about boosting the flavor depth. Sometimes I find that orange juice can be a bit weak. If you find that too, don’t reach for more sugar! Instead, swap out about a quarter-cup of the regular orange juice for a splash of concentrated pineapple juice or even passionfruit nectar if you can find it. It gives the mixture a sharper, sunnier kick!
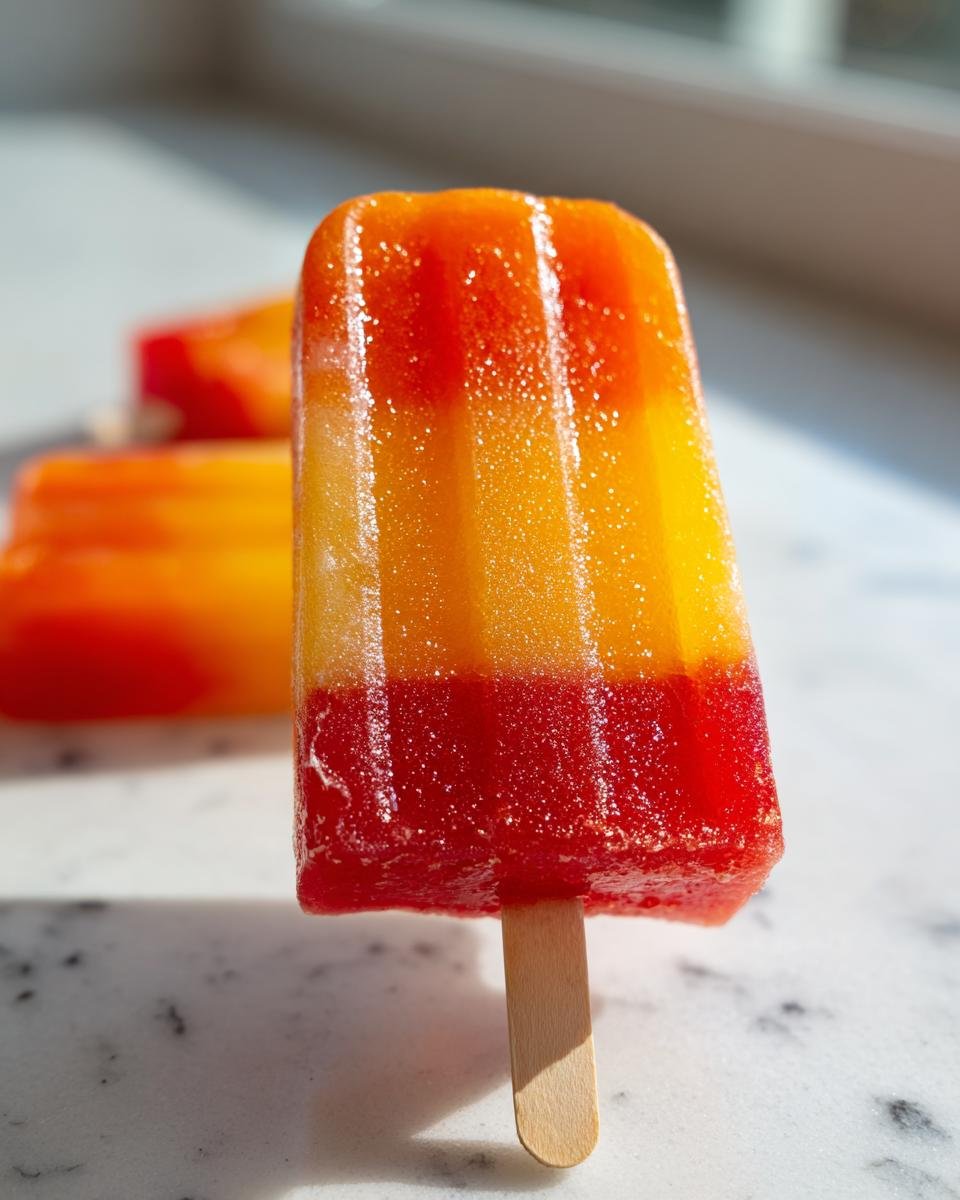
For the visual presentation, you absolutely have to try the layering trick if you have patience. This requires freezing in stages, which takes longer, but wow, the results look professional! You’ll freeze it in layers, which is a technique I’ve seen used beautifully in recipes like chilled summer drinks.
Here is how I layer my **Bahama Mama Ice Pops**: Mix your juices *without* the grenadine first. Pour about a third of that juice mix into the molds and freeze until it’s mostly solid—maybe two hours. Then, gently drizzle about a third of your grenadine over the top of that semi-frozen layer (it will sink a bit, which is fine!). Freeze again until set. Finally, top it all off with the remaining juice mix and maybe save a tiny drizzle of grenadine for the final freezing stage if you want those beautiful red streaks!
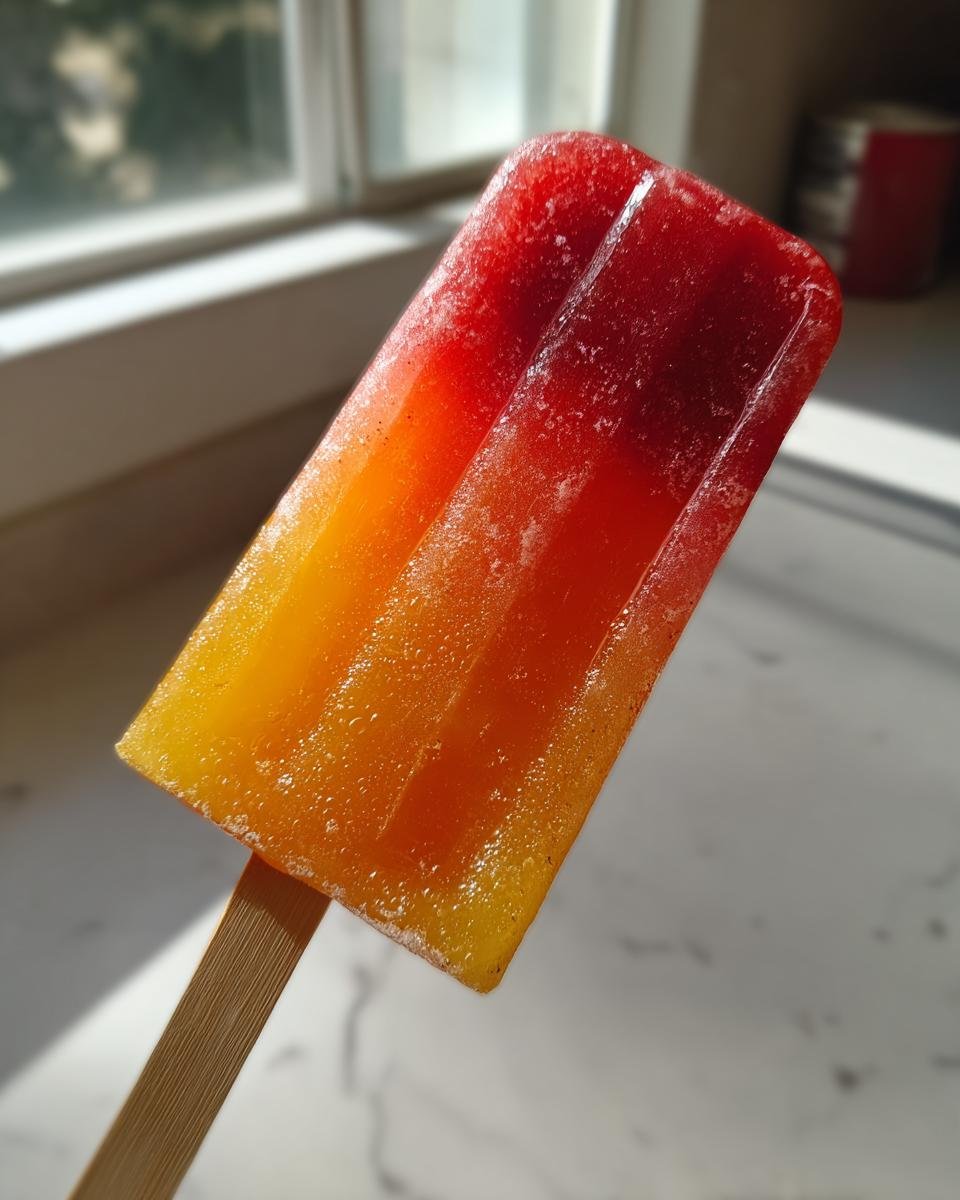
It might take an extra few hours, but having those distinct color stripes makes these **Bahama Mama Ice Pops** look like something you bought at an expensive resort stand. It’s worth the effort when you want to wow someone!
Storage and Make-Ahead Tips for Bahama Mama Ice Pops
The absolute best part about these frozen treats is that you can make a huge batch way ahead of time! Who wants to whip up juice mixtures when the sun is blazing? I always make at least two full trays of **Bahama Mama Ice Pops** on a cooler Saturday morning so we have them ready for spontaneous heatwaves all week long. They are fantastic for parties too because you can pull them out straight from the freezer.
You need to be smart about how you store them, though. If you just leave the open molds sitting in the freezer, two things will happen: they’ll absorb weird freezer smells, and they might develop freezer burn on the tops which just ruins that first lick!
Here is what I do to keep my **Bahama Mama Ice Pops** tasting fresh, just like they were mixed five minutes ago. I follow a similar principle to how I freeze things like fresh herbs—protect the surface!
First, make sure the pops are completely frozen solid. If you try wrapping them while they are even a little soft, you’ll end up with a sticky mess. Once they are rock hard, this is the key step: take each individual mold and wrap it tightly in plastic wrap. Then, I place the whole wrapped tray into a large, heavy-duty zip-top freezer bag and squeeze out every bit of air before sealing it.
This double layer of protection keeps the air out and prevents ice crystals from forming on the surface of your beautiful **Bahama Mama Ice Pops**. If stored this way, they stay perfect for at least two months! That’s plenty of warning for your next big pool day or tropical craving!
Serving Suggestions for Your Tropical Ice Pops
When you’re serving up these bright, fruity frozen desserts, you don’t need much in the way of fancy sides, but a little thought to presentation really elevates the experience. These pops already taste like a vacation, so we want to keep the serving style relaxed and colorful!
My favorite way to serve them is to make sure they are perfectly unmolded and sitting upright on a small white or bright blue platter. The contrast against the pink and orange just makes them sing! If you are having a big gathering, having a little bowl of fresh fruit nearby is always a hit. I often prepare a simple, vibrant fruit salad with mango, kiwi, and extra pineapple chunks to go alongside the pops.

The fruit adds a nice texture contrast—something soft and chewy next to something completely frozen and hard. It keeps things interesting!
For an adult-only afternoon, you can serve these alongside a small glass of sparkling water with a lime wedge, just to cleanse the palate between bites. Or, if you know someone trying to be extra mindful, serving them straight out of the mold is perfectly acceptable. They are refreshing enough all on their own!
Seriously, the less you do, the better, because the flavor of the juice mix is the star here. Just make sure you have plenty of napkins ready, because sticky hands are guaranteed when you’re enjoying a cold treat like this!
Frequently Asked Questions About Bahama Mama Ice Pops
I always get a ton of questions when I post pictures of these pops because everyone wants that perfect summer flavor without the hassle. We’ve covered the main recipe, but here are the quick answers to the stuff I hear most often about making the best **tropical frozen dessert** at home!
For anyone who needs more inspiration after mastering these, I always recommend looking at specialized guides, like this one on gourmet popsicle recipes, just to see what else is possible!
Can I make these Bahama Mama Ice Pops without alcohol?
Absolutely, yes! That’s one of the biggest reasons I developed this mix! The recipe is designed to work beautifully as **non-alcoholic ice pops**. If you skip the 1/4 cup of light rum, you just bump up the pineapple or orange juice by that same little amount, or you can substitute the rum with a little extra water mixed with another splash of lime juice. It stays perfectly balanced and completely family-friendly. They are so good, you won’t even miss the grown-up stuff!
How long do the Bahama Mama Ice Pops take to freeze solid?
This is crucial! You need enough time for those juices to turn into a hard, refreshing pop—not a sticky puddle. I always say plan for a minimum of six hours. Honestly, if you have the space, throwing them in the night before is the best way to guarantee they are rock solid and ready to go whenever you need them. Rushing it usually ends in disappointment!
What is the best way to get the ice pops out of the mold?
Ugh, sticking molds! It’s the worst, especially when you’ve waited all that time. Please, please, please do not yank them. The absolute trick is to take the mold and hold the outside directly under warm (not hot!) running water for just about 10 to 15 seconds. This warms up the plastic just enough to break the seal around the edges. They should then slide right out with barely any effort at all!
Nutritional Snapshot of Bahama Mama Ice Pops
Now, I know some of you are checking labels, and I totally get it! Since these delicious **Bahama Mama Ice Pops** are mostly juice and syrup, they are naturally super low in fat—practically zero, which is nice on a hot day when you don’t want anything heavy.
I ran these numbers through my usual calculator, but remember this is just a ballpark estimate, especially since those measurements like “splash of rum” can vary wildly! These estimates are based on using the light rum specified in the recipe. If you skip the alcohol, the sugar content will drop slightly as well.
Here’s what you’re generally looking at per single pop:
- Serving Size: 1 pop
- Calories: About 150 (Wow, that’s a low number for such a flavorful treat!)
- Fat: 0g (Can’t beat zero fat!)
- Sugar: Around 35g (This is mostly natural sugar from the fruit juices and the grenadine, so it feels less guilty than, say, a candy bar!)
- Protein: About 1g
- Cholesterol: 0mg
See? These are a perfect light dessert when you want maximum tropical flavor without wrecking your day’s goals. Just remember that little sugar note is what makes them taste so wonderfully sweet and refreshing when they’re frozen solid!
Print
Bahama Mama Ice Pops
- Total Time: 6 hr 10 min
- Yield: 6 servings 1x
- Diet: Low Fat
Description
A refreshing, frozen treat inspired by the classic tropical cocktail.
Ingredients
- 1 cup pineapple juice
- 1 cup orange juice
- 1/2 cup grenadine syrup
- 1/4 cup lime juice, fresh squeezed
- 1/4 cup light rum (optional)
- Ice pop molds and sticks
Instructions
- In a bowl, mix the pineapple juice, orange juice, grenadine syrup, lime juice, and rum if you are using it.
- Stir the mixture well until the grenadine is evenly distributed.
- Carefully pour the liquid into your ice pop molds, leaving a small space at the top for expansion.
- Insert the ice pop sticks.
- Freeze for at least 6 hours, or until completely solid.
- To release the pops, run the outside of the mold briefly under warm water.
Notes
- For a non-alcoholic version, omit the rum completely.
- You can layer the grenadine at the bottom before pouring the rest of the juice for a striped effect, but you must freeze each layer slightly before adding the next.
- Prep Time: 10 min
- Cook Time: 0 min
- Category: Dessert
- Method: Freezing
- Cuisine: American
Nutrition
- Serving Size: 1 pop
- Calories: 150
- Sugar: 35g
- Sodium: 10mg
- Fat: 0g
- Saturated Fat: 0g
- Unsaturated Fat: 0g
- Trans Fat: 0g
- Carbohydrates: 38g
- Fiber: 0g
- Protein: 1g
- Cholesterol: 0mg
Keywords: Bahama Mama, ice pops, frozen dessert, tropical, pineapple, orange, grenadine, summer treat